Viewing differences between requirement documents in baselines
Note: The following information applies to viewing differences for requirement documents in baselines. See Viewing differences between items in baselines for information about viewing issues, requirement, test cases, and test run differences, or Viewing differences between folders in baselines for information about viewing folder differences.
When you are comparing two baselines, you can view differences for a specific requirement document in the baselines. You can see detailed changes made between the baselines, such as changes to fields, workflow, links, folders, and more.
Note: The information you can view and actions you can perform depend on your licensing and security permissions.
1. Compare two baselines. See Viewing differences between baselines.
2. On the Baseline Differences page, click the document to view differences for. You can also select the item and click View.
The document comparison page opens. Differences are displayed on the List and Details tabs.
Note: Click  to expand all requirements or
  to collapse expanded requirements at the top of the page.
3. To search for a requirement, enter information in the search field. Matching information is displayed as you type.
4. To view the contents and details for one of the compared baselines, click the hyperlink with the baseline number. To view the baseline name, description, and date/time it was added, mouse over  .
.

5. To view the document without differences in one of the baselines, click View in Baseline #. See Viewing details for items in baselines.
List tab
The List tab displays the document and requirements in the document in hierarchical order side by side for easy comparison. The Differences column shows the differences between the items in the compared baselines.
Tip: Click to expand the entire tree or to collapse it. You can also search for items in the document. Matches are displayed as you type.
- To view differences for a specific requirements, click the summary or select the requirement and click View. The requirement differences are displayed. See Viewing differences between items in baselines for information about requirement differences.
- To find a moved requirement in the compared document, select the moved requirement and click Find In Other Document. The requirement is selected to show the old or new location in the baselined document.
- Change the Display Options to control which differences are displayed in the list.

- Show — Select the differences to display in the list. Click Select All to select all differences. If multiple differences types are selected, but you only want to display one type, mouse over the type to display and click
 . All other types are cleared. The number of items with each difference is displayed in parentheses. Keep in mind that the number of items includes any requirements you cannot view based on security permissions.
- Row Spacing — To adjust the spacing of rows in the list, click a row spacing button.
| Button | Spacing |
|---|---|

|
Narrow |

|
Normal |

|
Wide |
Details tab
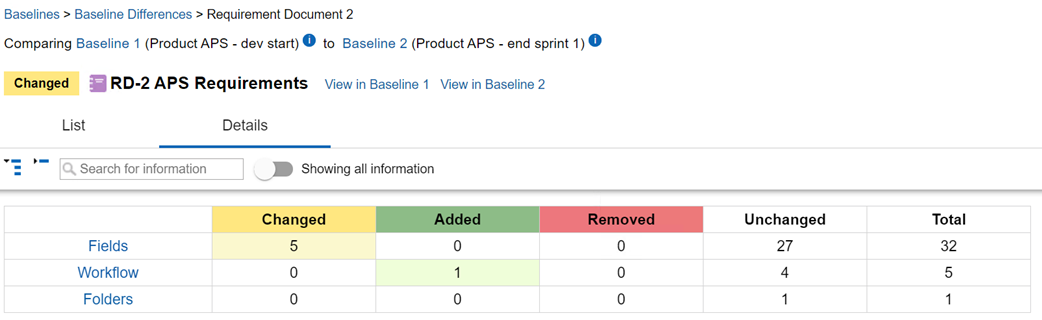
The Details tab displays the document information and differences between the baselines.
A table shows areas in the document with differences between the baselines, the number of each type of difference (changed, added, removed, and unchanged), and the total number of differences. Use this table to quickly determine the areas you need to review. Areas below the table display the specific differences information. Changed information is indicated in yellow, added information in green, and removed information in red. Click an area in the table to go directly to it.
Note: Click an area title to expand or collapse the area. Click to expand all areas or to collapse expanded areas at the top of the page. You can also expand and collapse sections within some areas.
You can toggle to show all areas in the document that have information (Showing all information) or only areas with differences (Showing differences only).

Areas
The following areas are displayed when viewing differences on the Details tab for a document in a baseline. An area is only displayed if the document contains information for the area and depending on if you are showing all information or only differences.
Changed information is indicated in yellow, added information in green, and removed information in red.
Text styles for added and removed information are controlled in the differences display options in the Helix ALM desktop client. By default, added information is green and bold. Removed information is red with a strikeout effect. See the desktop client help for information about changing the options.
| Area | Displays: |
|---|---|
| Fields | Field names and values in the item, and differences between the baselines. Includes system and custom fields sorted alphabetically by field name. If a new custom field is added between the baselines and a value is set in the item, it is displayed in the New Fields section. If a custom field is deleted between the baselines, it is displayed in the Deleted Fields section. If the field name changed between the baselines, the new and old names are displayed. To narrow the list of fields displayed, select the fields to view in the Specific fields list. Select <All> to view all fields. For multi-line text fields, only text and image differences are displayed. Text is displayed as plain text. Images are displayed at the bottom of the field information. Changes to styling and other elements in fields, such as tables, are not displayed unless you view the field differences side by side. Click  to open the differences side by side. Click to open the differences side by side. Click  to close the differences. If the field value does not have any changes between the baselines, the formatted text is displayed on the differences page. to close the differences. If the field value does not have any changes between the baselines, the formatted text is displayed on the differences page.If an item is marked as suspect or the suspect reasons were cleared between baselines, a View Details link is displayed next to the Is Marked As Suspect field. Click the link to go to the Suspect Reasons area for more information. If fields are renamed between the baselines, the old and new names are displayed in most cases. If a new custom field is added to the project and the baseline is added before items with the new field are changed, the baseline does not include the new field. Calculated custom fields based on the current time are not included in baselines. |
| Workflow | Workflow events and fields added to the item. Click > to expand an event and view the information. To narrow the list of events displayed, select the events to view in the Specific events list. Select <All> to view all events. Click Clear to clear the selected events. Select an option in the Sort events from list to sort the events in a different order. If the event was renamed between the baselines, both names are displayed. If the event has attachments, you can view or download them. To view a file, click the filename or select the file and click View. If the browser cannot open the file, it is automatically downloaded. You can then open the local copy in the associated application. To download the file, select the file and click Download, or click  to download it. to download it. |
| Attachments | Files attached to the item, including added and removed attachments in the item between the baselines. To view a file, click the filename or select the file and click View. If the browser cannot open the file, it is automatically downloaded. You can then open the local copy in the associated application. To download the file, select the file and click Download, or click to download it. |
| Source Code | Source files and changelists attached to the item, including files added, changed, or removed in the item between the baselines. Depending on the source control provider configuration, you may be able to click the file path to open the file in the associated source control viewer. |
| Tracked email sent about the item, including added or removed emails between the baselines. Click > to expand an email and view the information. Select an option in the Sort by list to sort the emails in a different order. If the email has attachments, click them to view or download them. If the browser cannot open the file, it is automatically downloaded. You can then open the local copy in the associated application. |
|
| Links | Links in the item, including if the link was added, changed, or removed in the item between the baselines. Click > to expand a link and view the information. The items linked to the item you are viewing differences for are displayed. If the linked item is also included in the baselines, click the number or summary to view the item differences, or select the item and click View. You can only view linked items included in the baseline. The Number, Summary, and Status columns display values from the newer baseline. If the item is in a link, but not included in the newer baseline, <item not added to baseline> is displayed. If the link definition was renamed between the baselines, both names are displayed. If a link is broken, an icon is displayed. |
| Suspect Reasons | Source items that caused the item you are viewing to be suspect and details about who marked the item as suspect, including items added, changed, or removed as suspect reasons for the item between the baselines. See Working with suspect items. If the item was manually marked as suspect, <manually marked as suspect> is displayed instead of the item tag and summary. Click > to expand an item and view the information. If the item is marked as suspect due to a link relationship and the Links area is visible, click View Link Details to go to the link. |
| Folders | Folders that the item is in, including folders the item was added to, moved to or from, or removed from between the baselines. If the folder is also included in the baseline, you can click the folder path to view the differences for the folder in the baseline. |
| Jira Issues | Jira issues the item is associated with, including if issues were added or removed in the item between the baselines. |


