Viewing differences between baselines
You can compare two baselines to see what changed. For example, if you added baselines with a similar collection of items at the beginning of a sprint and end of a sprint, you can compare them to see what changed. A side-by-side list of all items included in each baseline helps you easily identify added, removed, changed, and unchanged items.
When you view differences between baselines, you can also run reports that contain the differences information, compare items included in both baselines to see differences, and view information about the baselines you are comparing.
Note: The information you can view and actions you can perform depend on your licensing and security permissions.
1. In the Baselines list, select the baselines to compare.
2. Click View Differences.
The Baseline Differences page opens. Lists of items in both baselines are displayed. The left column displays items in the older baseline and the right column displays items in the newer baseline. The item tag and summary or name identifies the item (e.g., IS-4 is issue 4). Folders are identified with Folder and the internal ID for the folder (e.g., Folder-10). The Differences column indicates if there are differences between the item in the baselines. The following values are displayed:
- Added — The item exists in the newer baseline, but not the older one. These items are displayed in green.
- Changed — The item exists in both baselines and changed between when the baselines were added. These items are displayed in yellow.
- Removed — The item exists in the older baseline, but not the newer one. These items are displayed in red.
- <No text in column> — The item is in both baselines and has not changed since the baselines were added.
Tip: Click a column heading to sort the column in ascending or descending order. Baseline item columns are sorted based on the item tag.
3. Change the Display Options to control which items are displayed in the list.
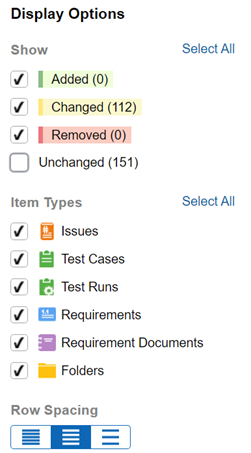
- Show — Select the differences to display in the list. The number of items with each difference is displayed in parentheses.
- Item Types — Select the item types to display in the list. Click Select All to select all item types. You must select at least one type. If multiple item types are selected, but you only want to display one type, mouse over the type to display and click
 . All other item types are cleared.
- Row Spacing — To adjust the spacing of rows in the list, click a row spacing button.
| Button | Spacing |
|---|---|

|
Narrow |

|
Normal |

|
Wide |
4. To view differences between the item in both baselines, click the item. You can also select the item and click View. See Viewing differences between items in baselines.
5. To view the contents and details for one of the compared baselines, click the hyperlink with the baseline number.
To view the baseline name, description, and date/time it was added, mouse over  .
.

6. To run a report that contains the differences information, click  and choose a report. See Running baseline differences reports.


