Adding a shortcut menu item for the Hansoft Helix Core integration in P4V
To use the integration, you must add a shortcut menu item to add changelists to Hansoft in P4V. Generally, an administrative user will deploy the menu item to team members. You can also manually add the menu item if it is not deployed to your team.
Note: The following steps provide basic information about adding a shortcut menu item for the integration in P4V. See the P4VJS Developer Guide for more information about adding and deploying shortcut menu items using HTML windows.
Deploying the menu item to all users
An administrative user with permission to update P4VJS.HTMLWindows for Helix Core can deploy the shortcut menu item for the integration to all users on the Helix Core server using an XML file . The XML file is automatically generated when the Hansoft web service starts.
1. Enter the following command from a command prompt:
$ p4 property -a -n P4VJS.HTMLWindows -v "https://<HansoftWebDomain:Port>/htmlwindows.xml"
For example, $ p4 property -a -n P4VJS.HTMLWindows -v "https://hansoft.example.com:443/htmlwindows.xml"
2. Enter the following command to check that the HTML window was deployed:
$ p4 property -n P4VJS.HTMLWindows -l
returns:
P4VJS.HTMLWindows = https://<HansoftWebDomain:Port>/htmlwindows.xml
For example, $ p4 property -n P4VJS.HTMLWindows -lreturns:
P4VJS.HTMLWindows = https://hansoft.example.com:443/htmlwindows.xml
3. Restart P4V.
The integration shortcut menu item is available when right-clicking a changelist.
Manually adding the menu item
1. In P4V, choose Tools > Manage Tools > HTML Windows.
The Manage HTML Windows dialog box opens.
2. Click New and select Window.
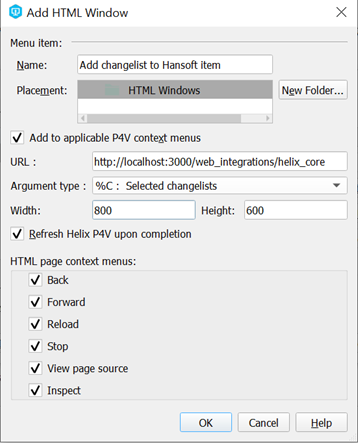
The Add HTML Window dialog box opens.
3. Enter or select the following information:
- Name — Enter the name to display for the shortcut menu item. For example, Add changelist to Hansoft item.
- Placement — Select Add to applicable P4V context menus.
- URL — Enter the URL for the integration. The URL includes the domain name or IP address to the web service and the path to the integration. For example, https://localhost/web_integrations/helix_core. You must include the port number for the web service if it is not 443.
- Argument Type — Select %C: Selected changelists. We recommend selecting this argument type instead of %c: Selected changelists to avoid errors.
- Width — Enter the width for the menu. We recommend at least 800.
- Height - Enter the height for the menu. We recommend at least 600.
4. Click OK to save the changes.
5. Click OK to close the Manage HTML Windows dialog box.
6. Restart P4V.
7. The integration shortcut menu item is available when right-clicking a changelist.


