Using Marking Menus
The marking menu feature of Views Studio provides fast access to certain items of the Main window menu bar.
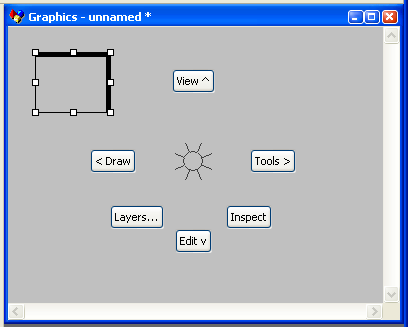
You trigger the marking menu feature by pressing the right mouse button in the buffer window. The marking menu then appears showing the menu items in a circle around the current location of the pointer. To choose a menu item, you move up, down, left, right, or diagonally to the appropriate region of the menu and release the mouse button.
Views Studio Marking Menu shows the marking menu of Views Studio. The Views, Tools, Inspect, Edit, Layers, and Draw menu items are arranged around the center circle.

To activate one of the menu items (for example, Inspect), press the right mouse button, move the mouse quickly in the direction of the Inspect item, and release the button. When you do this, the inspector panel for the object selected in the buffer window is displayed.
Some of the marking menu items contain submenus. For example, when you move the mouse over Edit (The Edit Menu Selected in the Marking Menu), a submenu appears with additional items (The Paste Selection from the Edit Submenu). You could then choose Paste, for example, by moving the mouse in that direction. You can go back to the previous menu by moving the mouse back to the center of the previous menu. In The Paste Selection from the Edit Submenu, the previous menu center is the circle just above Redo in the Edit submenu.
The Edit Menu Selected in the Marking Menu
The Paste Selection from the Edit Submenu
You can also trigger the items in a submenu by using the “fast” method. This consists of moving the mouse quickly in the directions needed to trigger the item without having to wait for the menu to appear. For example, the Edit/Paste menu selection can be made by making an L-shaped mark in the buffer window while holding down the right mouse button. Move the mouse down and then to right (The “Marking” Action of Marking Menus). The term “marking menu” comes from this capability to select submenu items as if you are tracing marks with a pencil.
The “Marking” Action of Marking Menus
|
If you practice using the Marking Menus feature for a short period of time, you will find that you can work in a much more fluid and fast way. Therefore, we encourage you to consider practicing with the marking menus to get the benefits of the improved workflow. |
Views Studio Default Marking Menu
The Views Studio default marking menu consists of the Views, Tools, Inspect, Edit, Layers, and Draw menu items are arranged around the center circle. These items contain the following selections:
View Menu
|
Menu Item |
Description |
Command |
|
Grid Snap |
Snaps movements of object to the grid. |
|
|
Zoom Out |
Zooms out the current view. |
|
|
Fit |
Resizes the buffer window so that all the contents of the buffer fit within the window. |
|
|
Grid |
Displays a grid in the current buffer window. |
|
|
Reset |
Returns the object to its original size. |
|
|
Zoom In |
Zooms in the current view. |
Tools Menu
|
Menu Item |
Description |
Command |
|
Points |
Activates PolySelection mode. |
|
|
Select |
Activates Selection mode. |
|
|
Text |
Activates Label List mode. |
|
|
Last |
Returns to the last creation mode used in the buffer window. |
|
|
Active |
Activates Active mode. |
|
|
Rotate |
Activates Rotate mode. |
Inspect Menu Item
|
Menu Item |
Description |
Command |
|
Inspect |
Displays the Inspector panel for the object selected in the work space. |
Edit Menu
|
Menu Item |
Description |
Command |
|
Redo |
Repeats an editing action that was previously undone. |
|
|
Duplicate |
Duplicates the selected objects. |
|
|
Paste |
Copies the objects in the clipboard to the buffer window. |
|
|
S. All |
Selects all objects in the buffer window. |
|
|
Undo |
Undoes the previous action. |
|
|
Delete |
Deletes the selected objects. |
|
|
Cut |
Cuts the selected objects to the clipboard. |
|
|
Copy |
Copies the selected objects to the clipboard. |
Layers Menu Item
|
Menu Item |
Description |
Command |
|
Layers |
Displays the Layers Inspector panel. |
Draw Menu
|
Menu Item |
Description |
Command |
|
Front |
Brings the selected object to the front of the work space. |
|
|
Layer ... |
Lets you change the layer number of the selected object. |
|
|
Ungroup |
Ungroups the selected object. |
|
|
Use T. |
Places the selected object in transformer mode. |
|
|
Back |
Sends the selected objects to the back of the work space. |
|
|
Group |
Groups the selected objects. |