Defining the PARTS_DS SQL Data Source
Define the PARTS_DS data source by doing the following:
1. Drag an SQL data source gadget from the Palettes panel to the Gadgets buffer.
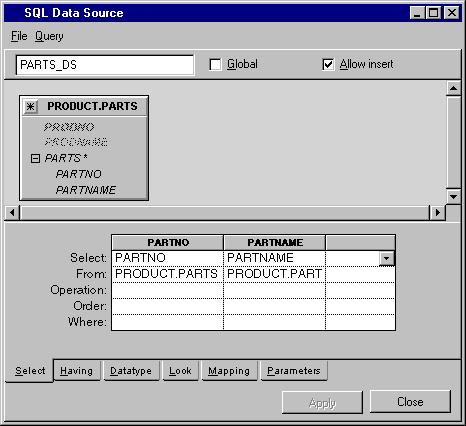
Type the name PARTS_DS in the Name field of the SQL Data Source inspector.
Select Add Tables... from the Query menu of the SQL Data Source inspector panel. When the Select Tables panel appears, select the PRODUCT table in the left list and move it to the right list by clicking the -> button. Click OK.
2. Click the + sign to the left of the PARTS column. Select the nested columns PARTNO and PARTNAME and add them to the PARTS_DS data source by dragging lines to the SELECT section:

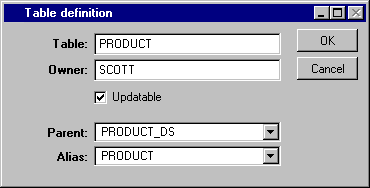
3. Double-click the table PRODUCT.PARTS in the FROM section of the inspector panel or select the Edit Table from the Query menu.
Edit the Parent and Alias items in the dialog box as follows:

Click OK. As a result, the PARTS_DS data source holds a table that edits the nested PARTS table of the PRODUCT designated in the current row of the PRODUCT_DS data source.
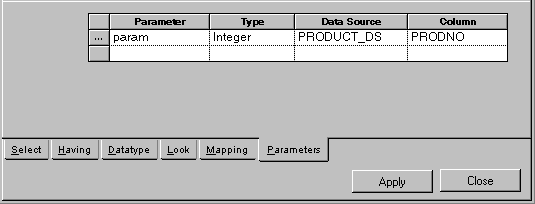
4. In the SQL Data Source inspector, click the Parameters page to make it active. Fill in the parameters table cells as shown below. Click Apply.

5. Select Properties from the File menu in the SQL Data Source inspector panel.
The SQL Data Source Properties panel appears.
6. In the SQL Data Source Properties panel, change the Auto select property from No to Yes. Click OK.
The combination of the parameter and the auto select mode is used so that PARTS_DS rows are selected as soon as you change row in PRODUCT_DS data source.
7. Click Apply in the SQL Data Source inspector.
Published date: 05/24/2022
Last modified date: 02/24/2022


