Defining the Attributes
Use the following procedure to define and edit the external attributes (or “properties”) of your prototype or group. (Properties determine how you will access your prototype or group from your application or from other objects.)
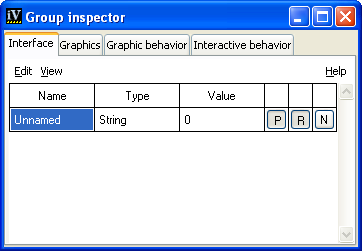
1. Open the Interface page of the Group Inspector Panel. This page allows you to define a set of attributes, giving each of them a type and a default value:
2. Choose Edit > New Attribute or Ctrl+N to add an attribute.
A new row "Unnamed" appears in the table.
3. To specify the name of the attribute, click the box Unnamed. Enter a name for this attribute. This name must be unique to avoid ambiguities; it is used to access the behavior of this attribute.
4. To specify the type of the attribute, click twice on the adjacent Type combo box (or press F2 if using only the keyboard). Select the pull-down menu, which will let you specify a type.
All attributes are typed: each type indicates the kind of values that can be assigned to the attribute, which helps determine its meaning. The types available are:
 Value
Value - The attribute holds a value that can be set or queried directly (a string, a color, an integer, and so on). When you set an attribute to a given value type, the combo box will display this type directly.
Reference - A reference to another internal attribute of the group. For instance, creating an attribute named "temperature", and having it reference the "value" attribute of a "slider" graphic object allows you to access the "value" internal attribute of the slider under the more appropriate name of "temperature", which is helpful if the group is to represent a thermometer. This is equivalent to a pointer or an alias in a programming language. When you have set the type to reference, the referenced attribute, prefixed with “^”, appears in the combo box that describes the attribute type.
Grouping of attributes - All subattributes in the group bearing the name of the attribute will be addressed collectively and assigned the same value. For instance, creating an attribute named "foreground" and giving it the type "group" creates an attribute that will set the foreground of all objects contained in the group to the same value.
Script - A script is executed. This script should return a value, which defines the attribute. Use the Behavior page to change the name of the function that defines the value. The name of the function, followed by “()”, appears when you choose this type of attribute.
NoType - Some attributes can be purely functional, and therefore untyped.
Note: If an attribute has neither a type nor a behavior, it cannot exist. Therefore, setting a type of "none" to an attribute after creating it is equivalent to deleting the attribute. |
5. Enter a default value for the attribute in the Value column of the attribute.
6. To set other parameters of the attribute, use the buttons on the right side of the page. When the button is released, the property is set:
Public (button P in the inspector) - The attribute is visible by outside objects. Attributes are public by default, but you can hide those attributes that are only used to perform internal computations.
Persistent (button R in the inspector) - The attribute value will be stored when the group is saved, allowing the last value set by the user to be maintained. By default, attributes are persistent. To optimize reading and writing, or to always restore the attributes to the original state of the prototype when a file is read, you can set them to non-persistent.
Notifying (button N in the inspector) - When this is set, the attribute can notify other attributes that it has changed its value and, therefore, enable other attributes to update themselves. See section
Notify.
7. Repeat steps 2 through 6 for each attribute you wish to add to provide a description of the interface for your prototype.
Using the Edit Menu on the Interface Page
When specifying the interface of your prototype, you can also:
Import the interface of another Prototype to add predefined attributes and behaviors from that prototype:
Select Edit > Delegate To Prototype and choose from the available list the prototype whose attributes you want to inherit.
A new attribute is created with the inherited attributes shown grayed-out in the table. You cannot directly edit these inherited attributes, but you can reference them through other attributes.
Some inherited attributes may already reference other attributes or graphic nodes, and therefore you may find that not every prototype can be imported into another prototype.
Order the attributes:
Select an attribute and choose Edit > Move Item Up or Edit > Move Item Down.
Delete an attribute:
Select the attribute and choose Edit > Delete.
Cut/Copy/Paste: You can copy or cut a whole attribute and its behavior by selecting the first line of an attributes tree and selecting Edit > Copy or Edit > Cut. You can paste the content of the attribute's clipboard by first selecting a line where you want the attribute to be inserted, and then selecting Edit > Paste.
Using the View Menu on the Interface Page
This menu on the Interface page presents alternative views of the attributes of your group or prototype, and allows you to select which types of attributes you want to edit for a given group or prototype:
Interface - Lets you access and edit all the attributes defined for the group or prototype. This is the default presentation.
Public Attributes - Shows only the public attributes of the prototype, those that can be seen by other objects and by the application.
Modified Values - Lists the values of a prototype instance that differ from its prototype. These values will be saved together with the prototype instance.
All Values - Lists all the prototype values and subvalues. These values can be modified, but this does not mean that the modifications will be saved with the prototype if some other behaviors override the new settings.
Version 5.8
Copyright © 2014, Rogue Wave Software, Inc. All Rights Reserved.