Creating the Second Panel Class
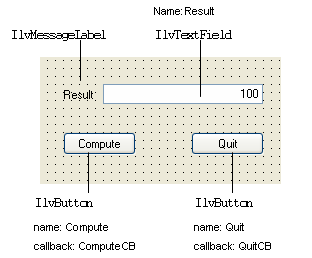
You are now going to build the panel class for the instance of the Second Panel class illustrated below. (This is the Results Panel in
Figure 4.1.)
Creating the Panel Data File
1. Open a new Gadgets buffer window. In the Main window, choose New from the File menu and then Gadgets in the submenu that appears.
2. Edit the new buffer to create the panel illustrated above.
3. Choose Save As… from the File menu to save it as class2.ilv in the directory of your choice.
Setting Up the Panel Class
To set up the panel class:
1. Make sure that class2 is the current buffer.
2. Select Panel Class Palette in the Application menu to open the Panel Class palette (if it isn’t already open).
3. Click the New Panel Class icon

in the Panel Class palette tool bar to create the panel class.
An icon representing the new panel class, with the title Class2 appears in the palette.
4. Select the
class2 panel class and click the Panel Class Inspector icon

in the Panel Class palette to examine it.
The Panel inspector appears.
5. On the General page of the Panel inspector, type SecondPanelClass in the Class field.
6. Click Apply, then Close.
Creating the Second Panel
1. Click the Edit Application icon

in the Main window toolbar to edit the application.
The current Application buffer window is opened and the Panel Class palette is displayed (if it isn’t already open).
2. To create an instance of the second panel, drag the SecondPanelClass icon from the Panel Class Palette to the Application buffer window.
An instance of SecondPanelClass appears in the Application buffer window.
3. Double-click the SecondPanelClass title bar.
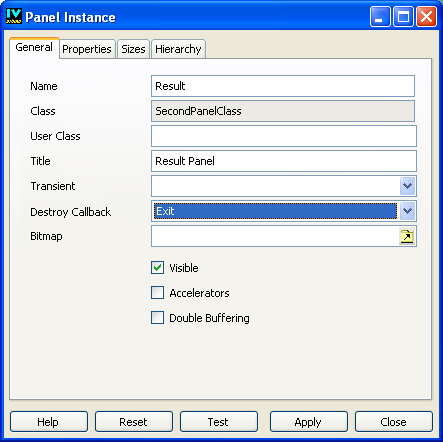
The Panel Instance inspector appears.
4. In the General page of the Panel Instance inspector, type Result in the Name field.
This name can be used to retrieve this panel.
5. Change the other fields in the appropriate inspector page as follows:

Title:
Result Panel Destroy Callback:
Exit x:
200 y:
650The inspector should look like this:
6. Click Apply to validate the options, then click Close to close the inspector.
Version 5.8
Copyright © 2014, Rogue Wave Software, Inc. All Rights Reserved.