Creating the First Panel Class
The First and Second Panels (see
Figure 4.1) are two instances of the same panel class (the class
FirstPanelClass). This means that they have the same contents, but their names, titles, and positions are different.
You are now going to build the panel class for the two instances of this panel class.
Creating the Panel Data File
1. If necessary, open a new Gadget buffer window. In the Main window, choose New from the File menu and then Gadgets in the submenu that appears.
2. In the top pane of the Palettes panel, click Gadgets.
3. Drag the following gadgets from the bottom pane of the Palettes panel and drop them in the Gadgets buffer window:
When a gadget is selected, its class name appears in the message area at the bottom of the Main window.
4. Double-click the message label to open its inspector panel.
5. In the Specific page of the Message Label inspector:

Delete the text in the Label field.
Type
Value in the Label field.
6. Click Apply, then Close.
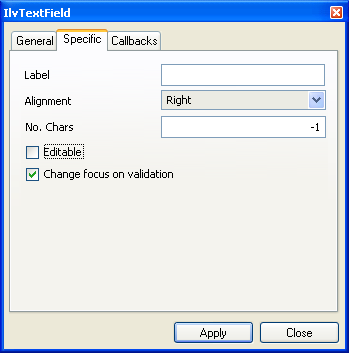
7. Double-click the text field to open its inspector panel.
8. In the Specific page of the Text Field inspector:
Delete the text in the Label field.
Select Right in the Alignment option menu.
Turn off the Editable toggle button.
The Text Field inspector should look like this:
9. Click Apply, then Close.
10. In the top pane of the Palettes panel, click Miscellaneous.
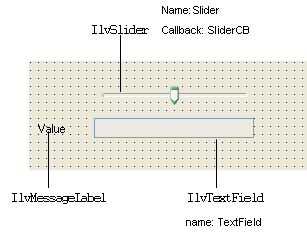
11. From the bottom pane, drag the horizontal slider (class name:
IlvSlider) and drop it in the Gadgets buffer window.
12. Move and resize the objects, then resize the panel so that it looks like in the figure below.
13. Select the slider.
14. Type Slider in the Name field of the generic inspector.
15. Type SliderCB in the Callback field of the generic inspector.
The generic inspector should look like this:
16. Select the text field.
17. Type TextField in the Name field of the generic inspector.
18. Choose Save As… from the File menu and save the panel as class1.ilv in the directory of your choice.
Setting Up the Panel Class
To set up the panel class:
1. Make sure that class1 is the current buffer.
2. Click the Panel Class Palette icon

in the Main window tool bar to open the Panel Class palette.
3. Create the new panel class by clicking the New Panel Class icon

in the Panel Class palette.
An icon representing the new panel class, with the title Class1, appears in the palette.
4. Select the
Class1 panel class and click the Panel Class Inspector icon

in the Panel Class palette tool bar to open its inspector.
5. On the General page of the inspector, type FirstPanelClass in the Class field.
6. Click Apply, then Close.
Creating the First Panel
To create the first instance of the class FirstPanelClass:
1. Choose the Edit Application icon

from the tool bar in the Main window to edit the application.
The Application buffer window is activated and the Panel Class palette is displayed (if it isn’t already displayed).
2. To create an instance of the first panel, drag the icon from the Panel Class palette to the Application buffer window.
An instance of FirstPanelClass appears in the Application buffer window.
3. Double-click the panel title bar to inspect the panel instance.
The Panel Instance inspector appears.
4. In the Panel Instance inspector, type FirstPanel in the Name field.
This name is used to retrieve this panel.
5. In addition, the title can be changed to First Panel and the position (x,y) can be moved to (200,200).
Specify the title in the General page.
Specify the position of the panel in the Sizes page.
The Panel Instance inspector should look like this:
6. Click Apply to validate the FirstPanel options, then click Close.
Creating the Second Panel Instance
To create a second instance of the class FirstPanelClass:
1. Drag the FirstPanelClass icon again from the Panel Class palette to the Application buffer window.
2. In the General page of the Panel Instance inspector of the second instance of FirstPanelClass, change the fields as follows:
Name:
SecondPanel Title:
Second Panel 3. In the Sizes page of the same inspector, change the fields as follows:
x:
200 y:
400 The Panel Instance inspector should look like this:
4. Click Apply, then Close.
Version 5.8
Copyright © 2014, Rogue Wave Software, Inc. All Rights Reserved.