Panel Instances
Once the panel classes have been defined in the Panel Class palette, you can create and inspect the instances of these classes.
Adding a Panel to an Application
To add a panel to your application:
1. Make sure that the Application buffer window is the current window, and that the Panel Class palette is displayed.
To display the Panel Class palette, click the Panel Class Palette icon

in the Main window toolbar.
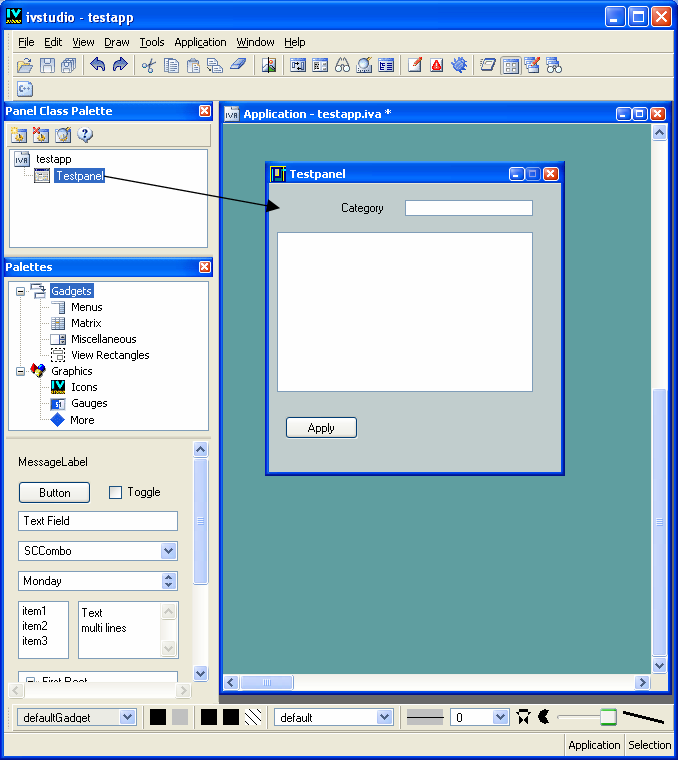
2. In the Panel Class palette, select the panel class icon and drag it directly into the Application buffer window.
An instance of the panel is created in the Application buffer window. This instance is represented as a window. The panel class name is the default name of your new panel.
Managing Panel Instances in the Application Buffer
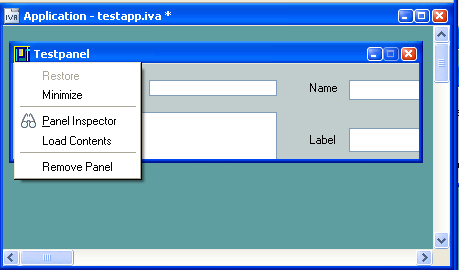
Once panel instances have been added to your Application buffer window, you can manage them in the same way that you manage windows in a windowing environment. Each panel instance window has a pop-up menu that appears when you click on the top-left corner of the window. The menu has standard window options, such as Restore and Minimize.
Figure 3.13 Panel Pop-up Menu
The Restore menu item enables you to restore a minimized panel instance to a window with its original size.
The Minimize menu item reduces the panel instance to its title bar.
A panel instance can be inspected by choosing Panel Inspector from this menu.
The Load Contents menu item lets you explicitly load the contents of your panel instance. This is useful when you use the
noPanelContents option. (See the description of the
noPanelContents option in the section “Configuration Options for the Gadgets Extension” in
Customizing the Gadgets Extension of Rogue Wave Views Studio.
The Remove Panel option removes the panel instance from the Application buffer window.
Inspecting a Panel Instance
To inspect a panel instance:
1. Click the box in the top-left corner of the panel instance.
A pop-up menu appears.
2. From that menu, choose Panel Inspector.
You can also double-click the title bar of the panel instance window.
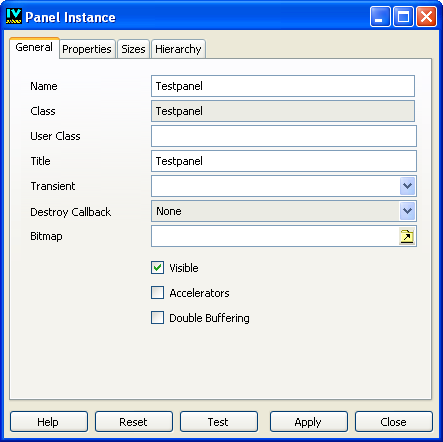
The Panel Instance inspector appears:
Figure 3.14 The General Page of the Panel Instance Inspector
The four notebook pages of the Panel Instance inspector allow you to edit the properties of your panel instances.
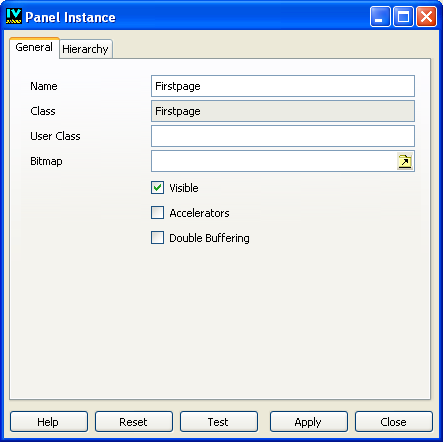
The General Page
Name Use this field to name your panel. This name must be a valid C++ name if you want Rogue Wave Views Studio to generate the panel accessors for your application.
Class This text field displays the name of the generated class of your panel. You cannot edit this field.
User Class If you use a class that is derived from the generated class displayed in the Class field, type its name in this field. In this case, the file declaring such a class must be included in the generated application class file (see
The Header and Source Pages) and its definition module must be linked to the final application.
Title Use this field to set the title of your panel.
Transient Use this option menu to set up a relationship between two panels. By selecting an existing panel in this field, you are specifying that the current panel will always be displayed in front of the panel selected in the Transient field.
Destroy Callback This is the callback invoked when the panel is closed by the window manager. Use the option menu to choose a default destroy callback for your panel.
Bitmap Enables you to specify a bitmap as the panel background.
Visible If you do not want the panel to be displayed when launching the application, do not select the Visible toggle button. By default, the panel is visible.
Accelerators If checked, the panel instance is created with the default container’s accelerators. This means that the panel constructor is called with useacc parameter set to IlvTrue.
Double Buffering If checked, the inspected panel uses the double-buffering mechanism. This generates the following code:
cont ->setDoubleBuffering(IlvTrue)
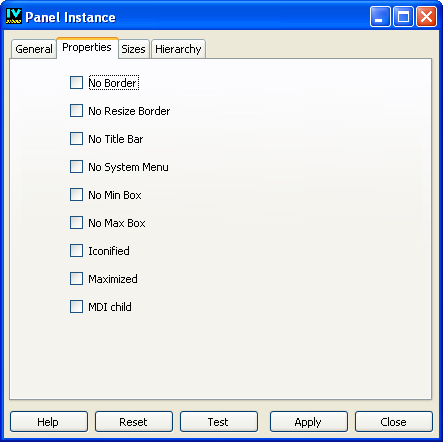
The Properties Page
The toggle buttons in the Properties page let you specify the window frame properties. In the generated code, the selected options are combined to set the properties parameter in the call to the panel constructor. Each option corresponds to a predefined property.
Figure 3.15 The Properties Page of the Panel Instance Inspector
The following table shows the predefined properties that are linked to the toggle buttons in the Properties page of the Panel Instance inspector.
Toggle button | Predefined Property |
No Border | IlvBorder |
No Resize Border | IIvNoResizeBorder |
No Title Bar | IlvNoTitleBar |
No System Menu | IlvNoSysMenu |
No Min Box | IlvNoMinBox |
No Max Bars | IlvNoMaxBox |
Iconified | IlvIconified |
Maximized | IlvMaximized |
MDI child | IlvMDIChild |
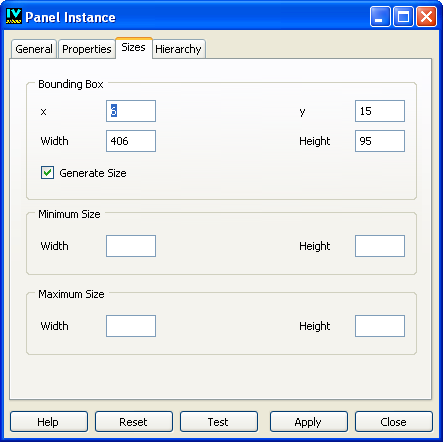
The Sizes Page
The Sizes page of the Panel Instance inspector has three sections: Bounding Box, Minimum Size, and Maximum Size.
Figure 3.16 The Sizes Page of the Panel Instance Inspector
x, y, Width, Height Use these fields to specify the initial position of the panel. The panel size defaults to the size of the buffer. If you want to assign a new size to your panel, turn on the toggle button Generate Size and enter desired values in the Width and Height fields.
Maximum and Minimum Size Use these fields to specify the Maximum or Minimum field sizes for the panel by entering the desired values in the Width and Height fields
Panel Instance Buttons
Apply Click to validate your panel options.
Reset Click to reset the Panel Instance inspector to the last validated values.
Test Click to test your panel. Unlike the global test for the application, only the inspected panel is shown by this action. The options entered but not yet validated with the Apply button are used to create the test panel. Even if the panel is configured to be not visible, it can be tested.
Close Click to close the Panel Instance inspector.
Help Click to access Online Help.
Editing Subpanels
You can use the Application buffer window to create panel instances that are contained in an
IlvContainerRectangle object or in an
IlvNotebook object. In other words, container rectangles and notebooks can hold subpanels.
To make a panel instance a subpanel of a container rectangle or of a notebook, proceed as explained below:
1. Click View Rectangles in the top pane of the Palettes panel to display the corresponding palette.
3. Save the buffer as mymainpanel.ilv.
4. Click the Panel Class Palette icon
in the Main window toolbar to display the Panel Class palette.
5. Click the New Panel Class icon

to add the
Mymainpanel class to the Panel Class palette.
6. From the File menu, choose New. In the submenu that appears, choose Gadgets.
A new Gadgets buffer window opens.
7. Click Gadgets in the top pane of the Palettes panel.
8. Drag an IlvNotebook object to the current Gadgets buffer window.
9. Save the buffer as notebook.ilv.
10. Click the New Panel Class icon
to add the
Notebook panel class to the Panel Class palette.
11. Choose <Application> from the Window menu to activate the Application buffer window.
12. Drag the Mymainpanel class icon from the Panel Class palette to the Application buffer window.
13. Drag the Notebook class icon from the Panel Class palette to the container rectangle inside Mymainpanel.
The container rectangle is highlighted when you drop the subpanel on it.
14. Choose New from the File menu and then Gadgets in the submenu that appears.
A new Gadgets buffer window opens.
15. Drag any objects to the buffer window (text field and message labels, for example) and save it as firstpage.ilv.
16. Click the New Panel Class icon
to add the
Firstpage panel class to the Panel Class palette.
17. Choose <Application> from the Window menu to activate the Application buffer window.
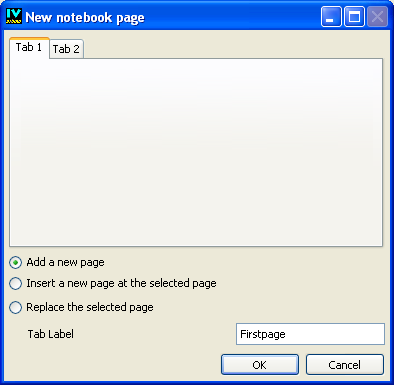
18. Drag the Firstpage class icon from the Panel Class palette and drop it onto the notebook inside the Mymainpanel panel.
The following dialog box appears.
This dialog box lets you add the subpanel instance as a new notebook page or replace an existing page with a new one. A sample of the notebook is displayed in the dialog box in which you can select a page to indicate where the new page should be inserted. If you activate the “Add a new page” toggle button, the new page is inserted after the last notebook page and the selected page is ignored.
Inspecting Subpanel Instances
To inspect a subpanel instance:
1. Click the box in the top-left corner of Mymainpanel in the Application buffer window.
2. Choose Panel Inspector from the menu that appears.
The Panel Instance inspector is displayed.
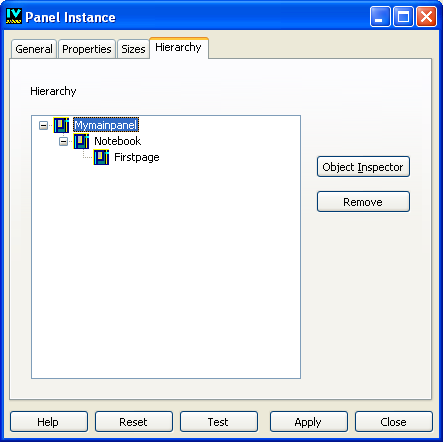
3. Click the Hierarchy page.
In this page, the hierarchy of the panel is displayed as a tree gadget.
You can see that the Firstpage panel is a subpanel of the Notebook panel, which is itself a subpanel of Mymainpanel.
4. Double-click the subpanel you want to inspect in the tree gadget, or select the subpanel and click Object Inspector.
The Panel Instance inspector for the subpanel appears.
5. To remove a subpanel, select it in the tree gadget in the Hierarchy page and click Remove.
Version 5.8
Copyright © 2014, Rogue Wave Software, Inc. All Rights Reserved.