Step 1: Reading a Panel Containing Prototype Instances
The file step1/program.cpp contains the basic canvas of a Rogue Wave® Views program, with which you should already be familiar.
In order to have the prototypes library working, it is necessary to include the following files, specific to the prototypes modules:
#include <ilviews/protos/proto.h>
#include <ilviews/protos/protogr.h>
#include <ilviews/protos/groupholder.h>
#include <ilviews/protos/allaccs.h>
Note: Other includes would be needed to use other features of Rogue Wave Views, such as Managers. |
While not mandatory, it is often convenient to include all default graphic objects in the main file. This enables you to edit a prototype in Rogue Wave Views Studio without having to ensure that all the individual graphic objects have been included. Once you have finished modifying or extending your prototypes, you may wish to include only the necessary objects in order to optimize the runtime footprint.
#include <ilviews/graphics/all.h>
For this particular example, you will also need to include the following file in order to read the display prototype that uses the IlvMessageLabel class:
#include <ilviews/gadgets/msglabel.h>
If you have Rogue Wave Views Controls, including all predefined gadgets will let you use the gadgets in your prototypes:
#include <ilviews/gadgets/gadgets.h>
To run a program that contains calls to the Prototype package, you have to link the program with (at least) these libraries: ilvproto, ilvgrapher, ilvmgr, views, ilog, and with the specific libraries for your platform. Only the library ilvproto is specific to the Prototype package.
Note: The makefiles and project files provided have already specified all the libraries needed to compile, link, and execute this program. |
The program opens a display. You then add “..” to the display path to locate the prototype library myLib.ipl which holds the prototypes already defined. Next, the program creates a container and loads the file myPanel.ilv, containing prototype instances. These instances are automatically loaded. Finally, the program shows the container and starts the main loop, like all regular Rogue Wave Views programs:
int
main(int argc, char* argv[])
{
// Connect to the display system.
IlvDisplay* display = new IlvDisplay("ViewsBGO", 0, argc, argv);
if (!display || display->isBad()) {
IlvFatalError("Couldn’t open display");
return -1;
}
// Prepare a window and a manager to display a scene.
IlvManager* manager = new IlvManager(display);
IlvView* view = new IlvView(display, "BGO tutorial 1",
"BGO tutorial 1", IlvRect(0, 0, 400, 300));
manager->addView(view);
// Load a data file into the manager
// Add the samples data directory to the display path
// to be sure to find the proper file.
IlString buf (getenv("ILVHOME"));
buf+="/doc/tutorial2/step1";
display->appendToPath(buf);
display->appendToPath("..");
manager->read("myPanel.ilv");
// The prototype instances are automatically read.
// Then run the main loop.
manager->setDoubleBuffering(view, IlvTrue);
view->show();
IlvMainLoop();
return 0;
}
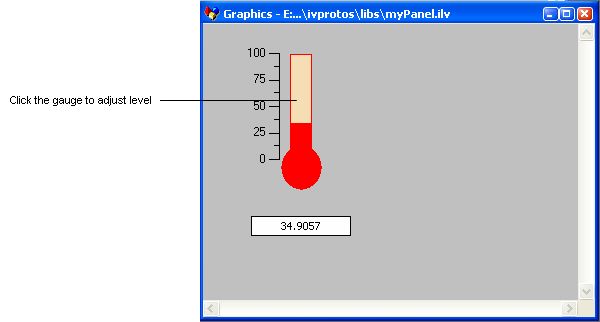
You can compile and link this program (step1/program.cpp) to see that your panel has been read, which will operate as indicated here:
In the next section you will add some code to retrieve the prototype instance
myThermometer, which you created in the panel in the first tutorial (see
Creating Prototypes in Rogue Wave Views Studio).
Version 5.8
Copyright © 2014, Rogue Wave Software, Inc. All Rights Reserved.