Summary
The prototype that you have created in this tutorial is a simplified version of the thermo prototype, one of the predefined prototypes of the sample library. The thermo prototype (and also the myproto prototype that you created) has three components:
 Application interface
: this is composed of its public values and defines how the application is to manipulate the prototype.
Threshold: Float, the alert temperature you want to draw the user’s attention to.
Temperature: Int, the main value.
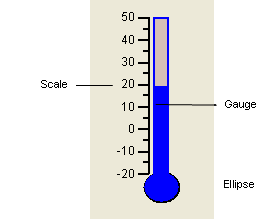
Graphical representation: this is how the user perceives the application interface values. It is composed of three objects: a scale, a gauge, and an ellipse:
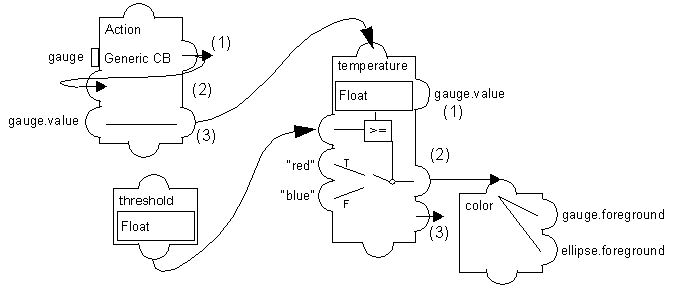
Behavior (Graphic and Interactive): this is represented using the following dataflow graph showing the relationships between accessors:
This dataflow graph is meant to provide an overview of the dependencies among the accessors that define the prototype behavior. At this point, you do not need to understand the conventions used in the graph to represent accessors.
The behavior of the prototype is defined by the following four attributes:
threshold - holds a float value that is used when setting the
temperature value. It is important that this attribute be defined before
temperature, as
temperature is dependent on it. When the prototype is read back,
threshold is set to its value before
temperature is evaluated, so that the condition accessor tests a correct value when it is evaluated for the first time. An alternate way to ensure that the behaviors are executed in a workable order would be to add an Assigned behavior
temperature=temperature to the
threshold behavior, to force a reevaluation of
temperature when
threshold is modified.
temperature - holds the following behaviors:
(1) A Reference accessor: it references the gauge.value internal attribute. gauge.value can also be called a subattribute of the prototype.
(2) A Condition accessor: when the temperature is above the threshold, the value “red” is sent to the color attribute. Otherwise, “blue” is sent.
(3) A Notify accessor: this indicates that when the value is changed, this attribute can notify others of its changes.
color - is a Multiple accessor that sends its value to the Ellipse and Gauge foreground colors.
Action - holds the following accessors:
(1) A Callback accessor: whenever the user triggers the Generic callback of the gauge (by clicking and dragging), a value is sent to whatever other accessor needs to be kept aware of changes in the gauge value.
(2) A Watch accessor: it indicates that it wants to be kept aware of changes to the Action attribute (which is itself).
(3) An Assign accessor: it indicates that whenever the Action attribute is changed, the gauge.value subattribute should be assigned to the temperature value. This is slightly redundant given that temperature is a reference to gauge.value itself, but is necessary to interpret the other behaviors of the temperature attribute (condition and notify).
Finally, you may want to connect a prototype instance to a real application providing data. This is the topic of the next tutorial.
You may also want to examine in more detail the resources of the behaviors mechanism, and how to create more complex behaviors. The samples libraries that come with Rogue Wave Views Studio are a good starting point to further examine the various effects that can be created with prototypes.
Version 5.8
Copyright © 2014, Rogue Wave Software, Inc. All Rights Reserved.