Modifying the Prototype
You are going to modify your prototype to make it look more like a thermometer.
1. Choose myproto from the Window menu in the Main window to bring the Prototype buffer window to the foreground.
2. In the upper pane of the Palettes panel, use the scroll bar to move down the tree gadget and click Graphics.
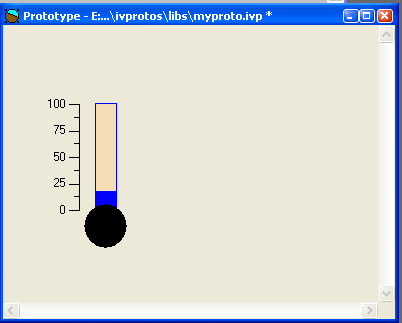
3. From the Graphics palette displayed in the lower pane, drag a filled ellipse (IlvFilledEllipse) over to the myproto.ivp window.
4. Reshape and resize the ellipse. Place it under the gauge so that the combination of the two graphic objects looks like a thermometer:
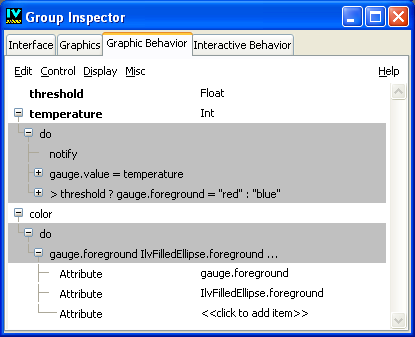
5. Click on the Graphic Behavior tab in the Group Inspector panel to bring the corresponding notebook page to the foreground.
6. Ensure that no attributes are currently selected. If necessary, choose Edit > Deselect, or deselect the selected item by clicking on it using the middle mouse button.
7. Select Control > Multiple. This has the effect of creating a new intermediate attribute, named “Action”.
8. Click on the Action label and type color to set the name of this attribute. Press Enter.
9. In the right hand column of the first Attribute parameter, click twice and choose [All Types]. Select gauge > foreground from the combo box menu. Alternatively you can directly type gauge.foreground and press Enter.
10. Click twice on the second parameter, labeled “<<click to add item>>”. Choose [All Types], and then select IlvFilledEllipse > foreground from the combo box menu.
You have added an intermediate attribute, color, that will address both the gauge and the ellipse foreground when set.
You need to edit the temperature.Condition accessor to use the color accessor instead of the gauge.foreground attribute.
1. In the behaviors tree, expand the temperature > Condition accessor by clicking the [+] button at the left of the line > threshold ? gauge.foreground =...
The gauge.foreground parameter appears in the matrix on the right side of the page, ready to be edited.
2. Click twice on that parameter, open the combo box and select color.
3. This replaces the former definition of the accessor with the new one which changes the foreground color of both the ellipse and the gauge when the temperature is modified.
4. Choose Save from the File menu of the Main window to save your prototype.
You can move back to the Interface page if you wish, and test the new behavior of the prototype by changing the temperature value and seeing that both the ellipse and the gauge are affected by the condition behavior.
Finally, simplify the temperature attributes. Because this temperature will always be equal to the internal gauge.value attribute, you can change its type. Instead of being a simple Int value, you can make the temperature attribute directly reference the gauge.value. To do this:
1. Go to the Graphic Behavior page of the Group Inspector.
2. In the right hand side of the temperature attribute, click twice on the Int label that indicates its type. A combo box appears.
3. Choose Reference > gauge > value in the combo box menu.
The Int type is replaced by ^gauge.value indicating that changing the temperature is equivalent to directly setting the gauge.value subattribute.
4. Select the gauge.value=temperature line in the tree. Then choose Edit > Delete.
This has the effect of removing the redundant assignment.
Version 5.8
Copyright © 2014, Rogue Wave Software, Inc. All Rights Reserved.