Creating and Configuring an Options File (.odv file)
To create a .odv file:
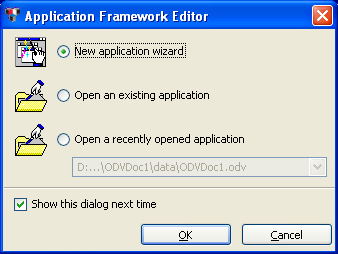
1. Launch the Application Framework Editor.
To launch the Application Framework Editor, execute <ILVHOME>/bin/<SYSTEM>/dvwizard. <ILVHOME> is the directory where you installed Rogue Wave® Views and <SYSTEM> is the platform (for instance, x86_.net2008_9.0 or ultrasparc32_10_11). Make sure that your path includes Rogue Wave Views libraries.
2. Select New application wizard and click OK to create a new application:
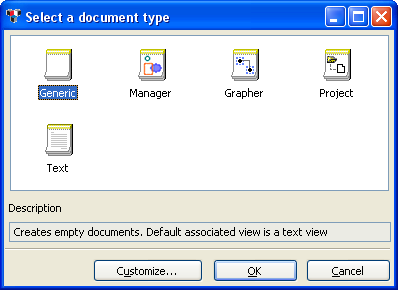
3. From the Select a document type panel, choose Generic:
Several predefined types of documents are made available. Each type of document defines convenient methods for manipulating its data and is pre-associated with a specific view.
For instance, the Manager document type deals with
IlvGraphic objects inserted in an
IlvManager object. It is particularly suited for developing graphic editors.
The Generic document type does not make any assumptions about the type of document. This is the choice for most applications.
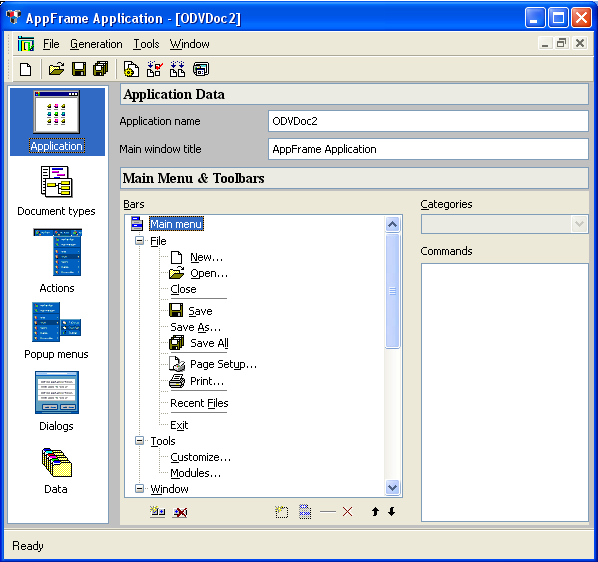
The Application Framework Editor opens a new .odv file and displays several windows. The left area lets you select the application entity you are editing (Application, Document types, Actions, Popup menus, and Data), whereas the right area lets you set the parameters of the selected entity:
Enter the Application Parameters
1. Change the application name from ODVDoc1 to BitmapEditor. By default, this name is used to create the directory and the project name.
2. Change the main window title to Bitmap Editor by Application Framework.
Specify the Document Parameters Used to Generate the Code
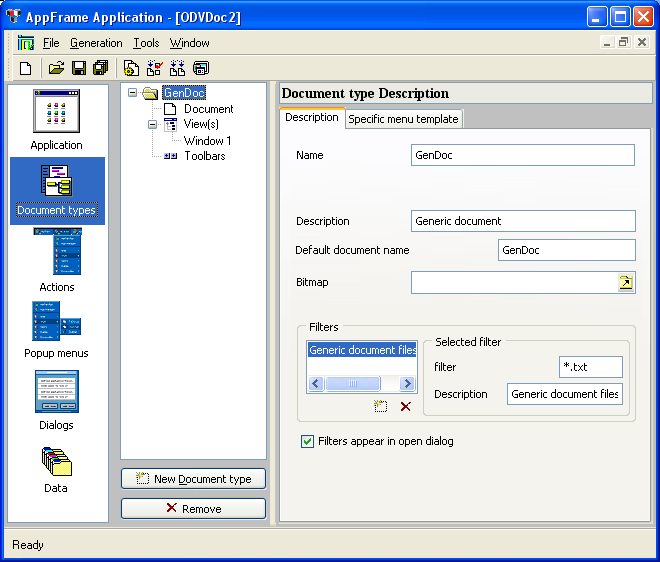
1. Click Document Type from the left area of the window:
The center area presents within a tree the application documents, their views, and their toolbars. The area to the right inspects the object selected in the tree.
2. From the tree in the center area, select GenDoc.
The right area displays the Document type Description page.
3. From this description, change the Name field to BitmapEditor.
The document name is used by the application.
4. Change the Description field to Bitmap Editor Document.
This property is used for displaying the document type description in the New Document dialog box.
5. Set the Default document name field to Bitmap.
This property is used to assign a default name to new documents before they are saved by the user.
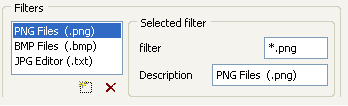
6. Change the filters. Selected filter is changed to *.png. This property is used when opening a new document through the file selector. *.png will be the default extension. The Bitmap Editor allows you to open PNG, BMP, and JPEG files.
7. Set the description to PNG Files (.png).
8. Click the Add a filter button to add a BMP filter.
9. Selected filter is changed to *.bmp in the filter field.
10. Set the description to BMP Files (.bmp)
11. Click the Add a filter button to add a JPG filter.
12. Selected filter is changed to *.jpg in the filter field.
13. Set the description to JPG Files (.jpg):
Specify the Document C++ Class
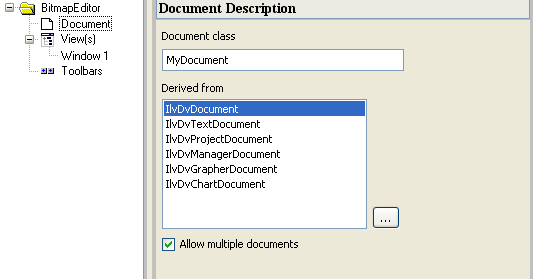
1. Select Document from the tree in the center window:
The right area lets you name the class and determine the document class from which the bitmap document will inherit.
2. Change the Document class field to BitmapDocument.
The document class inherits from
IlvDvDocument (which is the base class for all documents). A
BitmapDocument C++ class will be generated. The generated code will be completed later on.
Up to this point, several characteristics of the bitmap document have been specified. A name has been given to the document, a description to be displayed in tooltips and information areas, the file extension used in the file selector to open a bitmap, and so on. Finally, the C++ class to be generated has been selected.
Specify the View and User Interface
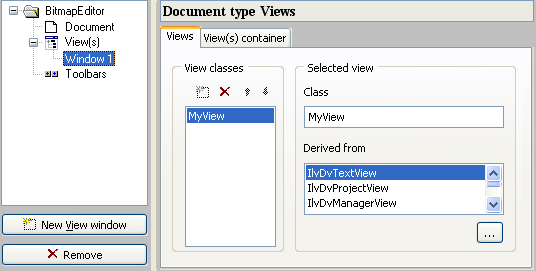
1. From the center area tree, select Window1:
The Document type Views page lets you determine the type of views that may be attached to the document and to specify the C++ class to be generated. Application Framework provides different views that can be used with a document. Each view implements the corresponding Rogue Wave Views objects and provides specific methods that simplify the interaction between the document and the view.
There is now a bitmap in the Bitmap Editor document and it needs to be displayed in a document view. From the predefined document views proposed by Application Framework, none allow you to display a bitmap. Therefore, select
IlvDvFormView, which is a generic class allowing you to load Rogue Wave Views files (
.ilv).
Note: Step 2 will show how to display the bitmap. |
2. In the Views notebook page the Class field is replaced by
BitmapView, which is still derived from
IlvDvFormView.
3. In the View(s) container notebook page, set Type to View in MDI child frame (this is the default selection).
This parameter lets you choose among several ways of displaying the view: MDI child frame, MDI maximized child frame, or docked at either the left, right, top, bottom, or float window.
Now that the parameters of both the document and the view have been set, the C++ code and the configuration file (.odv) that will be used to build and run the application can be generated.
Version 5.8
Copyright © 2014, Rogue Wave Software, Inc. All Rights Reserved.