Mapping and Formatting the Cells
In this example, each employee works in a department that has a given number. However, you would rather display the department name instead of its number. You want to replace the DEPTNO column numbers with names.
In this section, you are going to map the cells of the DEPTNO column of the EMP_DS data source to the NAME cells of the DEPT_DS data source. To do this, follow these steps:
1. In Selection mode

, double-click the EMP_DS SQL Data Source gadget to open its inspector.
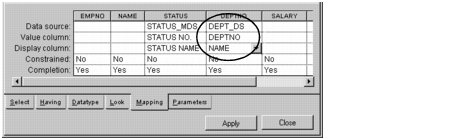
2. Select the Mapping page of the inspector.
3. Fill in the DEPTNO column cells as shown below:
4. Because you are going to display the department name instead of the number, you need to change the column header. Select the Look page in the SQL Data Source inspector and change the Header cell of the DEPTNO column from DEPTNO to DEPT.
5. Because numbers are aligned right and text is aligned left, change the Align cell in the DEPTNO column from Right to Left.
The SELECT section of the Look page in the SQL Data Source inspector panel now looks like this:
6. Click Apply in the SQL Data Source inspector.
The header of the DEPTNO column of the Employee table gadget in the Main window changes to DEPT, while the numbers in the DEPT cells change to their corresponding names and are aligned left. If necessary, adjust the size of the columns.
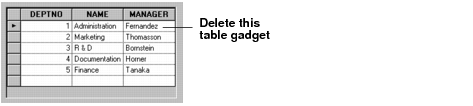
7. As you will not need it anymore, delete the table gadget connected to the DEPT_DS data source. Click the table gadget and press the Delete key.
The Main window now looks like this:
Note: A combo box is now available for the DEPT and STATUS columns of the EMP table gadget. This allows the user to change the department name or status for an employee by selecting an item from a list. |
8. Save the Employee window by clicking the Save button

in the Main window.
Version 5.8
Copyright © 2014, Rogue Wave Software, Inc. All Rights Reserved.