Defining the EMP_DS SQL Data Source
To define an SQL data source using the I_EMP table in the Employee database, do the following:
1. Make sure that you have an empty Gadgets buffer open. Select the unnamed buffer from the Window menu.
If for some reason the unnamed buffer does not exist, you will need to create a new Gadgets buffer. Choose New > Gadgets from the File menu. When you choose New > Gadgets, the new buffer becomes the current buffer. Any buffers that were already opened can be accessed from the Window menu.
To give yourself more room in the work space, you can minimize the Application buffer window and resize the Gadgets buffer window by dragging a corner or side.
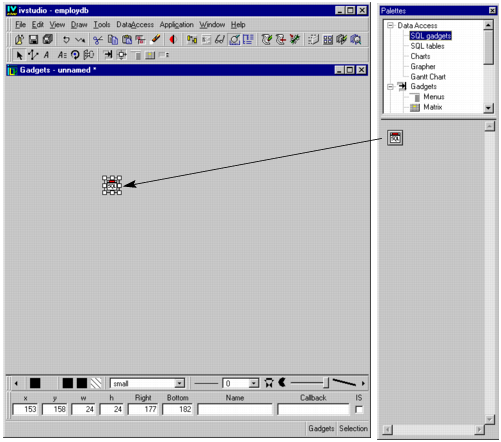
2. Drag an SQL Data Source gadget from the SQL gadgets palette to the Gadgets buffer of the Main window.
3. Double-click the SQL data source gadget.
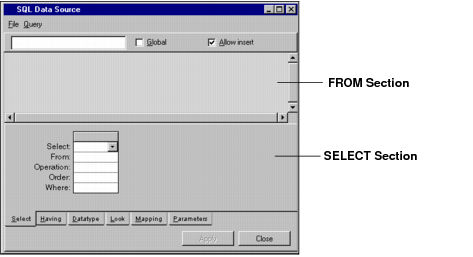
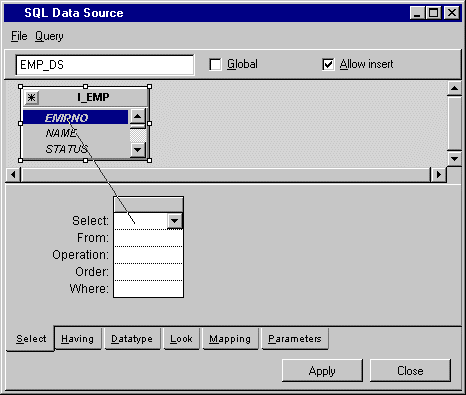
The SQL Data Source inspector appears.
This panel has two main sections:
 FROM section
—the area where you place representations of the database tables from which values are to be taken.
SELECT section—the area where you select the criteria for defining the data source tables and their display.
4. Type the data source name EMP_DS in the Name field at the top of the panel.
5. Choose Add Tables... from the Query menu to add a table to the SQL data source.
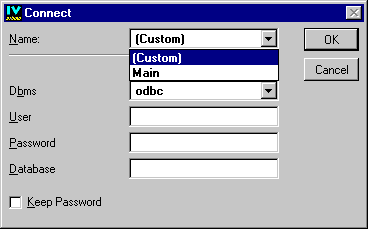
Since this is the first time an operation needs a connection to the database, the Connect panel appears.
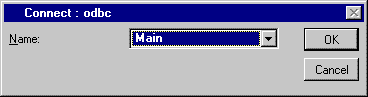
The Connect panel changes to show only the name of your selected session.
Note: If you filled in the connection parameters instead of selecting a name, you would have created an SQL session specific to the current data source. The application-wide SQL session you created can be used by all the tutorial data sources. |
7. Click OK.
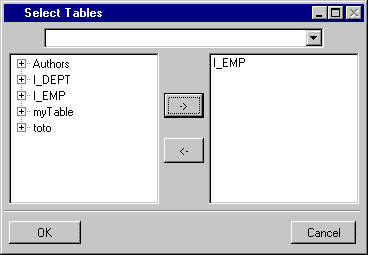
The Select Tables panel appears with the names of the I_EMP and I_DEPT tables. These are the tables that you added to the Employee database at the beginning of the tutorial.
8. Select the name I_EMP in the list on the left of the panel and click the -> button to add it to the right list. Then click OK to add a representation of the I_EMP database table to the EMP_DS SQL data source.
Notes: 1. To remove a name from the right list, select it and click the <- button. 2. To display the fields of a table in the list, double-click its name or on the '+' to the left of its name. |
The table appears in the FROM section of the SQL Data Source inspector.
9. You can position the table in the FROM section by doing one or more of the following:
Use the scroll bars that appear with the table if the table does not fit in the FROM section.
Increase the size of the FROM section by using the system Window manager to enlarge the entire SQL Data Source inspector panel.
Change the size of the table by dragging its handles.
Move the table within the FROM section by clicking the tables title bar and dragging.
10. Leave the Allow Insert check box activated to allow users to insert new employees later.
Leave the Global check box deactivated. When the check box is activated, the current data source can be used by more than one panel.
11. Click EMPNO in the table (which becomes highlighted) and drag a line to the empty column in the SELECT section as shown in the previous figure.
EMPNO appears in the header and in the Select cell. I_EMP appears in the From cell, showing from which table the data is taken.
12. Repeat step 11 for the NAME, STATUS, DEPTNO and SALARY columns of the I_EMP table. If you make a mistake, you can edit the column display by choosing column commands from the Query menu:
Append Column adds a column to the right of all existing columns.
Insert Column adds a column to the left of the selected column.
Delete Column removes the selected column. Alternatively you can remove the selected column using the Delete key.
You can also drag a column by its header and drop it where you want.
Note: In this tutorial, you want the data source table to have exactly the same columns as the database table. Therefore, instead of dragging each column manually from the FROM section to the SELECT section, you could have dragged the whole table by using the asterisk in the top left corner of the database table. |
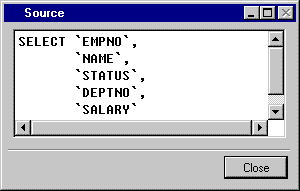
13. Choose View Source... from the File menu in the SQL Data Source inspector.
The Source panel appears. This is a read-only panel allowing you to see the SQL statements created by your entries.
Click Close in the Source panel when you are finished with it.
14. Click Apply in the SQL Data Source inspector.
EMP_DS appears under the SQL Data Source gadget in the Main window.
You have now defined the EMP_DS data source.
Version 5.8
Copyright © 2014, Rogue Wave Software, Inc. All Rights Reserved.