Connecting a Table Gadget to the DEPTMAXSAL_DS Data Source
You are now going to connect a table gadget to the data source.
The DEPTMAXSAL_DS SQL data source is now defined and connected to a table gadget.
2. Click the Active mode button

in the Main window. Click in the table gadget and press the F9 key to refresh the data source.
The I_EMP table gadget in the Gadgets buffer changes to display the name of each department along with the highest salary in that department.
The Main window now looks like this:
Keep the window as it is, since you will need it to continue the tutorial.
To change the format of the salary column in the table gadget (see the figure above) so that it shows the type of currency and has two digits after the decimal point, do the following:
1. Choose Application Properties from the Data Access menu.
The Application Properties panel appears.
2. Click the Number page and set the format like this:
Decimal point: .
Thousands separator: no separator
Currency symbol: $
Currency position: $3.14
3. Click Apply, then Close.
4. In Selection mode

, double-click the DEPTMAXSAL_DS SQL Data Source gadget in the Gadgets buffer.
The SQL Data Source inspector appears.
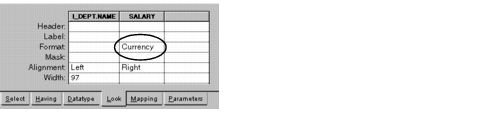
5. On the Look page, choose Currency in the combo box menu of the Format cell of the Salary column.
The word Currency, which is a predefined system format, appears in the cell.
6. Click Apply in the SQL Data Source inspector.
In the Gadgets buffer, the format of the Salary column of the table gadget changes:
Keep the window as it is as you will need it to continue the tutorial.
Additional Information about Using Data Formats
You can create and edit data formats for your data source tables in various ways. Whatever method used, you always apply the format in a Format cell of a data source column in the SELECT section of the SQL Data Source inspector Look page.
You can either choose a predefined named format from the cell combo box menu or you can define your own string, number or date format using the symbols and formulas found in
Appendix B, Format Syntax. For example, instead of choosing the predefined system format
Currency from the menu as in the figure, you could create your own format such as this:
$ #,##0.00. See
Appendix B, Format Syntax.
Predefined System Formats
Data Access provides numerous predefined formats that you can choose from the combo box menu of the Format cell. Whether system formats appear in the menu depends on the data type for the column; that is, what is entered in the Type cell on the Datatype page of the SQL Data Source inspector.
Predefined User Formats
You can create your own predefined format by using the symbols and formulas described in Appendix B and then giving the format a name. This name then appears in the combo box menu of all Format cells whose data type is appropriate for the format. To create a user predefined format, do this:
1. Choose Application Properties from the Data Access menu of the Application Editor panel. The Application Properties panel appears.
2. Click the Format page. On this page, type a name for the format in the Name field and define a string, number, or date format in the Definition field (see
Appendix B, Format Syntax).
3. Click Apply. The format is defined and the name appears in the appropriate combo box menus of the Format cells.
Application-Wide Settings
You can apply application-wide setting as follows:
Numbers: Use the Number page in the Application inspector panel to define settings for the decimal point and thousands separator as well as a currency symbol and its placement. These settings are always applied when they are appropriate for the value. The settings also apply to number formulas typed in the Format cell and with predefined user number formats.
Dates: Use the Date page in the Application inspector panel to define the order of the month and date and the date and time separator symbols. These settings are applied with predefined date and time system formats that appear in the Format cell combo box menu when Date is used in the Datatype cell. The settings also apply to date formulas typed in the Format cell and with predefined user date formats.
Version 5.8
Copyright © 2014, Rogue Wave Software, Inc. All Rights Reserved.