Creating the Tutorial Database Schema
To create the schema for the example, do the following:
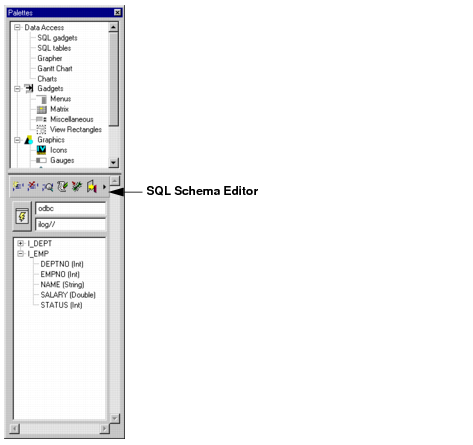
1. Choose the SQL Tables from the Data Access palette in Studio.
The SQL Schema Editor appears.
2. To connect to the database, click the Connect button

from the SQL Tables palette.
The Connect panel appears. The elements composing this panel depend on the database system being used (for example, you can have an Options and/or Database field, depending on your system). The Connect panel for an ODBC system is shown here.
3. Type the data needed for accessing the database:
 User
User and
Password—(Click the Keep Password button if you want the password to appear the next time you connect.)
Database field—The name of the database. This field is database dependent.
4. To define the table, click the Create table button

from the SQL Schema Editor toolbar.
The Table Definition panel appears.
5. To give a name to the table, type I_EMP in the Table field.
6. Make sure the Owner field is correct. By default, the name displayed in the User field of the Connect panel is displayed here. If you want another owner, type that name.
7. Define the five columns for the I_EMP table by entering the information in the cells as shown in the following figure. (Note Yes in the Null column for SALARY.):
There are five parameters to be edited for each column in the table:
Column—Required. The name of the column.
Type—Required. The type of data to be entered in the column. Combo box provided.
Length—Optional. The maximum number of characters a user can enter in the column. Applicable only when the type is
String. If left empty, an unlimited number of characters can be entered.
Key—Required:
Yes or
No. Selects whether or not this column is to be part of the key for the row. A key uniquely identifies a row. Combo box provided.
Null—Required:
Yes or
No. Selects whether or not the column can have a null value.
Yes means the column can be null.
No means the user must enter a value in the column. Combo box provided.
8. Click OK.
The table appears in the SQL Tables palette.
9. Define the three columns for the I_DEPT table in the same way as you did for the I_EMP table (see steps 4-8 above). Use the data shown in the following figure. Then click OK.
10. In the SQL Schema Editor toolbar, click the Export selected table button

to export the schema of the selected table of the table list. Choose Save As... from the File menu. A standard file selection dialog box appears.
Note: Data Access generates the SQL statements needed for creating the tables. These statements are then submitted to the Database Management System (DBMS), which creates the table. |
11. Give it the name EmployDB.ilx,. Then click Apply. (If necessary, create a directory outside of Data Access in which to save it.)
The schema representation, which is specific to Data Access, is saved. You can use it in the future to reproduce the schema without having to rebuild it. To do so, you would use the Import table button

to import a schema representation.
Warning: Remember, only use the SQL Schema Editor to create new tables. If you open and edit tables that already contain data, you will lose the data when you valid the changes. |
Version 5.8
Copyright © 2014, Rogue Wave Software, Inc. All Rights Reserved.