Displaying an Oracle Spatial Layer with the Map Builder
In this section, you are going to perform a simple request to the Oracle Database. You will see how to connect to the database, query the database and display a window of data. You will use the data loaded in the database in the previous section, however, you can use any other data set present in your Oracle Spatial Database.
1. Run the Rogue Wave® Views MapBuilder.
2. To connect to a database, you must create an empty buffer. Click the New Map icon of the toolbar or select New Map Buffer in the File menu.
3. Select the buffer you want to use for creating your map.
4. Select Oracle Object Model in the Connection menu. The default connection panel appears.
5. Enter your database connection parameters.
A parameter window appears, similar to the one used when loading the data from the file. This window adds Oracle related parameters to the parameter window.
6. In the Rendering page, select the colors you want to use.
7. In the Destination projection page, choose the projection in which data is stored. For the WORLD maps, the projection is Geographic.
8. In the Destination adapter page, leave the default parameters (1 meter).
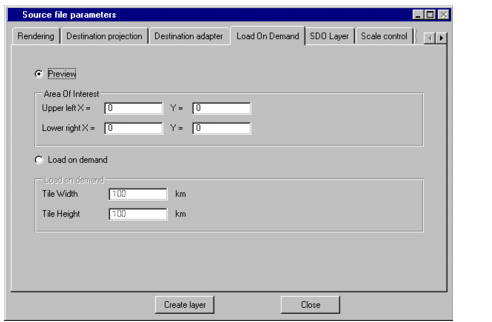
9. The Load-On-Demand page allows to make a request in two modes:

By specifying an area of interest (AOI): the data in this AOI is loaded in the current map buffer.
By using Load-on-demand.
In this section, you will use the Preview mode. After clicking the Preview toggle, you are allowed to select an array for requesting data. If you leave all fields set to 0 (zero), the whole layer will be loaded.
Note: In this sample, you used a small data set. If you want to perform a request using an AOI on larger data sets, be careful that the AOI you selected is small enough so that the amount of data that will be loaded is reasonable. |
Figure 2.15 The Load-On-Demand Page of the Oracle Connection Panel
10. The SDO Layer page lists all the available layers in your database. The layer name is composed of the name of the table containing the layer, a period ‘.’ and the name of the table column containing the geometry of data. In this example, you will see at least the layer named WORLD.GEOMETRY. Select this layer.
11. The Scale control page allows you to set scale visibility filters on the created layers. For this sample, you do not need to set scale visibility filters.
12. The Attribute page allows you to load the attributes associated with objects. When this is selected, all columns that are not of type geometry are attached as attributes to created graphic objects. Refer to the reference manual of the Oracle readers for more information. For this sample, you do not need to load the object attributes.
13. After you have selected the options on the various pages, click Create Layer button.
A layer containing the whole data has now been created.
Version 5.8
Copyright © 2014, Rogue Wave Software, Inc. All Rights Reserved.