Defining a Parameter That Accepts User Input
In the Rogue Wave Views Data Access Getting Started Manual, you saw how to filter data according to the values in a column of another data source table. It is possible to adapt this behavior to accept user input as a parameter. This can be done using a memory data source.
The following example shows how to filter an employee table to show only those employees that work in a particular department. The example also uses a foreign table. The tables used in this example are the same as those used in the example described in the Rogue Wave Views Data Access Getting Started Manual.
You need to set up a panel containing an SQL data source, a gadget table that is connected to it, and a DbField gadget to control record display.
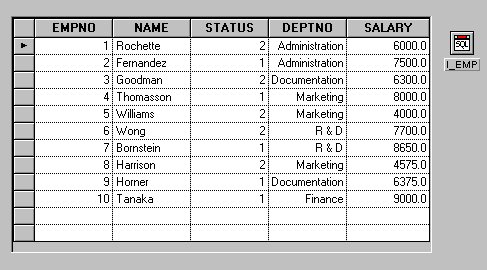
You will start with a table resembling the one shown in the following figure, that is, an SQL data source connected to a table gadget that shows the I_EMP database table:
Figure 8.2 A Table Gadget Linked to an SQL Table
Note: Ensure that when you connect to the database you click on the “Keep Password” button. This avoids having to reconnect later. |
The DEPTNO column has a foreign table that is connected to it and that converts a department number to the appropriate department name (See
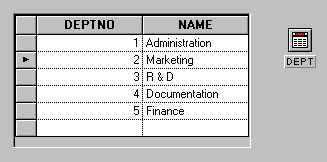
Foreign Tables). The foreign table is a memory table like the one shown in the following figure:
Figure 8.3 The Foreign Table for the DEPTNO Column
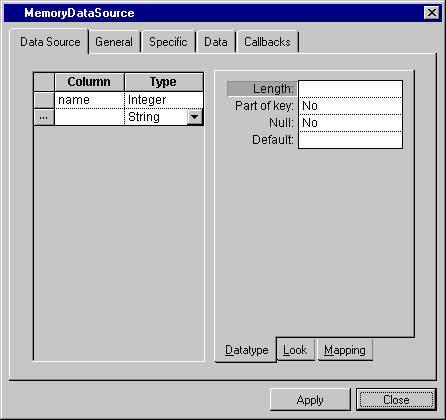
A new DbField gadget and a memory data source should then be created. The DbField gadget will be connected to the single column of the memory data source. The memory table must be set up as a single column table that accepts an integer type.
The memory data source that acts as a “go-between” for the parameter value.
Figure 8.4 The DEPT_NAME Memory Data Source
Note that it is important to set up the column type as an integer even though the user will be entering a string value. This is because the foreign table will convert the string to an integer before entering the value into the memory table.
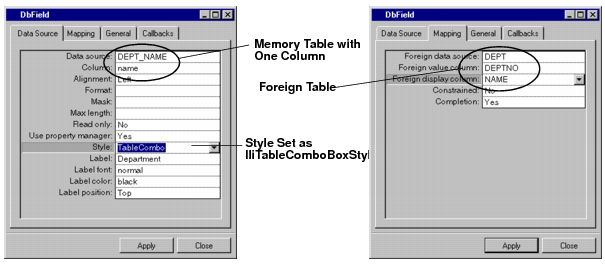
The DbField should be connected to this memory data source and configured in the following way:
Figure 8.5 The Data Source and Mapping pages of the DbField Inspector that Accepts the Parameter Input
You will now define a parameter in the original SQL table that accepts its input from the contents of the only column in the memory data source. This column in turn accepts its input from the DbField. A parameter must be defined in the SQL Data Source inspector:
Figure 8.6 Defining a Parameter via a Memory Data Source with a Single Column
In addition to this, you must set Auto Select to Yes in the SQL Data Source Properties dialog box. This enables a data source that uses data from another data source table to automatically select the required value.
To specify that the data shown in the table gadget is to be filtered according to the department parameter, you need to enter the following into the Select page of the SQL Data Source inspector:
Figure 8.7 Specifying the Selection Criterion for a SQL Table
Note: When a parameter is used, its name must be prefixed by a colon (for example, = :department). |
You are now able to enter a department in the DbField that will be entered into the memory table column and taken as the “department” parameter value. It will then be used to make a selection in the SQL table.
One thing remains to be done. The validation of the user input in the memory table can be done by setting a predefined callback on the DbField.
Figure 8.8 Setting a Callback on the DbField
This callback validates the user input in the memory table. Now, when you test this panel, the SQL table automatically selects according to the value that you enter in the DbField.
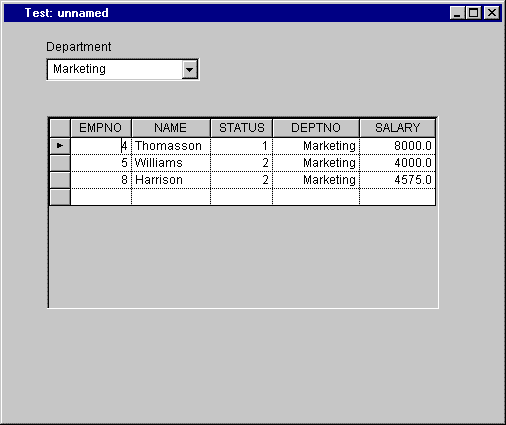
You should now have a panel that allows you to select the required department from a combo box and display only the employees that work in the department.
Figure 8.9 Completed Panel Allowing Department Selection and Table Contents Filtering
Version 5.7
Copyright © 2013, Rogue Wave Software, Inc. All Rights Reserved.
