SQL Session: Communication Channel Between the Application and the DBMS
When you create an SQL Session, you are creating an Data Access object that represents a communication channel between the application and the DBMS. An application can have several SQL sessions opened at once, thus allowing you to have more than one transaction active at the same time in your application. Also, the same SQL session can be shared by different data sources.
There are two basic ways in which you can establish an SQL session:

By creating an SQL session specific to one data source.

By creating an application-wide SQL session.
Creating an SQL Session Specific to One Data Source
Use one of the following procedures for creating an SQL session specific to one data source.
 Specifying the SQL session the first time you add a database table to a data source.
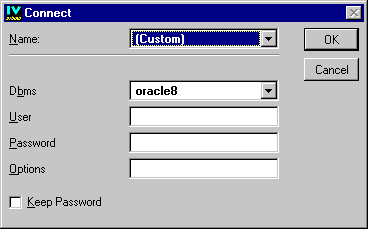
The connection to the database can be made through a Connect panel that is specific to the type of DBMS being used. The Connect panel automatically appears when you first request access to a table in the database by choosing Add Tables from the Query menu in the SQL Data Source inspector panel.
By filling out this panel and clicking OK, you establish a communication channel between the application and the DBMS; that is, you establish an SQL session.
 Using the SQL Data Source Properties panel.
 You can also establish an SQL session at any time by using the following procedure:
1. In the Gadgets buffer, double-click the SQL Data Source gadget that you have previously dragged there from the Palettes panel.
The SQL Data Source inspector panel appears.
2. Choose Properties... from the File menu of the SQL Data Source inspector.
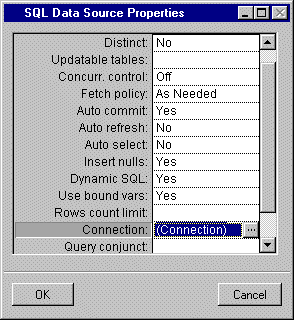
The SQL Data Source Properties appears.
3. Click the Connection row.
A Connection button

appears in the Connection field:
4. Click the Connection button.
The Connect panel appears:
5. Fill out the Connect panel and click OK.
An SQL session is established.
6. Choose Add Tables from the Query menu in the SQL Data Source inspector panel.
In both cases, if you ignore the Name field of the Connect panel (see “Creating an application-wide SQL session” below) and fill in the other fields, an SQL session is established that is specific to the data source. This means that the SQL commands COMMIT and ROLLBACK, used to update the database, apply only to the data source.
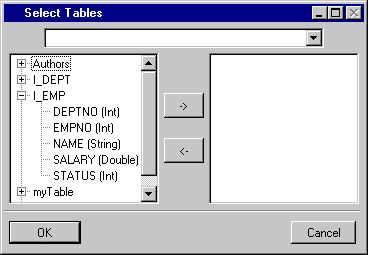
If the SQL session is successfully established using the Connect panel, the Select Tables panel appears. This panel is used to select the table in the database that you want to add to the data source.
Select one or more tables from the list on the left side of the panel and click the -> button to move the table(s) to the list on the right side of the panel. By clicking OK, you add the table(s) to the data source. The table(s) appear in the FROM section of the SQL Data Source panel.
Creating an Application-Wide SQL Session
You can create an SQL session which, besides the parameters needed for connecting to a database, also has a name. You can then use this name when you want to make use of the SQL session it represents. The connection name belongs to the application, can be used with all loaded buffers, and is saved with the application.
For example, you can use the Name field of the Connect panel to select a connection to a database. You would use this field instead of filling out the other fields of the Connection panel. The current data source can thus immediately make use of this predefined SQL session:
To create an application-wide SQL session, you choose SQL Application Properties in the Data Access menu. You then use the Sessions notebook page in the SQL Application Properties panel that appears to establish the session. For a detailed description of this procedure, see
Defining a Named SQL Session.
With an application-wide SQL session, the COMMIT and ROLLBACK commands apply to all the data sources using the session.
Version 5.5.1
Copyright © 2012, Rogue Wave Software, Inc. All Rights Reserved.


