Tables
This section explains how to manipulate tables, and rows and
hyper-references in a table.
Adding Rows to a Table
You can add rows to a table. To do so:
1. Click a cell in the last empty row of the table and type a value.
2. Press the Tab or the Enter key to go to the next empty cell.
When the row is complete, press Enter to position the cursor in the first column of the next row.
3. The values you have just entered are sent to the server.
This operation may fail for several reasons —for example, if you entered invalid values. In this case, the newly added row is removed from the table and the model is not updated.
Note: Values specified as read-only or as derived in the model can not be edited. If your panel allows the values to be edited, the server rolls back the change as soon as the update is sent to the server. Hyper-references can be edited only if their label is editable (see the Rogue Wave Server User’s Manual and Reference Manual for details). The value of a hyper-reference can be changed only by means of the drag-drop or copy-paste technique. |
Dragging a Row to a New Location
Like hyper-references, rows can be dragged to a new position. To transfer a node from one domain to another:
1. In the DomainsOfNetwork panel, double-click on the three dots at the intersection of row
Domain#1 and column
Nodes to open the Domain Nodes panels for
Domain#1 (just as you did to open the Domain Lines panel in step 1 of the section
“Hyper-References”.).
2. In the same way, open the Domain Nodes panel for Domain#2.
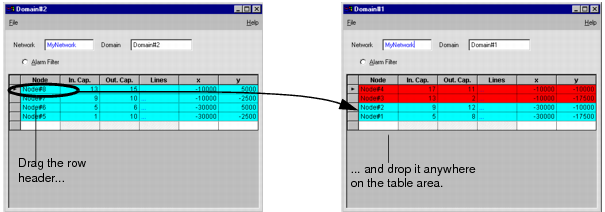
3. Select the Node#8 row in Domain#2 by clicking its marker, drag it to the table in the Domain Nodes panel for Domain#1, and drop it anywhere on the table area.
You can see a ghost <row> placeholder moving along with the pointer.
Figure 5.14 Domain Nodes Panels Before and After Modification
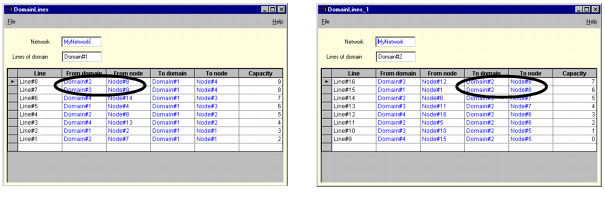
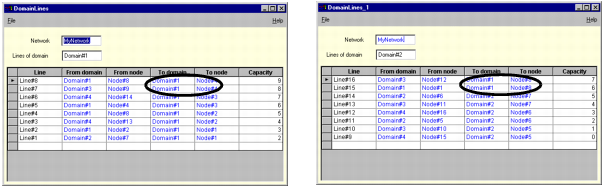
These changes are reflected in the Domain Lines panels for Domain#1 and Domain#2, as illustrated in the figures below.
Figure 5.16 Domain Lines Panels Before and After Modification
Modifying Cells in a Row
Depending on a cell’s content, there are two ways to modify it. If the cell contains a basic type, such as a string or an integer, click the cell and type the new value. If the cell contains a hyper-reference, you can modify the hyper-reference only by replacing it with another hyper-reference (see
“Dragging a Hyper-Reference to a New Location”. for an example).
In this section, you are going to modify the capacity of the output lines of a node so that it equals the capacity of its input lines.
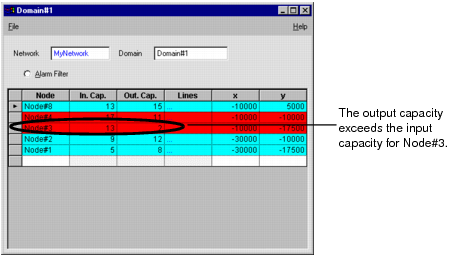
1. Open the Domain Nodes panel for Domain#1.
Figure 5.17 Modifying Cells in a Row
You can see that Node#3 appears in red, meaning that its input capacity exceeds its output capacity.
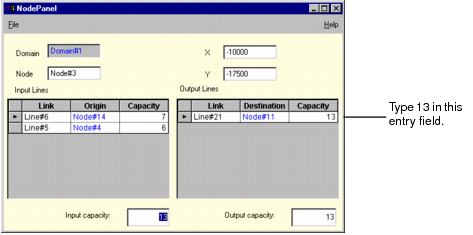
2. From the Domain Nodes panel, open the Node panel for Node#3 by double-clicking on the dots at the intersection of row Node#3 and column Lines.
The Node panel displaying information on Node#3 appears.
Figure 5.18 Displaying Changes in Node Panel
3. In the Capacity column of the Output Lines table, type 13 and press Enter to increase the output capacity of the node up to its input capacity.
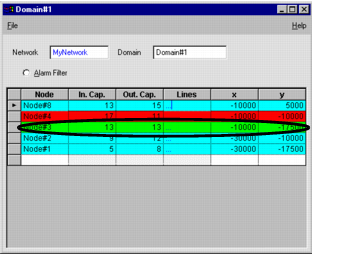
In the Domain Node panel, the color of the Node#3 cell changes to green to indicate that now the load is balanced and the output capacity reflects the value you have just entered.
Figure 5.19 Displaying Changes in DomainNodes Panel
Summary
Now you know how to run the predefined client application swcomp with the Network application.
In the next chapter, you will learn step by step how to design your own server object model.
Version 5.8
Copyright © 2014, Rogue Wave Software, Inc. All Rights Reserved.