Filling the Properties Data Source Table with Values
So far, we have examined the contents of the Main data source. Let us now turn our attention to the Properties data source.
This data source table lets you define properties that apply to its associated server class,
Network. These attributes will be accessible from the
application component without being inserted into the Main table. An example of this would be to put the network name into the Properties table so that it can be attached to a label in the application component.
If you take a look back at the Network panel (see
Figure 8.1), you can see that it contains an entry field that displays the name of the current network. This name is a property that is attached to the representation of the network, unlike the attributes we defined earlier, which belong to the representation of a domain and are used to fill rows of the Main data source.
To be able to display the name of the current network, you have to place its identifier in the Properties data source as follows:
1. If you have not already done so, double-click on the Server Data Source icon in the Main window to display the Server Data Source inspector.
2. Click on the Properties tab in the notebook to bring it to the foreground.
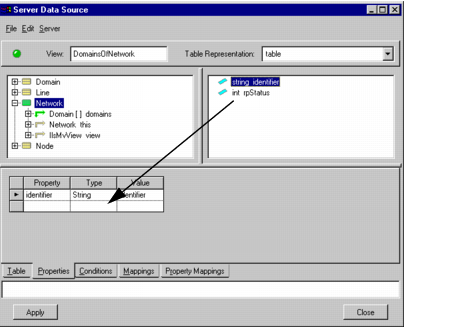
The Properties data source table has three columns (see figure on the next page). The Value column contains the property’s value and the Type column its type. The Property column is the name that will be given to the column in the Properties data source. This data source will allow you to attach this identifier to a data source-aware gadget at a later time.
3. In the top pane of the inspector panel, click on the Network class name or icon.
The class name is highlighted in blue and its related data members are displayed in the top right pane.
4. From the top right pane, drag identifier and drop it into the empty row in the Properties table.
You can see a ghost string identifier placeholder (or a dashed outline on Windows®) as you move the pointer.
5. Click Apply.
The Properties data source table should now look like this:
Figure 8.19 Dragging an Identifier Attribute to the Table Notebook Page
Version 5.8
Copyright © 2014, Rogue Wave Software, Inc. All Rights Reserved.