Filling the Main Data Source Table with Values
In the previous section, you created a table representation, which means that you created two data source tables. As you can see, these tables are empty. The Main data source table, called DomainsOfNetwork::table, represents a network with its associated domains appearing as rows in the table.
This section describes how to fill it with values. See
“Filling the Properties Data Source Table with Values”. to learn how to fill the Properties table.
The Main data source table is composed of two kinds of representation objects: the table itself, and its associated rows. In this example, the table represents a network and the rows represent the domains owned by the network.
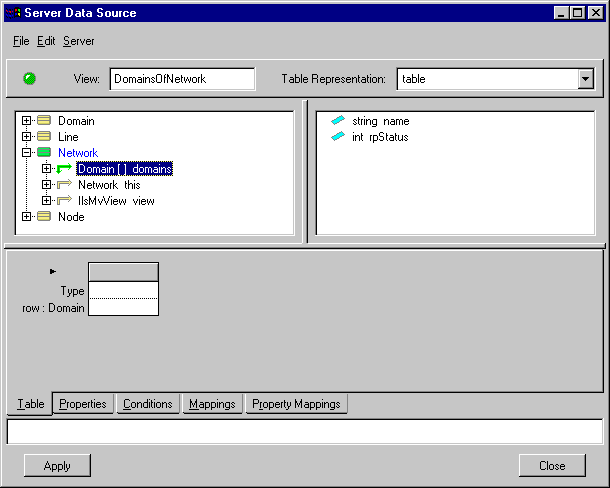
Each representation object contains a list of typed attributes. The table data source lets you specify the attributes for each table row. As shown in the figure below, this table contains an empty column into which you can drop items when filling the table.
Figure 8.11 Empty Column Available in Table Notebook Page
Each column in the table represents a column in the Main data source. The row labeled Type specifies the data type of the entry for the given column. Each column in the table contains the data related to one server object attribute. If a column is too narrow, you can resize it by dragging the column delimiters.
Editing a Table To resize a column in a table: Position the cursor on a column delimiter. The cursor changes to a double arrow. Drag the column delimiter right or left to resize the column. To remove a column: Click on the column header to select the column and press Delete. A message box prompts you to confirm your action. Note that in some tables, the columns cannot be deleted. To remove a row: Click on the box to the left of the row you want to delete to select it and press Delete. An alert message asks you to confirm deletion. Note that in some tables, the rows cannot be deleted. To change a coIumn name: Tables where the column name is defined by the application, such as in those of the Table page, double-clicking on the column header displays a dialog box that allows you to change the column name (see Step 3 below for instructions). To add a column to a table: Click on the arrow on the top left corner of the table or click on a cell with the right mouse button and select Add Column from the context-sensitive pop-up menu (if the table allows columns to be added). |
Adding Columns by Dragging and Dropping Attributes
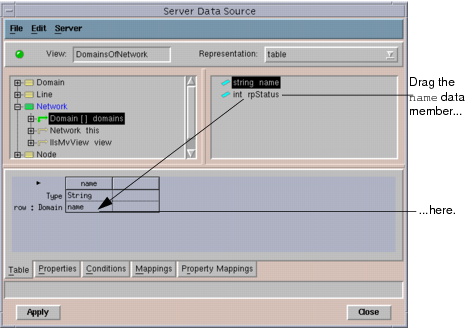
If you take a look back at the Network panel we presented in
“Creating the Network Panel”., you will see that the first column of the table displays the names of the network domains. Therefore, the first attribute we are going to put into the table data source is the domain’s name.
1. In the top pane of the inspector panel, the relation domains of Network should be selected.
If not, you can either select it manually or re-select “table” in the Table Representation combo-box at the top right of the inspector panel to select the relation. You should now be able to see the Domain class attributes in the top right pane.
2. Drag the attribute name from the top right pane and drop it onto the empty column of the Main table in the bottom pane of the inspector panel.
You can see a ghost string name placeholder (or a dashed outline on Windows®) following the pointer as you move it.
Figure 8.12 Dragging an Attribute to the Table Notebook Page
Note that when you drop an attribute into the empty column, the table automatically adds a new empty column. This way, you can drag several attributes, one after the other, without having to add a new column manually each time.
By default, the attribute you dragged is inserted as the column title —in this example, name. If you want the column name to be “Domains”, you can change it as follows.
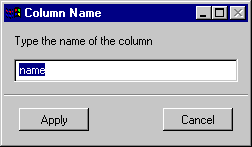
3. Double-click on the column header, or click on the column header with the right mouse button and choose Change Column Name in the context-sensitive pop-up menu.
The Column Name dialog box appears as shown below.
Figure 8.13 Changing the Name of a Column
4. Type Domains in the text field and click Apply to change the column name.
As we have just seen, attributes can be simple values. They can also be hyper-references.
A hyper-reference is the equivalent of a hypertext link which lets you open a view of the object it points to. The final Network panel contains hyper-references —represented by three blue dots— which point to views of the domain nodes and lines. Since the views these hyper-references are linked to have not been created yet, we replace them by character strings for the moment. An example of a hyper-reference is given in
“Creating a Hyper-Reference to the Network Panel”..
Adding Columns Using the Arrow Icon
In the above procedure, you added columns to your data source table by dragging new attributes. The following steps describe another method.
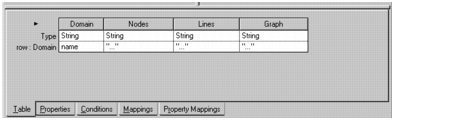
1. Select the empty column and change its column header to “Nodes” as explained in Step 3 above.
2. Click on the empty Type row and select String from the pull-down menu.
3. In the row labeled “row:Domain”, type "..." (include the quotation marks).
4. Now add a new column by clicking on the arrow in the top left corner of the table.
5. Repeat steps 1 through 3 above to create a third column called Lines and a fourth column called Graph.
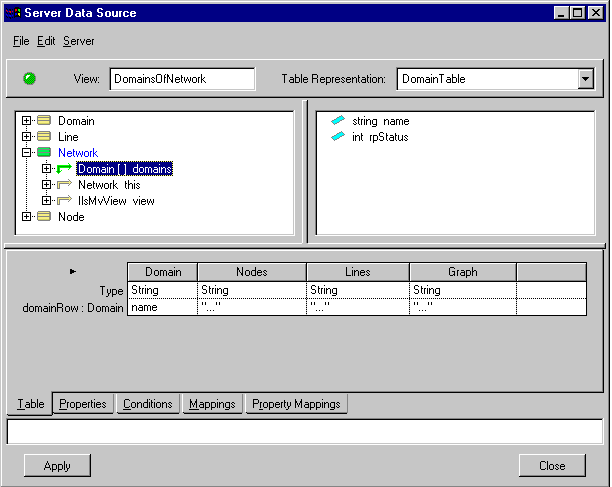
The table should now have the following appearance:
Figure 8.14 Adding Columns to the Table Notebook Page
Later when you are finished, the name of each domain and the character strings "..." will appear under the column Domains, Nodes, Lines, or Graph in the final Network panel.
6. Click Apply.
In the next section, you will learn how to link this data source to a table gadget.
Renaming a Table Representation
You are now going to rename the table Representation to domainTable:
1. Choose Table Representation Properties from the Edit menu to open the Edit Table Representation Properties dialog box.
2. Change the name of the table in the general section to domainTable.
3. Click Apply.
Renaming the Row Type
Next, you are going to rename the rows that reference this table:
1. Place the pointer on the row located on the left of the main table and press the right mouse button.
A contextual menu opens.
2. Select Edit Row Properties to open the Edit Row Properties dialog box.
3. Change the name of the row to domainRow.
4. Click Apply.
The table representation now appears as illustrated below:
Figure 8.15 Table Representation with New Row Name
Version 5.8
Copyright © 2014, Rogue Wave Software, Inc. All Rights Reserved.