Loading the Network Object Model
Once the Network object server is running (see
“Starting the Network Server”.), you need to load the model to Rogue Wave® Server Studio before you can define views dynamically.
To load a server object model, you use the Server Data Source. The Server Data Dource is available as an icon from the Server palette. It lets you establish a connection with any server object model currently running and load it to define views of that model at runtime.
To load the Network object model:
1. Click on the Server item in the top left frame to display the Server palette.
The contents of the Palettes window changes as reflected in the illustration below.
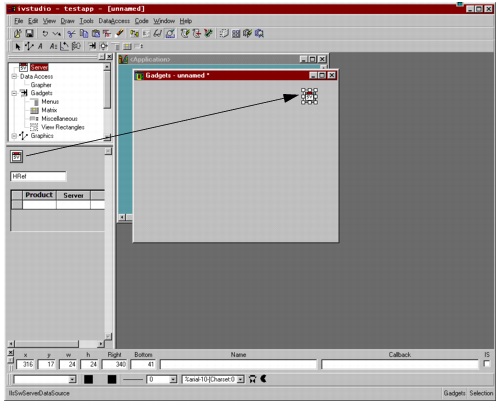
2. Drag the Server Data Source icon from the Server Palette to the Main window and double-click on it.
Figure 8.5 Dragging the Server Data Source Icon to the Main Window
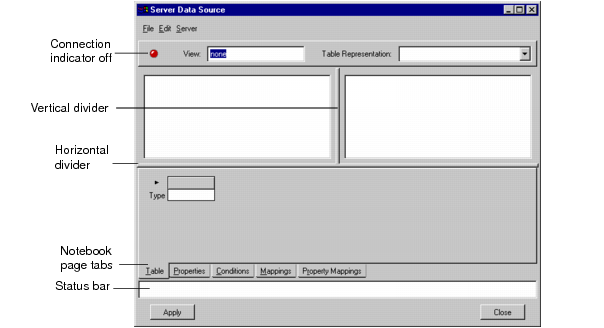
The Server Data Source inspector appears.
Figure 8.6 Empty Server Data Source Inspector
This inspector is divided into two panes and has a menu bar whose items are described in the box “Inspector Menus” on the next page. You can find more information about the inspector in the User’s Manual.

The top pane is split into two sections and displays the server object model.
The bottom pane is divided into five notebook pages. You bring any page to the front by clicking on its name tab. This is where you drag the server classes you want to map to a graphic representation through a view.
You can rescale the relative size of the top and bottom panes by dragging the horizontal divider up or down.
The status bar displays various messages as you work. You can also trace these messages by choosing Show Log from the File menu and scrolling the list in the log window.
Inspector Menus File Menu Load Model from file—Loads a server object model that was saved to a file. Save Model to file—Saves a server object model to a file. Show Log—Displays the log file of the inspector panel. Save Log—Saves the log file on the disk. Close—Closes the inspector window. Edit Menu Session Properties—Displays a dialog box in which you can edit the properties related to the current session. Table Representation Properties—Displays a dialog box in which you can edit the properties related to the current table representation. View Properties—Displays a dialog box in which you can edit the view properties related to the current view. Delete Representation Tables—Deletes the table representations created in the inspector panel. Server Menu Load Model—Loads a server object model. Update view on Server—Notifies the server about a new view. Show all classes—Makes any hidden classes in the model pane visible. Disconnect—Disconnects the inspector from the server. |
3. Choose Load Model from the Server menu in the Server Data Source inspector.
The Connect to Server dialog box appears as shown below:
Figure 8.7 Connecting Model to Server
4. Type my_network in the Server text field if that name is not already highlighted.
If Rogue Wave Server Studio is not running on the same machine as the server object model, press Tab to select the Host text field and type the name of the machine on which the server object model is running.
5. Click OK.
The Network object model appears in the left section of the upper pane of the inspector panel and the connection indicator (red circle below the File menu) turns green.
Figure 8.8 Connecting to a Server Object Model
The grey table on the next page describes how the Network object model appears once loaded in the Server Data Source inspector.
Description of the Model in the Server Data Source Inspector |
The Network object model appears as a tree gadget in the top left section of the Server Data Source inspector. Classes in the model are represented by rectangular icons and are preceded by a plus (+) sign. Clicking on a class name or on its icon displays the related entry data members and derived data members in the top right pane of the inspector. A lock icon to the left of a class data member means that the data member is read-only.  Figure 8.8 Displaying the Data Members of a Class A plus (+) sign to the left of a class means that this class can be expanded to show its relations. This plus (+) sign changes to a minus (-) sign once the class has been expanded. 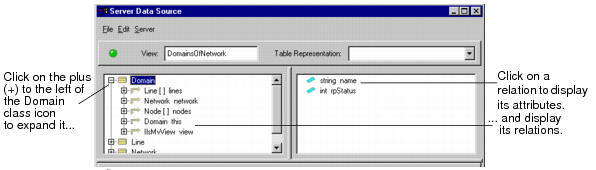 Figure 8.8 Expanding a Class to Show its Relations A square bracket ([ ]) before a relation indicates that this is a one-to-many relation (for example, a domain owns several lines). A double-headed arrow before a relation means that this relation has an inverse relation. You can traverse the relations of a class by expanding the relations. In this way, you can follow complex paths. For example, you can click to the plus (+) sign before the relation lines under Domain to follow the relation lines. Using the tree gadget, you can thus navigate through the object structure. Each time a relation is selected, the attributes of the class that the relation points to are displayed in the right-hand pane. In this manner, you can select attributes in the right-hand pane that are owned by a complex path in the model. Most of the items in the model pane have a context-sensitive pop-up menu which can be accessed by clicking on the item with the right mouse button. For example, to hide a class in the model pane, click on the class with the right mouse button and select Hide Class in the pop-up menu. |
Version 5.8
Copyright © 2014, Rogue Wave Software, Inc. All Rights Reserved.