Menus
Describes the menus of the JViews BPMN Modeler GUI.
Describes the contents of the File menu of the JViews BPMN Modeler GUI.
Describes the contents of the Edit menu of the JViews BPMN Modeler GUI.
Describes the contents of the View menu of the JViews BPMN Modeler GUI.
Describes the contents of the Options menu of the JViews BPMN Modeler GUI.
Describes the contents of the Help menu of the JViews BPMN Modeler GUI.
Describes the contents of the Document toolbar in the JViews BPMN Modeler GUI.
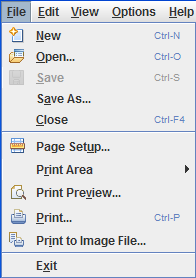
The File menu
Use this menu to create a new document, open, close, or save a document, define the printing parameters, and exit the application.
The File menu
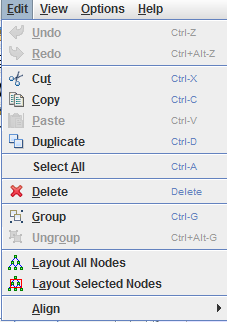
The Edit menu
This menu provides basic editing commands such as Copy, Paste, and Delete. There are also other commands, which are described in more detail in this section.
The Edit menu
Group and Ungroup
The Group and Ungroup commands are useful for creating ad-hoc subprocesses from tasks and other elements in your diagram:
-
The Group command creates a subprocess and moves the selected objects into this subprocess.

Before grouping

After grouping
-
The Ungroup command extracts the elements of a subprocess. It places them in the parent of the subprocess, and deletes the subprocess.
Layout All Nodes
This command arranges the entire diagram to remove overlaps and to provide an easy-to-read diagram. The function is particularly useful in the following circumstances:
-
During prototyping, when it enables you to add new elements without needing to move nodes manually.
-
When complex processes are loaded from a business process management system. In this case, there is often no graphics information within the process, and they would appear visually disorganized without the graph layout.
-
When you are working with complex diagrams. Simple diagrams may give better results when arranged manually.
Before performing a Layout All Nodes operation, you may sometimes need to set the Automatic Link Layout option to OFF. See The Document toolbar.
The figures Before automatic layout and After automatic layout show a Layout All Nodes operation.
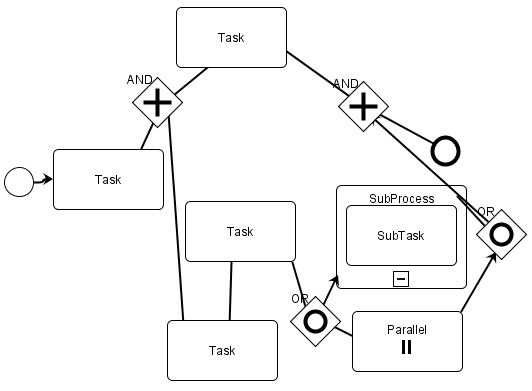
Before automatic layout
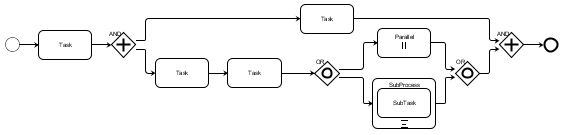
After automatic layout
Layout Selected Nodes
This command lets you arrange selected objects without moving unselected objects. This is useful when you have manually arranged a portion of the diagram, and you want the system to automatically arrange another portion.
You have to keep the Automatic Link Layout option set to ON during this operation. See The Document toolbar.
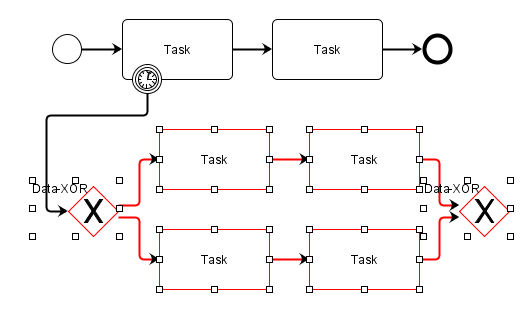
Layout Selected Nodes
Alignment
This menu gives access to a list of alignment commands that you can use to arrange nodes manually. They are complementary to the automatic layout commands. See Layout All Nodes and Layout Selected Nodes.
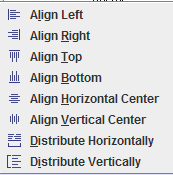
The Alignment options
The View menu
The View menu gives access to:
-
Commands for zooming in or out, and for resetting the initial zoom level.
-
Alternative views of the diagram information. They are described in more detail in this section.

The View Menu
Tree View
The Tree View displays the elements of the diagram as a tree. Objects selected in the Tree View are also selected in the Diagram View. Subprocesses are displayed as branches that can be expanded or collapsed.
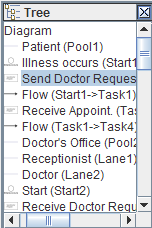
The Tree view
Properties view
The Properties View displays the properties of the selected object.

The Properties view
You can use this view to:
-
Change property values, for example, to set the names of the activities.
-
Remove a property for a selected element of the diagram. Removing pre-defined properties should be done carefully as it may have an impact on the diagram meaning and representation.
-
Add new properties to the selected element of the diagram; see the following figure. The property is saved in the XML document.
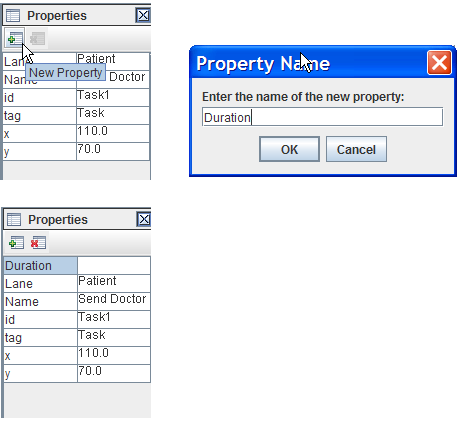
Adding a new property
Overview
The overview window displays an entire diagram. A rectangle with resizing handles represents the area displayed in the Diagram View. When moving the rectangle or when resizing it, you can zoom-in, zoom-out, and pan in the Diagram View.
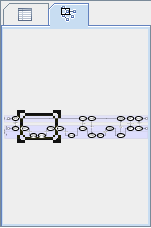
The Overview
Table View
The Table View displays the elements of the diagram and their properties in a table. The Table View provides a filter that allows you to display only those elements that match a certain type.

The Table view
The Options menu
The Options menu contains action, editing, and display options.
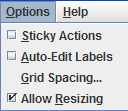
The Options menu
It allows you to define the following options:
Sticky Actions
When this option is ON, the last command remains active until a new command is triggered. This is useful when performing repetitive commands.
When this option is OFF, the modeler brings back the Select command after each action.
Auto-Edit Labels
When this option is ON, you are asked to enter object labels (for instance the name of a task) as they are added to the diagram.
When this option is OFF, the labels are edited either through the Properties View (see Properties view), or by selecting the Edit Label command (see The Document toolbar).
Grid Spacing
This option allows you to change the grid spacing. The grid is set ON/OFF through the Grid option on the View menu. See The View menu.
Allow Resizing
When this option is ON, the elements of the diagram can be resized manually. The selected objects are displayed in a selection rectangle with resizing handles.
When this option is OFF, the size of the elements of the diagram are automatically determined to ensure that the label text fits the elements. Subprocesses cannot be resized manually; their size depends on the size and position of their elements.
The Help Menu
The Help menu displays information about the JViews BPMN modeler. If you use the online version of the modeler, the Help menu also gives access to this documentation, and to a series of Web pages where you can obtain additional information.
The Document toolbar

The Document toolbar
The Document toolbar includes the following commands:
-
Create, Open, Save, and Print a diagram.
-
Undo/Redo.
-
Group and Ungroup commands, see Group and Ungroup.
-
The graph layout commands, see Layout All Nodes and Layout Selected Nodes.
-
Automatic Link Layout. This command routes the links to reduce the number of crossings between links. The command is useful when you add a new link, when you move a node that is linked, and when you do not want to re-layout all the nodes.
You may get better results by setting this option to OFF when performing the Layout All Nodes command. See Layout All Nodes.
-
Edit Label. This command lets you edit the label of the object that you select. To do this, click the Edit Label button, then select the object.
-
Hide/Show Property Sheet. This command allows you to hide or show the properties of the object that you select.


