Defining a Named SQL Session
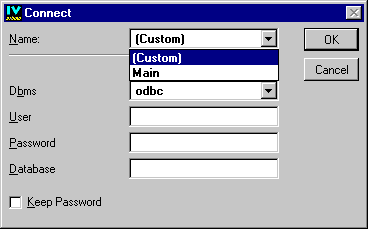
The application in this tutorial will use several data sources, all using the same SQL session. You are now going to define this application-wide SQL session, giving it a name. The following figure shows how the name of the selected SQL session (“Main”) appears in the Name combo box menu of the Connect panel when you have finished defining it.
Using the Connect panel, you will be able to select a name in the combo box to establish an SQL session between the application and the database. For more information on SQL sessions, see
SQL Session: Communication Channel Between the Application and the DBMS on page 24.
To define a named SQL session, do the following:
1. Choose SQL Application Properties from the DataAccess menu.
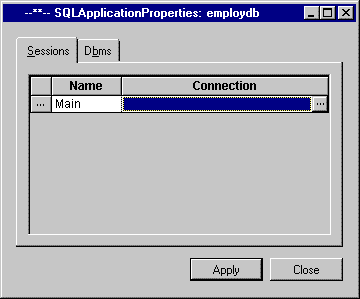
The SQL Application Properties panel appears.
2. If the Sessions notebook page is not active, click it and type Main in the Name field.
3. Click the Connection field, then click the Connection button

that appears on the right.
Note: The “--**--” characters appear in the title bar until you click Apply. |
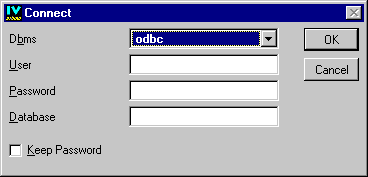
The Connect panel appears.
4. Enter the connection parameters. These parameters depend on the DBMS being used. You can activate the Keep Password button to save the password with the application. Otherwise, you are prompted for the password in the next application session. Click OK.
The Connect panel disappears and the parameters, prefaced by the database system name, appear in the Connection field of the SQL Application Properties panel.
5. Click Apply in the SQL Application Properties panel.
The named session is validated and a new row appears for defining another named SQL session, if desired.
6. Click Close to close the panel.
Version 6.0
Copyright © 2015, Rogue Wave Software, Inc. All Rights Reserved.