Using Parameters to Link Data Sources
You are now going to use the Parameters notebook page to link the EMP_DS and DEPT_DS data sources so that only employees for the current department are listed. To do this, follow these steps:
1. In Selection mode

, double-click the EMP_DS SQL data source gadget in the Main window.
The SQL Data Source inspector for the EMP_DS data source appears.
2. Click the Parameters page to make it active. Fill in the table cells as shown below:
The table can be read as follows: the parameter the_dept of type integer matches the DEPTNO column of the DEPT_DS data source.
You can now use the parameter the_dept as criteria for selecting employees from the I_EMP table.
3. Click the Select page in the SQL Data Source inspector. Type the parameter in the Where row of the DEPTNO column like this: = :the_dept
Note: Always preface a parameter with a colon without a space. |
4. If necessary, adjust the size of the DEPTNO column.
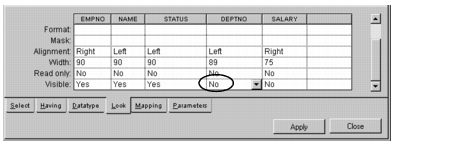
5. You will no longer need to have the DEPTNO column visible in the I_EMP table since all the employees selected will be in the current department displayed in the form field.
Click the Look page in the SQL Data Source inspector. Change the Visible cell of the DEPTNO column to No.
6. For this operation to work, you need to set the automatic selection of items for data sources using parameters to refer to items in other data sources.
Choose Properties... in the File menu of the SQL Data Source inspector.
The SQL Data Source Properties panel appears.
7. In the SQL Data Source Properties panel, change the Auto select field from No to Yes. Click OK.
The SQL Data Source Properties panel disappears.
8. Click Apply in the SQL Data Source inspector. Click Close.
The SQL Data Source inspector disappears.
9. In Active mode

, click the
@ button in the Main window to go to the first record (Department 1) of the DEPT_DS data source.
Only those employees in Department 1 are displayed in the I_EMP table.
10. Click the > button to go the next record in the DEPT_DS data source.
Only those employees in Department 2 are displayed in the I_EMP table.
11. Save the Employee window by clicking the Save button

in the Main window. Give it the name
employee.ilv and save it in the directory in which you saved the
.iva application file.
Version 6.0
Copyright © 2015, Rogue Wave Software, Inc. All Rights Reserved.