Adding a Menu Bar to the Window
To add a menu bar to the Control window, do the following:
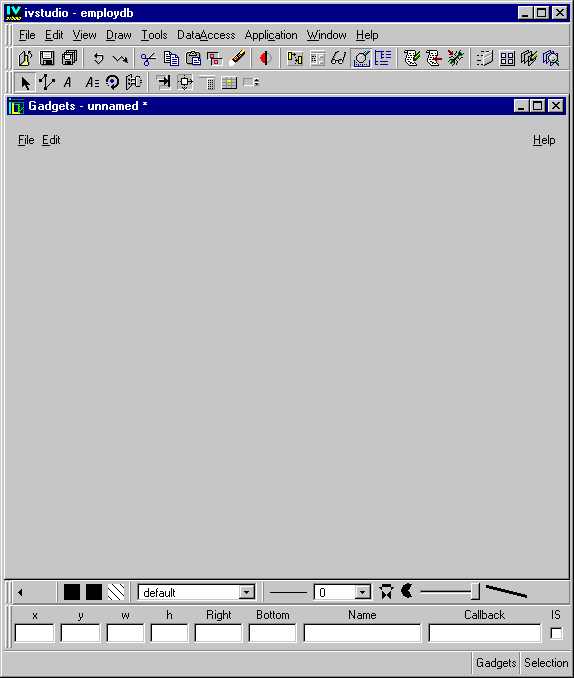
1. Choose New > Gadgets from the File menu in the Main window.
An empty Gadgets buffer window is opened ready for editing.
Note: If your dpmaxsal.ilv buffer is still open, minimize it in the Main Window. |
2. In the upper pane of the Palettes panel, click Menus under Gadgets.
3. Drag the menu bar gadget from the Gadgets palette and drop it in the Gadgets buffer window in the Main window, leaving it selected.
The menu bar automatically positions itself at the top while taking on the width of the window with default attachments.
4. Use the mouse to resize the panel so that its size corresponds more or less to that of the following figure:
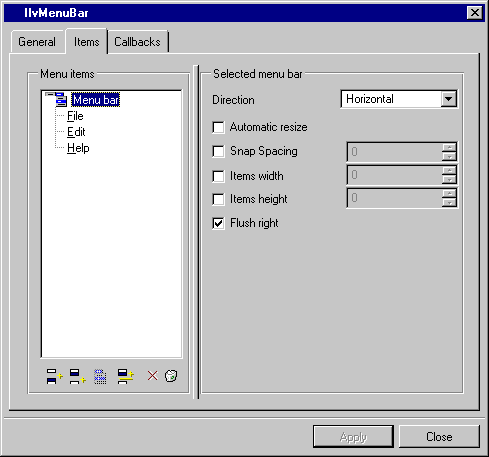
5. Double-click the menu bar gadget you just placed in the work space.
The IlvMenuBar inspector appears.
Note: Until you click Apply in the inspector panel, your actions do not affect the menu bar in the work space. |
6. Go to the Items notebook page. Click the Flush right toggle switch to deactivate it.
The Help menu item moves to the left. When activated, the Flush right toggle switch places the right-most item on the menu bar at the right margin, which you do not need in this example.
7. In the Menu Items tree gadget on the left side of the page, click Help to select it. Then click Remove button

under the tree gadget.
The Help item is removed from the menu bar.
Note: When you want to insert a new item, select the item in the menu bar of the inspector panel before which you want the new item to be inserted and then click Insert. If no item is selected, the item is added to the bottom of the list of items in the tree gadget in the Menu Items box. |
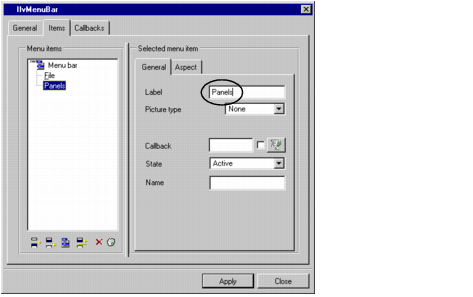
8. In the Menu Items tree gadget, click Edit to select it. You are going to change the label of this menu item from Edit to Panels. In the Selected menu item box on the right side of the Items page, type Panels in the Label field. Notice that the label in the tree gadget on the left changes as you type.
Leave the File menu item as it is.
Note: If you use an ampersand (&file, &menu_file), you make the item a variable for multilingual applications. By using the Message Editor, you can localize your window into different languages. You access this panel by choosing Messages Editor from the Tools menu. You will not be using this feature in the example. |
9. Click Apply.
The menu bar in the Gadgets buffer changes. It now has the two menu items you want for your application, File and Panels.
Version 6.0
Copyright © 2015, Rogue Wave Software, Inc. All Rights Reserved.