Joining Two Tables
You are now going to do a join operation, which allows the display of data in one or more columns from multiple tables. A join operation connects two columns in different tables. Depending on the type of join operation used, you can specify the way in which rows are displayed from the two tables.
The following procedure will join the I_EMP and I_DEPT tables so that the DEPTNO cell of the I_EMP table is matched to the DEPTNO cell of the I_DEPT table. By default, an inner join is created. This means that for each employee who is in a department that is referenced in the I_DEPT table, you will display:

From the I_EMP table: the employee number, name
From the I_DEPT table: the employee’s department name and manager
To join the DEPTNO columns of the I_EMP and I_DEPT tables, do the following:
1. In Selection mode

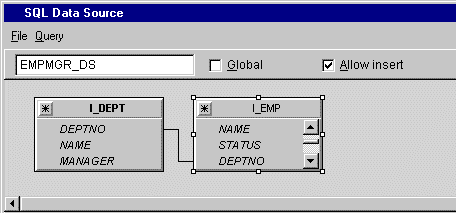
, click the EMPMGR_DS SQL data source gadget to make the SQL Data Source inspector appear.
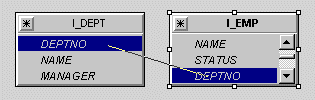
2. In the FROM section of the SQL Data Source inspector panel, drag a line from the DEPTNO label of the I_EMP table to the DEPTNO label of the I_DEPT table:
The FROM section now looks like this:
If you made a mistake, you can click the join line to select it, then choose Delete Join... from the Query menu of the EMP_DS SQL Data Source inspector. Alternatively you can use the Delete key to remove the selected join.
By default, an inner join is created. This is the type of join that we require. However, if you wish to check the join type, double-click the join line and the Edit Join panel is displayed.
3. Click Apply in the EMPMGR_DS SQL Data Source inspector panel to validate the join operation.
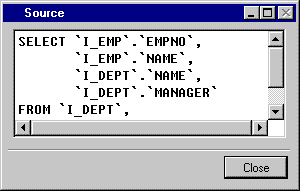
4. To view the SQL source file that reflects the operation you just performed, choose View Source... in the File menu of the EMPMGR_DS SQL Data Source inspector:
Click Close in the Source panel when finished with it.
5. Click the Active button

in the Main window, select the I_EMP table gadget and press the F9 key.
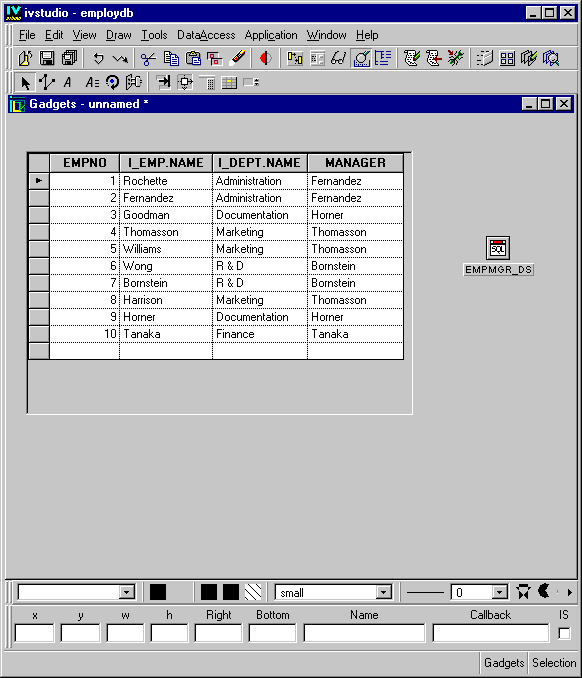
The table gadget is updated.
6. Adjust the size of the window. Resize the columns by placing the cursor on the line in the header row between the columns to be resized and dragging.
The Employee Manager window now looks like this:
Note: Since a column called NAME appears in both tables, Data Access automatically adds the title of the table from which these columns came as a prefix to the column headers, thus distinguishing them from one another. |
Version 6.0
Copyright © 2015, Rogue Wave Software, Inc. All Rights Reserved.