
This section of the User's and Programmer's Guide will demonstrate the steps involved in creating a sample layout file. It will also show how the layout file can be integrated into your application. For more information about relating particular Objective Grid Designer functions to Objective Grid APIs, please refer to the Objective Grid Designer help file (ogdesign.chm).
Objective Grid Designer is a tool that allows you to design the layout of a grid and save this layout into a file. This layout can be loaded at run time in order to initialize grids in your application.
For example, if you are designing a dialog with a grid where the user will enter data, you can specify the initial cell contents, parameter object settings, row heights, and column widths with Objective Grid Designer. This layout can be loaded into your grid with one API call. There is no need to specify the grid formatting with code.
You can also use a mixed approach where you load a layout and still apply certain formatting with code.

There are three essential components in the Objective Grid Designer interface.
Grid View - This is the main component, which uses a WYSIWYG model. This grid reflects the grid that will be created when you use the layout file in your application. The Objective Grid Designer does not make a distinction between run time and design time when designing a layout. If you specify a block of cells as read-only, those cells will be read-only in the Grid View. In order to make changes, you will have to turn the read-only flag back off. This important to keep in mind as you are designing your layout.
General Settings - The second component is the property page for general settings. General settings are settings that are applied to the whole grid.
The property page has the following categories:
Data. Use the data property page to set the row count (for example, to 20 rows) and the column count (for example, to 40). You can also set the number of frozen rows and frozen columns with this property page. Note that the grid view updates immediately to reflect the changed grid interface. On this page you can also set header-specific details and whether the row and column headers should be numbered.
User Actions. The user actions page is very interesting since it controls many aspects of how the user will interact with the grid. This interface can be very useful in usability testing of your grid interface. You can put the user right there in front of the grid and configure the grid to suit their needs. You can specify whether the grid should support rearranging columns, allow rows and columns to be resized, and set the minimum size of row and columns, among other things. Try changing the settings and interacting with the grid. Note that you can also specify whether the grid should add support for sorting. The setting is located at the bottom of the page.
Selection. It may be difficult to decide which of the various selection modes that your grid interface should support. You should take the time to select each and every option on this page to see how the grid interface interacts with this setting. This will give you a good feel for the various selection interfaces that the grid supports. It will also give you a good feel for how best to customize this to suit your needs. Also, there is support for some specific Excel emulation features that have been added. You should try all of these to see if there is some setting that your application must have! Another important aspect of this page is that it supports setting the grid into list box mode. You can choose between multiple and single selection list box modes.
It is an interesting exercise to check how the grid list box modes interact with the selection modes. There is no end to the amount of prototyping that you can do with Objective Grid Designer!
Sheet. Once you are content with the settings for the selection page, move to the next page, the sheet page. The sheet page also has several interesting features, including support for merged cells and floating cells. There is another important member in this page that you should check out and that is the Undo/Redo buffer size. You should look at optimizing this value. If you have memory constraints then you should look at the size of the Undo/Redo stack that is correct for your applications. And what better way to test this than with the Objective Grid Designer?
You can also try out other interesting attributes, such as 'Eat First Mouse Click', and the default CGXComboBox height.
Display. The display property page can be used to change the color of the grid lines, the tracking lines, and dragging lines, among other aspects of the grid. You can also specify whether these lines should be displayed or not.
Printing. The printing section specifies all settings related to the printer. You can change the settings and then choose print preview from the main grid frame to get instant feedback on how the layout will appear when printed.
Formula Engine. The formula engine lets you change formula engine-specific settings like recalc mode, or toggling the display of formulas in cells.
Cell Attributes - The cell attributes property page lets you change the attributes of the current cell or the currently selected group of cells. These settings allow you to customize each aspect of the grid.
Most of the attributes that are on this page are self-explanatory. Some of the more arcane aspects for a beginner include the role of user attributes and the architecture of how they fit into the grid framework.
Step 1: Start the Objective Grid Designer. You can find the Designer in the root directory of your Objective Grid installation. The Objective Grid setup program also adds a Designer icon to the program group.
After launching the Designer, you need to select the type of layout that you want to create from the New dialog. For purposes of this tutorial, choose the first option, Layout.
You will see the Objective Grid Designer and the property pages window.
Select a couple of cells and choose the cell type to be a spin edit control. You can use the cell type attribute on this page to set the type of control.
Once you have done this, scroll down the page a bit and you will see two user attributes: spin-bound max value and spin-bound min value. Set these to 100 and 10, respectively.
You will observe that the spin edit control now validates the input in the cell between these two boundaries. It 'knows' about these user attributes and always checks to see if they have any meaningful values and acts accordingly.
Similarly, several other controls have user attributes. These user attributes are presented on the page and can be used to control several aspects of the related controls. Remember user attributes pertain only to one control. Spin bound max value will validate only a spin control and not say, an edit control.
You are now ready to create a fully functional grid program that uses the MFC Document/View architecture without writing much code!
Step 2: Open an existing grid project or create an new grid project (you can use the Stingray AppWizard that ships with Objective Grid to generate a generic CGXGridView-based MFC application. Otherwise, take a look at the 1stGrid tutorial for creating a starter application).
Step 3: The layout file should be copied into the RES subdirectory in your project directory. Next, you have to manually edit the .RC2 file in your application and insert a reference to your layout file.
//
// 1STGRID.RC2 - resources Microsoft Visual C++ does not edit directly
//

#ifdef APSTUDIO_INVOKED
    #error this file is not editable by Microsoft Visual C++
#endif //APSTUDIO_INVOKED


///////////////////////////////////////////////////////////////////
// Add manually edited resources here...

LAYOUT1                 GXLAYOUT DISCARDABLE    "RES\\Layout1.OGL"
|
Binary resources must have the resource type "GXLAYOUT". Otherwise, CreateFromResource will not find the resource in your resource file.
Step 4: Next, you have to manually edit the OnInitialUpdate() routine of your grid view class and load the parameter object from the binary resource with the following code:
CGXGridParam* pParam =
    CGXGridParam::CreateFromResource(IDR_GXLAYOUT1);
void C1stGridView::OnInitialUpdate()
{
    BOOL bFirstView = FALSE;

    if (GetDocument()->m_pParam == NULL)
    {
      bFirstView = TRUE;
        // bFirstView = TRUE indicates that
        // this is the first view connected
        // to the document and therefore the
        // data must be intialized.

      // construct parameter object
      // CGXGridParam* pParam =
                   CGXGridParam::CreateFromFile(_T("RES\\LAYOUT1.OGL"));
      // CGXGridParam* pParam = CGXGridParam::CreateFromResource(_T("LAYOUT1"));
      CGXGridParam* pParam = CGXGridParam::CreateFromResource(IDR_GXLAYOUT1);

      // if load failed, create empty object
      if (pParam == NULL)
        pParam = new CGXGridParam;

      GetDocument()->m_pParam = pParam;
    }
    // else
      // bFirstView = FALSE indicates that this is
      // only another view connected to the document
      // No data need be initialized. It is
      // available in the document already.


    // pass the pointer to the grid view
    SetParam(GetDocument()->m_pParam, FALSE);
                               //     ˆ-- indicates document is
                          // responsible for deleting the object.

    // standard initialization, will create other objects
    // such as data object, stylesmap object, ...

    CGXGridView::OnInitialUpdate();

    // Just to be sure that everything is redrawn
    Invalidate();

    // Enable Objective Grid internal update-hint mechanism

    // You should make this line the last one
    // because as long as EnableHints is
    // not called, the modified flag
    // of the document will not be changed.

    EnableHints();
}
|
Step 5: Compile and run the application
There are some alternate techniques for loading the layout into the grid:
Loading the layout into grid windows embedded in a dialog
With CMyGridWnd, all you have to do is place a custom control in your dialog, specify CMyGridWnd as class name and enter the name of the binary resource (e.g. LAYOUT1) as caption text. CMyGridWnd then initializes itself automatically from the binary resource.
Use the static method CGXGridParam* CreateFromFile(LPCTSTR lpszFileName);
Give the name of the file and a new parameter object will be created from the layout file. The parameter object is roughly analogous to the document for the grid and the grid can initialize itself from the parameter object.
Your OnInitialUpdate() code would look like this:
CGXGridParam* pParam =
CGXGridParam::CreateFromFile(_T("Mylayout.ogl"));
|
Objective Grid Designer supports formula sheets. When you start the Designer, you will be presented with a choice of layouts. You will have to choose Layout Formula, the second choice, in order to operate the Objective Grid Designer in Formula mode. Once the Designer has been started in Formula mode, you can then enter formulas, as you want them to appear in your completed interface.
You will also notice that the general settings tab window has a formula-specific sheet. This tab is created only when the Objective Grid Designer is operated in Formula mode. Once you have added all the data (including any formulas) that you would like to display in your view, you can save the file. The file extension for formula files is .OGF.
If you have any regular layout files (.OGL) that you would like to convert to .OGF (formula) files, you should start the Objective Grid Designer in 'Formula Layout' mode. After the Objective Grid Designer has been started in formula layout mode (a default view will be created for you), choose Open OGL File from the File menu. Select the .OGL file that you want to open and the Objective Grid Designer will convert the data and display this file as an OGF view. (The original file will be left as is.) You can then choose save to save this file as a .OGF file.
You can save queries and the ODBC connect string as part of the data that gets stored in the layout file. To do this select, Layout ODBC when the Objective Grid Designer is started. You will be presented with a dialog that lets you type in the required SQL query. Once you have typed in the query, the ODBC DSN dialog will be presented to you asking you to select the data source. When you have selected the data source, you will be presented with a view of this query.
You can then proceed to change the settings for the columns. Please remember that with the browser grid, it is not possible to change individual cell settings directly; only column settings can be changed. If you wish to change individual cell settings, you will have to override OnLoadCellStyle().
You can change the query by choosing re-query. Please note that you cannot change the DSN for any view. You will have to create a new view to use a different DSN.
You can also attach foreign tables with the Designer. Simply select a column and then choose Database…Attach Foreign Table from the menu. You can then specify the query for the foreign table as well as details on the key column, the text to be displayed etc. This information will be stored when you save the layout.
When you save the layout and reopen the file, you can see that everything is initialized automatically.
Please note that Objective Grid has the functionality to store the schema of a database, however it does not initialize itself from this schema by default. To implement this capability in your derived views, please look at the sample gxquery or the Objective Grid Designer source code.
Special note for ODBC layout files:
The ODBC connect string that is stored when Access files are viewed with ODBC has a parameter named DBQ. (Please refer to the MFC/ODBC documentation for further information on this parameter.) This parameter contains the path name of the Access file. For example, if your path name were c:\test\stdreg32.mdb, then your connect string would have this embedded:
...;DBQ=c:\test\stdreg32.mdb;…rest of the connect string. |
If we were to use this connect string (from persistent storage), this would not work on another machine that has a different location for this file, even though this machine has the same data source registered. To work around this, we read the registry entry for this data source and get the DBQ string from there. We then replace this in the connect string. This only works for Access database sources. You will have to implement something similar to implement this support for other data sources. You can refer the gxquery sample or to the Objective Grid Designer source code for details on how this has been implemented for Access sources.
To answer this question, you need to understand what the Objective Grid Designer does. The Objective Grid Designer takes advantage of Objective Grid's support for serialization and writes all data that is entered at design-time into a binary file. This binary file is essentially CGXGridParam in a persistent state. Thereafter, the grid object in your application uses the serialization mechanism to read from this binary parameter object and initialize itself.
With the above in mind, it should be clear that the Objective Grid Designer can be used whenever a grid object needs to be initialized to some state. This same initialization can be achieved in code, but the Objective Grid Designer opens a path around the tedium of writing code for all the required calls.
What the Objective Grid Designer cannot do is to modify the behavior of Objective Grid (except through the properties that are already defined in a grid object). For example, the Objective Grid Designer can set the activation mode of cells to one of the predefined values. However, it cannot add code to pop up a dialog when the user performs a certain action. Whenever you need to enhance or override Objective Grid functionality, you go beyond the scope of the Objective Grid Designer. However, you can still use the Objective Grid Designer to lay out your grid object. The additional code needed to implement your special functionality should be added to your class.
The Stingray AppWizard is designed to help you create MFC applications that use the Objective Grid classes instead of the default MFC classes.
The interface of the Stingray AppWizard is identical to the Visual Studio AppWizard. You can use the Stingray AppWizard in the same manner as the regular AppWizard. We have added additional steps to customize your Objective Grid applications. The generated code will have a lot of sample code that may be used in ways that suit your needs.
You should see the Stingray Custom AppWizard appear when you choose the File|New|Projects menu from Microsoft Visual Studio.
Follow the normal steps when creating a new application, but choose the Stingray Objective Grid instead of the default MFC Application Wizard.
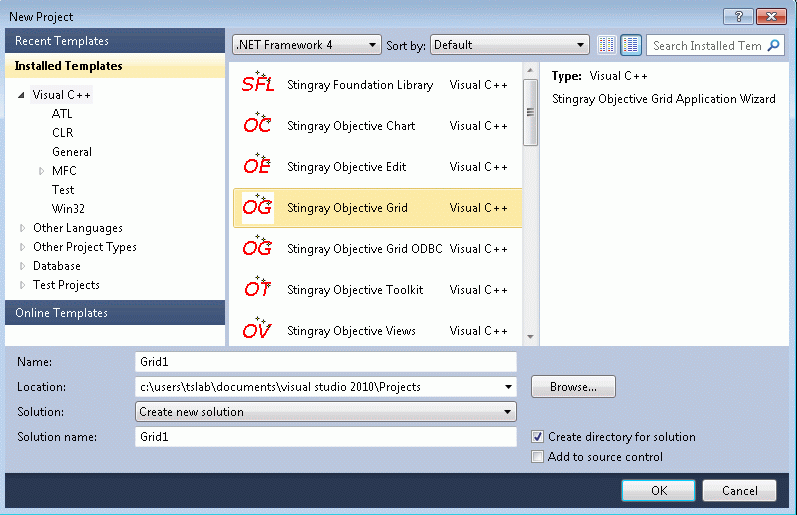
Select the options that you need as you would with any other AppWizard application. The interface is the same as the regular AppWizard.
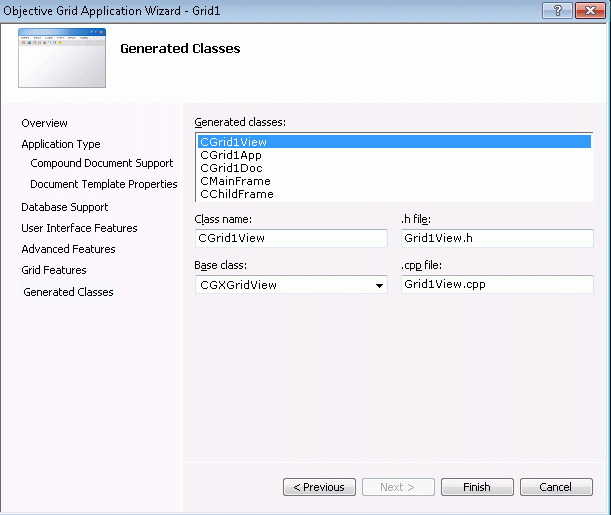
When you come to the page Generated Classes, change the base class of the view from the default CView to CGXGridView. This step is very important in order to have Objective Grid code generated. Stingray AppWizard will warn you if you do not choose CGXGridView. You may choose to have CView-specific code in which case you can ignore the warning.
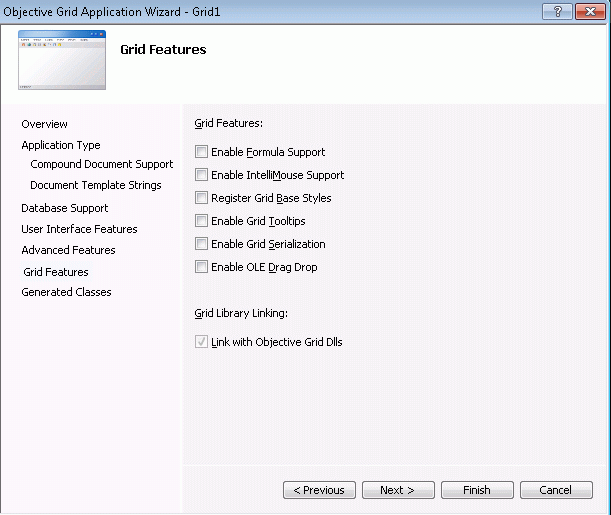
In the subsequent custom dialogs, select the Objective Grid options that you wish to include.
Once you click Finish, a complete project is generated that uses CGXGridView instead of CView. All Objective Grid-specific code needed for such an application is automatically added. We have also added extensive comments to help customize the application to your needs.
Simply compile the application and run it. You should see a complete Objective Grid application that is based on the document/view architecture.
The following points are important to keep in mind:
The wizard cannot be used to generate OLE-enabled applications. It also cannot be used to generate dialog-based applications that use the grid.
When data bound views are generated, formula support is disabled. Serialization support is enforced.
When generating a data bound view, do not include support for the database headers or select binding to any datasource. Select 'None' for the database support. The Stingray AppWizard will take care of doing this for you.
Copyright © Rogue Wave Software, Inc. All Rights Reserved.
The Rogue Wave name and logo, and Stingray, are registered trademarks of Rogue Wave Software. All other trademarks are the property of their respective owners.
Provide feedback to Rogue Wave about its documentation.