Using macros
HostAccess has a powerful macro facility which you can use to automate routine tasks. You can record a series of everyday task using HostAccess’s macro recorder, or you can create and edit macros manually using HostAccess’s Macro Language to automate almost any host task.
Macros can be automatically started to take the user seamlessly into the depth of the host application. You can setup automatic connections and much more.
The following sections summarise the macro language commands available to the user, and provides an example of how you can use the macro language to automatically logon to a session.
There are two ways of creating a macro in HostAccess. You can either write it from scratch, or you can use the macro recorder.
Recording a macro
The macro recorder records key strokes and left mouse button clicks. The following steps take you through the tasks typically needed to record a macro to automatically log on to a host.
-
Open or create a session.
-
Click the record macro button
 or select Macro, Record macro from the System menu.
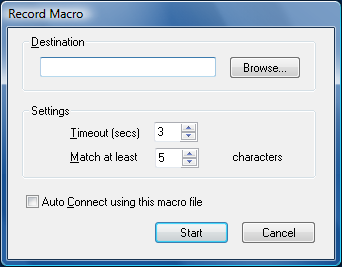
-
Type a file name in the Destination field, or select an existing file name using the Browse button.
The Timeout and the Match options are set at a default setting. You may need to increase the Timeout setting if you have a slow host. -
Check Auto Connect using this macro file box to enable it. If you are not recording a default logon script do not check this box. If you check the box, the macro file name will appear in the Session Setup AutoConnect dialog.
-
Select the Start button to begin recording. A toolbar is displayed:


Pauses the recording of the macro.

Stops the recording of the macro.
-
At the password prompt, you can either type in the password and press return, or you can choose to record the macro so that when the login and password prompt appears on the screen, the macro waits for you to type in the login and password and press the Return key. The advantage of choosing this second option is that the password will not be stored in the macro file. This is much more secure.
To record the macro so that you have to type the password in manually:
-
From the System menu, select Macro, Passthrough, type the password at the prompt, then press Return. Pressing the Return key has the effect of turning the macro recorder back on.
-
Once you are logged into the host you can either stop the macro recorder here, or you can perform any tasks which you always perform at the start of the session and that you would like to automate before stopping the macro recorder.
-
Stop the macro recorder by clicking on the stop button from the toolbar or by selecting Macro, Stop recording from the System menu.
-
Save the session. Next time you open the session it will automatically log you on to the host.
Pause
The pause option ![]() allows you to stop recording a macro temporarily and then restart it. This is useful in a situation where, for example, you are recording an auto connect macro. You want to record the password in the macro, but you can’t remember it. Clicking the Pause button or selecting Macro, Pause recording from the System menu at the password prompt will stop the macro from recording any time outs that may occur while you are finding out the password. Clicking or selecting Pause again will restart the macro.
allows you to stop recording a macro temporarily and then restart it. This is useful in a situation where, for example, you are recording an auto connect macro. You want to record the password in the macro, but you can’t remember it. Clicking the Pause button or selecting Macro, Pause recording from the System menu at the password prompt will stop the macro from recording any time outs that may occur while you are finding out the password. Clicking or selecting Pause again will restart the macro.
Passthrough
Using the Passthrough option in a macro (System menu, Macro, Passthrough) will prevent a character string up to a carriage return from being stored in the macro. When the macro is played back at the point where Passthrough was used, the macro will wait for you to enter a character string then a carriage return. When you enter the carriage return, the macro will continue.
Writing a macro
You can write a macro to automatically log you onto a host, or indeed any other tasks. The following steps take you through the steps needed to write an autoconnect macro which will log you automatically on to a host. You can adapt this for any macro.
-
Create a new session or open an existing one. Click on the AutoConnect tab in the Configure Session dialog, fill in the Username and Password fields then click on OK.
-
Select Macro, Edit macro from the System menu and type a macro name such as test.mcr. A dialog box saying “Cannot find the test.mcr file. Do you want to create a new file?” will appear.
-
Click on yes then type the macro below:
REM This is a macro for logging
REM automatically to the host.
GLOBAL USER, PASSWORD AS STRING
REM Send User from AutoConnect
SENDTERM USER, CHR$(13)
REM Delays for 2 seconds
DELAY 2
REM Send password from AutoConnect.
SENDTERM PASSWORD, CHR$(13)
END
-
Select Save from the File menu, then Exit.
-
Reopen the AutoConnect dialog and in the Run Macro on Connection field, type or select using the Browse button the macro that you just created. Click on OK then save the session.
Writing a macro - Example 2
This example takes you through the steps needed to create an AutoConnect macro which will prevent your login and password from being stored in the command stack.
-
Create a new session or open an existing one and enable the command stacker Select Macro, Edit macro from the System menu and type a macro name such as command.mcr. A dialog box saying “Cannot find the command.mcr file. Do you want to create a new file?” will appear.
-
Click on yes then type the macro below:
REM This is a macro for preventing
REM your login and password from being
REM stored in the command stack
REM Stop the login from being stored in
REM the command stack
PASSKEYS
REM Stop the password from being stored
REM in the command stack
PASSKEYS
END
-
Select Save from the File menu, then Exit.
-
Open the AutoConnect dialog and in the Run Macro on Connection field, select the macro that you just created. Click on OK then save the session.
Starting a macro
To run a specified macro:
Select Macro, Start macro from the System menu, or click on the start macro tool bar button ![]() . Select the file you want to start, then click on OK.
. Select the file you want to start, then click on OK.
Editing a macro
To edit a macro file:
Select Macro, Edit macro from the System menu. Find the file you want to edit, then click on OK. The macro will appear in a text editor.
Macro commands
The following macro language commands are available:
|
Command |
Description |
Example |
|---|---|---|
|
CALL |
Calls a (previously-defined) procedure. |
CALL SubProcedure() |
|
DELAY, DELAYTILL |
Delays a set number of seconds, or until a specified time. |
DELAY 5 |
|
DIM |
Declares a variable as INTEGER or REAL. |
DIM A AS INTEGER. |
|
DO (WHILE) ... LOOP |
Starts a program loop, continuing while the WHILE condition holds, exited when WHILE condition is fulfilled. |
LET A=10 DO WHILE A>=2 LET A=A-1 PRINT A LOOP |
|
END |
Stops a macro. |
|
|
EXIT |
Exits from the current loop or IF statement. For example, to exit a FOR loop. |
EXIT FOR
|
|
FOR ... NEXT |
Creates a loop of a specific duration. |
FOR i = 1 TO 10 |
|
GOTO |
Transfers control to a part of a program with a pre-defined label. |
L20: : PRINT A GOTO L20 |
|
IF ... THEN ... ELSEIF |
Specifies one or more actions to take if a condition is fulfilled. |
|
|
LET |
Assigns a value to a variable. Variables must be declared with DIM before being assigned. |
DIM A AS INTEGER LET A = 5 |
|
PASSKEYS |
Suspends macro processing to allow the user to enter keystrokes to the host. |
PASSKEYS |
|
PASSKEYSNOCR |
Suspends macro processing to allow the user to enter keystrokes to the host – does not send the final Enter to the host. |
PASSKEYSNOCR |
|
|
Prints a text message to the Host, or the session screen, or to the status bar. |
PRINT “HELLO” |
|
REM |
Used for code comments. |
REM This will automatically log you onto a host |
|
SELECT |
Selects alternative actions based on specified conditions. |
|
|
SENDTERM |
Sends text to the host. |
SENDTERM PASSWORD, CHR$(13) |
|
SEND, SENDWIN |
Sends special characters to the host, or to the currently-active Windows application. |
|
|
WAIT (TIMEOUT) |
Waits for a host response (optionally, for a maximum timeout period). |
WAIT TIMEOUT 20 |
|
WHILE ... WEND |
Specifies a loop containing one or more instructions to be carried out while a condition holds. |
DIM B AS INTEGER WHILE B >=1 PRINT B LET B = B-1 WEND |