Sculpting the Screen
You can use the following group of escape sequences to exploit the sculpture facilities of Windows:
-
Turning sculpture mode on/off.
-
Drawing sculpted boxes.
-
Drawing sculpted lines.
-
Changing default colours.
This allows you to create raised or sunken images on your screen, with the 3-D effect of a stone sculpture. A sculpted image is produced by shading sides of a picture, so when drawing a sculpted box , the top and left sides of the box are shaded one colour, and the bottom and right sides of the box are shaded another colour.
For example, to produce an image of a sunken box, you would need to shade the top/left sides a dark colour, and the bottom/right sides a light colour.
Because of the way HostAccess sculpting works, you can have a full sculpted screen without losing any of your 24 by 80 display. Sculpting works independently of your normal screen, so clearing the screen does not clear sculpture.
See the Example of sculpting the screen using a macro.
Colours
Colours for sculpted boxes and lines are chosen from the HostAccess colour palette. This palette consists of colours 1 - 16 as follows:
|
|
|
|
|
|
1 |
black |
9 |
dark grey |
|
2 |
blue |
10 |
light blue |
|
3 |
green |
11 |
light green |
|
4 |
cyan |
12 |
light cyan |
|
5 |
red |
13 |
light red |
|
6 |
magenta |
14 |
light magenta |
|
7 |
brown |
15 |
light brown |
|
8 |
grey |
16 |
white |
When choosing colour, you can also choose the clear colour (number 17). This represents the colour of the current background, and has the effect of clearing the relevant lines and/or boxes.
Turning Sculpture Mode on/off
To turn sculpture mode on/off, use the following AiF escape sequence:
ESC_1 {; enable} {; clear} w ESC\
Where:
enable
|
1 = disable sculpture mode. |
|
|
0* = do not clear existing lines/boxes. |
Turning sculpture mode on or off does not affect the drawing of any sculpted boxes or lines. To draw a complete sculpted screen very quickly, draw your screen, then set sculpture mode to on.
You can also use this escape sequence to just clear sculpted lines and boxes, without switching mode. Clearing lines and boxes sets their border colour to clear.
Drawing Sculpted Boxes
To draw a sculpted box, use the following AiF escape sequence:
ESC_2 ; y ; x ; h ; wid {; col1} {; col2 ; col3} w ESC\
Where:
|
|
y co-ordinate of top of box. |
|
|
x co-ordinate of left of box. |
|
|
Height of box, in characters (rows). |
|
|
Width of box, in characters. |
|
|
Colour selection: |
|
|
Palette colour of top and left sides of box. 1-17, ignored unless col1 = 3. See Colours for a description of the colours. |
|
|
Colour of bottom and right sides of box. 1-17, ignored unless col1 = 3. |
Example
To draw a box at (10, 2), height 5, width 10, and colours 1 (top/left) and 16 (bottom/right), use:
ESC_2 ; 10 ; 2 ; 5 ; 10 ; 3 ; 1 ; 16 w ESC \
Drawing Sculpted Lines
To draw a sculpted horizontal line, use the following AiF escape sequence:
ESC_3 ; y ; x ; len {; col} w ESC\
Where:
y
|
y co-ordinate of line origin. |
|
|
x co-ordinate of line origin. |
|
|
Length of line, in characters. |
|
|
Colour for line: See Drawing Sculpted Boxes to find out how to change the default and Colours for a description of the colours. |
To draw a sculpted vertical line, use the following AiF escape sequence:
ESC_4 ; y ; x ; len {; col } w ESC\
Where y, x, len and col are as described above.
Examples
To draw a sculpted horizontal line at (12, 14), 10 characters (columns) long, with colour 1, use the following AiF escape sequence:
ESC_3 ; 12 ; 14 ; 10 ; 1 w ESC \
To draw a sculpted vertical line at (10, 31), 5 characters (rows) long, with colour 16, use the following AiF escape sequence:
ESC_4 ; 10 ; 31 ; 5 ; 16 w ESC \
Changing Default Colours
To change default sculpture colours, use the following AiF escape sequence:
ESC_5 ; top-left ; bot-right w ESC\
Where:
top-left
|
Default top side and left side colour. 1..17: colour number. See Colours for a description of the colours. |
|
|
Default bottom side and right side colour. 1..17, as described above. |
These colours will be used as defaults for all subsequent sculpted box and line drawing.
Example: Sculpted Drawing
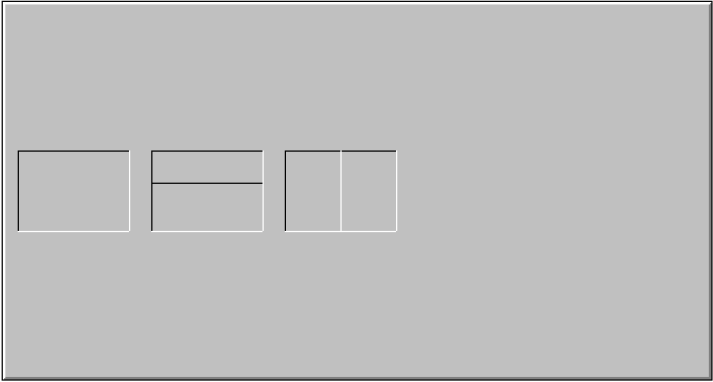
The following diagram shows how you can use the sculpture features of the Windows AiF to produce lines and boxes. The example turns sculpture mode on, and draws three sculpted boxes, then a sculpted horizontal line (in a box), and a sculpted vertical line (in a box).
ESC_1 w ESC\
ESC_2 ; 10 ; 2 ; 5 ; 10 ; 3 ; 1 ; 16 w ESC\
ESC_2 ; 10 ; 14 ; 5 ; 10 ; 3 ; 1 ; 16 w ESC\
ESC_2 ; 10 ; 26 ; 5 ; 10 ; 3 ; 1 ; 16 w ESC\
ESC_3 ; 12 ; 14 ; 10 ; 1 w ESC\
ESC_4 ; 10 ; 31 ; 5 ; 16 w ESC\
Example of sculpting the screen using a macro
REM
REM Macro to demonstrate sculpted line drawing
REM using boxes that touch and those that do not.
REM Also using vertical and Horizontal lines to split boxes.
REM
REM For best results, select the NORMAL Attribute Colour
REM of Black foreground on Lightgrey background.
REM
REM Turn Sculpture mode ON. print chr$(27) ; “_1w” ; chr$(27) ; “\”;
REM Draw 3 Boxes .
print chr$(27) ; “_2;10;2;5;10;3;1;16w” ; chr$(27) ; “\”; print chr$(27) ; “_2;10;14;5;10;3;1;16w” ; chr$(27) ; “\”; print chr$(27) ; “_2;10;26;5;10;3;1;16w” ; chr$(27) ; “\”;
REM Draw 2 Lines , Horizontal & Vertical
print chr$(27) ; “_3;12;14;10;1w” ; chr$(27) ; “\”; print chr$(27) ; “_4;10;31;5;16w” ; chr$(27) ; “\”;
REM Draw 4 Boxes directly underneath each other.
print chr$(27) ; “_2;10;40;1;30;3;1;16w” ; chr$(27) ; “\”; print chr$(27) ; “_2;11;40;1;30;3;1;16w” ; chr$(27) ; “\”; print chr$(27) ; “_2;12;40;1;30;3;1;16w” ; chr$(27) ; “\”; print chr$(27) ; “_2;13;40;1;30;3;1;16w” ; chr$(27) ; “\”; print chr$(27) ; “_2;14;40;1;30;3;1;16w” ; chr$(27) ; “\”;
REM NOTES : Please note that each line has the ; at the end.
REM This will suppress the CRLF and stop the screen from REM scrolling.