Buttons
The following sections describe how to use AiF escape sequences to create and use:
-
Text push button.
-
Image push button.
-
Images (treated as static buttons).
-
Radio buttons.
-
Check boxes.
When using these escape sequences, you can describe button images for a button in great detail.
Creating a Text Button
To create a pushbutton holding a text label, use the following AiF escape sequence:
ESC_30 ; y ; x ; h ; wid {; visible} {; enabled} {; font} w control-id ; label ESC\
Where:
|
|
x co-ordinate of left of button. |
|
|
Height of control, in character cell units. |
|
|
Width of control, in character cell units. |
|
|
1 = create hidden. |
|
|
1 = initially disabled. |
|
|
Selects button label font: 1* =Terminal. Styles 3 and 4 map on to the Helvetica fonts used in Borland-style bitmap pushbuttons and in dialog static text used by the application. |
|
|
Control id – must be unique, and may not be “root”. |
|
|
Button label. |
Creating An Image Button
To create a push button holding a bitmap image and (optionally) a text label, use the following AiF escape sequence:
ESC_31 ; y ; x ; h ; wid {; visible} {; enabled} {; font} w control-id ; spec ESC\
Where:
y
|
y co-ordinate of top of button. |
|
|
x co-ordinate of left of button. |
|
|
Height of button, in rows. |
|
|
Width of button, in columns. |
|
|
1 = create hidden, 2 = create visible(*). |
|
|
1 = initially disabled, 2 = initially enabled(*). |
|
|
Selects button label font: 1* = Terminal. Styles 3 and 4 map on to the Helvetica fonts used in Borland-style bitmap pushbuttons and in dialog static text used by the application. |
|
|
Control id. |
|
|
See Appendix A, Describing Images for details. |
Image Specification for Pushbuttons
This powerful feature allows you to create pushbuttons holding:
-
Bitmap images (.BMP files).
-
Icon images (.ICO files).
-
Bitmaps or icons in resource files (.DLL or .EXE files).
Example
To create a pushbutton called help, displayed at (10,10), with height 5 and width 10, using the bitmap image held in the file c:\pictures\question.bmp, use the following AiF escape sequence:
ESC_31 ; 10 ; 10 ; 5 ; 10 w help ; file=c:\pictures\question.bmp ESC\
See Appendix A, Describing Images for details.
Displaying an Image
To display an image on the screen, you can create a disabled push button, with an image defined using an image specification string. This allows a simple way of displaying icons or bitmap images.
To display an image, use the following AiF escape sequence:
ESC_32 ; y ; x ; h ; wid {; visible} w control-id ; spec ESC\
Where:
y
|
y co-ordinate of top of button. |
|
|
x co-ordinate of left of button. |
|
|
Height of control, in character cell units. |
|
|
Width of control, in character cell units. |
|
|
1 = create hidden. |
|
|
Control id. |
|
|
See Appendix A, Describing Images for details. |
Example
To display an image called asterisk, displayed at (10,10), with height 5 and width 10, using the bitmap image held in the file star.bmp, use the following AiF escape sequence:
ESC_32 ; 10 ; 10 ; 5 ; 10 w asterisk ; file=star ESC\
Creating a Check box
To create a check box, use the following AiF escape sequence:
ESC_34 ; y ; x ; h ; wid {; visible} {; enabled} {; font} {; left} {; check} w control-id ; label ESC\
Where:
y
|
y co-ordinate of top of check box. |
|
|
x co-ordinate of left of check box. |
|
|
Height of check box, in rows. |
|
|
Width of check box, in columns. |
|
|
1 = create hidden. |
|
|
1 = initially disabled. |
|
|
Selects font: 1* = Terminal. |
|
|
1 = text on left. |
|
|
1* = initially unchecked. |
|
|
Control id - must be unique and may not be “root”. |
|
|
Text label. |
The event reporting mask is initially set to all bits clear.
Creating a Radio Button
To create a radio button, use the following AiF escape sequence:
ESC_35 ; y ; x ; h ; wid {; vis} {; en} {; font} {; left} {; check} w r-id {; label} {; g-id} ESC\
Where:
y
|
y co-ordinate of top of radio button. |
|
|
x co-ordinate of left of radio button. |
|
|
Height of radio button, in rows. |
|
|
Width of radio button, in columns. |
|
|
1 = create hidden. |
|
|
1 = initially disabled. |
|
|
Selects font: 1* = Terminal. |
|
|
1 = text on left, 2* = text on right. |
|
|
1* = initially unchecked, 2 = initially checked. |
|
|
Radio button control id - must be unique, and may not be “root”. |
|
|
Text label for button - optional. |
|
|
Control group id, if relevant - optional. |
The event reporting mask is initially set to all bits clear.
Using Radio Buttons in Groups
If you give a control group id, the button control is automatically added to that group. The group is created if it does not exist.
When the first radio button control is added to a radio button group, it is forced to be checked, even if the host has not asked for it. When subsequent radio buttons are added to a radio button group, if an initially checked button is added, the check is removed from the previously checked button in the group.
These rules ensure that exactly one radio button in a group will be initially checked. It also means that when creating the controls, if they are created as visible, and the initially checked button is not going to be the first, the user will momentarily see the check on the first button. To avoid this, create radio buttons initially hidden, and then show them all at once.
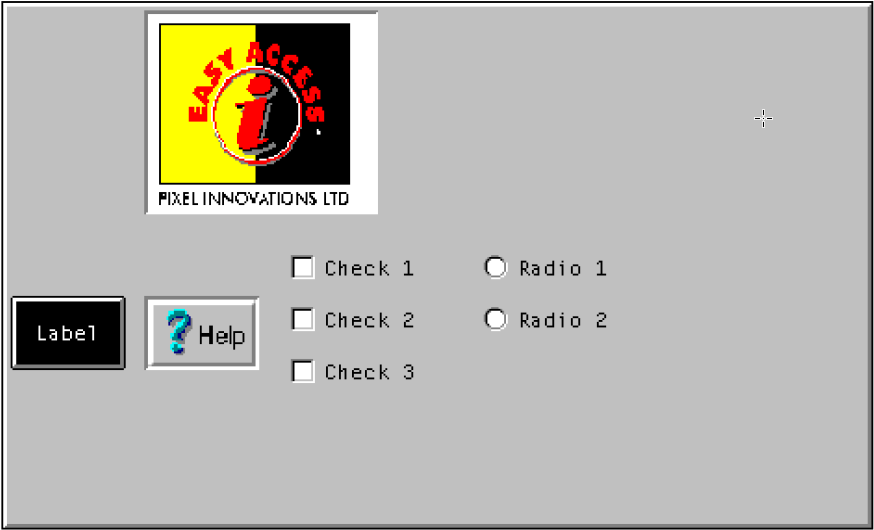
Example: Using Buttons
This example displays the following on your terminal window:
-
A 3x8 push button called text, at (12,1), labelled "Label".
-
A 3x8 image button called help, at (12,10), using the image held in the file c:\bitmaps\f1help.bmp.
-
A 8x16 image called logo, at (1,10), using the image c:\bitmaps\easyacc.bmp.
-
Three check boxes: check1, check2 and check3.
-
Two radio button: radio1 and radio2.
using the following AiF escape sequences:
ESC_30 ; 12 ; 1 ; 3 ; 8 w text ; Label ESC\
ESC_31 ; 12 ; 10 ; 3 ; 8 w help ; file=c:\bitmaps\f1help.bmp ESC\
ESC_32 ; 1 ; 10 ; 8 ; 16 w logo ; file=c:\bitmaps\easy-acc.bmp ESC\
ESC_34 ; 10 ; 20 ; 2 ; 10 ;;;;; 2 w check1 ; Check 1 ESC\
ESC_34 ; 12 ; 20 ; 2 ; 10 ;;;;; 2 w check2 ; Check 2 ESC\
ESC_34 ; 14 ; 20 ; 2 ; 10 w check3 ; Check 3 ESC\
ESC_35 ; 10 ; 33 ; 2 ; 10 w radio1 ; Radio 1 ESC\
ESC_35 ; 12 ; 33 ; 2 ; 10 ;;;;; 2 w radio2 ; Radio 2 ESC\
Reading a Button
You can read when check boxes or radio buttons have been checked, as described in the following sections.
In all cases, a value will be sent to the host. This is formatted as:
<STX><value> <CR>
If an error is detected in the arguments, the value returned is a single question mark (STX ? CR).
Reading a Button’s Check State
To read the check state of a button, use the following AiF escape sequence:
ESC_36 ; 1 w control-id ESC\
Where:
|
|
Is the id of the button. |
All buttons have a check state, but it is only meaningful to read the state of check boxes and radio buttons.
Reading Which Button is Checked
To read the id of a radio button in the group that is currently checked, use the following AiF escape sequence:
ESC_36 ; 2 w control-id ESC\
Where:
|
|
Is the id of the button group. |
Setting/Clearing a Button
To set or clear a given radio button or check box, use the following AiF escape sequence:
ESC_37 ; 1 ; change w control-id ESC\
Where:
|
|
1 = clear (uncheck) the radio button or check box. 2* = set (check) the radio button or check box. |
|
|
Is the id of the button group. |
When doing this to a radio button that is part of a radio button group, the button is always checked; and the previously checked button in the group (there must be one) is always unchecked.