Step 8: Create a mainline stream | Admin
Streams are the preferred way to handle branching and merging in P4. Streams provide a framework to manage concurrent development and track relationships visually across branches.
To work with versioned assets, you must create at least one stream for each depot you create. To start, you will create one mainline stream for the depot you created in the previous step. You can customize your stream workflow later.
For example, if you are developing a game, you might have artists working in an art stream while developers are working in a development stream. Artists will not be distracted by in-progress development work because the two streams use separate versions of the files. When development work is stable and ready for the artists to use, you can copy and merge the files from the development stream into the art stream.
To learn more about creating a mainline stream, watch this video or review the instructions following the video.
-
In P4V, click the + button and select Stream Graph.
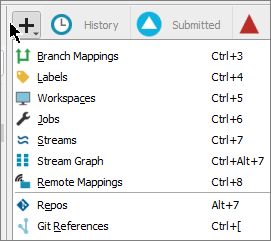
The Stream Graph tab opens in the right pane and displays a visual representation of all streams in a specific depot.
-
Right-click anywhere on the Stream Graph tab and choose New Stream.
-
In the Stream: New dialog box, enter a Stream name.
Establish a stream naming convention and communicate it to your team for consistency and to make it easier to identify streams in any view. For example, you can use a short code for your project, followed by an underscore, followed by a description of the stream type.
For example, if the project is named Stellar Plaza, use SP for the short code. The mainline stream will be named SP_main and all other streams in the depot will be named SP_streamType.
-
In the Stream type field, select mainline.
Every stream depot needs a mainline stream before other stream types can be added.
-
In the Depot field, click Browse, select the depot you previously created and click OK.
-
Keep the Location as the default path.
-
Optionally, enter a Description of the stream.
-
Clear the following checkboxes:
-
Create a new workspace to use with this stream: Clear the checkbox so you can choose a name and location for your workspace. When this box is selected, your workspace is created with a default name and location.
-
Populate the mainline stream after it is created: Clear the checkbox so you can perform additional configuration before populating the stream.
You will name the workspace and populate the mainline stream in later steps.
-
-
To exclude files or folders from version control, click the Advanced tab. Specify file or folder patterns to exclude from version control in the Ignored field.
P4 will check all file or folder names and ignore them if they match lines in this field. You can enter filenames, filename extensions, or file paths. Separate each with a line break. For example:
Copy/tmp # ignores files named "tmp"
/tmp/... # ignores directories named tmp
.tmp # ignores file names ending in .tmpYou can add comments by using the
#prefix.To learn more, see Configure ignored files.
-
Click OK to create the stream.
Learn more
Watch the following video to learn more about streams.
What's next
Next, create a workspace that links your computer to the stream you created. Every P4 user on your team will create one or more workspaces.
Go to Step 9: Create a workspace.