Configure P4 DTG
To specify how data is replicated between P4 Server and the defect tracker, you use the P4 DTG configuration control panel. To launch the configuration control panel, double-click p4dtg-config.exe. To configure replication, perform the following steps:
- Define defect tracker sources
- Configure plug-in attributes
- Define P4 Server sources
- Optional: Filtered replication
- Map data between P4 Server and P4 DTG
- Optional: Map fix data
The data you enter, change, or delete using the P4 DTG configuration control panel is stored (to configuration files on disk) when you click Apply or OK on one of the main tabs. Clicking OK on the data entry dialogs stores your entries temporarily, but they are not stored permanently until you click Apply or OK on one of the main tabs.
Define defect tracker sources
For defect trackers, the connection information depends on the requirements of the defect tracker server. For example, for Jira Software Cloud, specify your Jira Software Cloud server using the syntax: https://<your-site-name>.atlassian.net. In addition to specifying the connection information, some defect trackers might require you to specify the project you are mapping P4 Server jobs to.
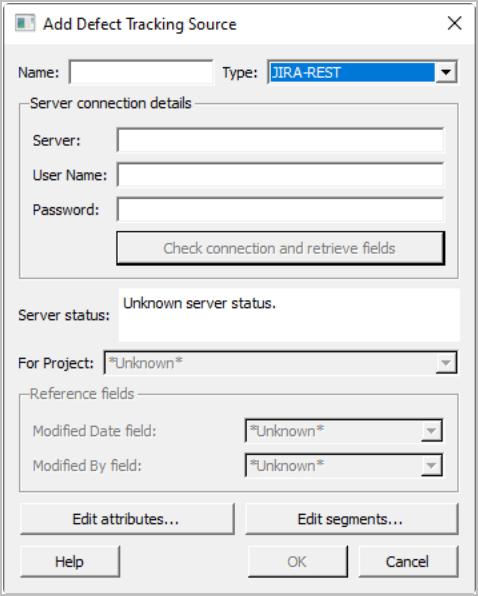
To add a defect tracking source:
-
Click New. The Add Defect Tracking Source dialog appears.
-
Enter the required information:
Field Description Name An alias for the source and its associated information.
Type The defect tracker for this source. Specify the defect tracker type by choosing the type from the drop-down list (if you have installed plug-ins for multiple defect trackers). To connect to a Jira Software Cloud server, select JIRA-REST from the drop-down list.
Server The information required by the defect tracker for client connections. The format is determined by the defect tracker, for example:
- For Jira Software Cloud, specify your Jira Software Cloud server: https://<your-site-name>.atlassian.net.
- For Jira Software On-Premises, enter
http://<your-site-name>/orhttps://<your-site-name>. For troubleshooting SSL connection problems, see the Knowledge Base article on P4DTG Jira SSL Support. -
For Bugzilla, specify
host:portfor Bugzilla's MySQL database.
User name
The user name to be used to connect to the defect tracking server. For Jira Software Cloud, <your-atlassian-account>.
Password
The password for the specified user, if required.
Jira Software Cloud: the password is a special API token. To obtain your API token:
- Go to https://id.atlassian.com/manage/api-tokens
- Log in with your Atlassian administrator credentials.
- Click Create and name your API token something recognizable, for example p4jira.
- The API token is displayed in a dialog.
- Copy the token and paste it into the Password field. It is a good idea to save the API token somewhere safe in case you need it in the future.
Reference Field
The fields that are required to keep P4 Server and the defect tracker synchronized.
Modified Date Field
The date that the issue was last changed.
Modified By Field
The user that last changed the issue (if supported by your defect tracker).
The plugin for your defect tracker might enable you to specify other proprietary settings. If so, click Edit Attributes... to change these settings. For details, see Configure plug-in attributes.
If you intend to use filtered replication for this data source, you must define segments. To define segments, click Edit Segments.... For details, see Filtered replication.
-
Click Check connection and retrieve fields. If you have correctly specified valid values, the dialog displays a success message and the reference fields retrieved from the defect tracker.
If a connection error is displayed, correct your entries and click Check connection and retrieve fields again.
-
Choose the defect tracker project from the Project drop-down list.
-
Click OK to save your entries and dismiss the dialog.
Your newly-defined defect tracking source is now displayed in Defined Defect Tracking Sources.
To edit a defect tracking source, click the source in the Defined Defect Tracking Sources list, then click Edit.
To delete a defect tracking source, click the source in the Defined Defect Tracking Sources list, then click Delete. The source is marked for deletion, as indicated in the Defined Defect Tracking Sources list. Click OK or Apply. To undo deletion, click the source marked for deletion, then click Undelete.
Configure plug-in attributes
Specific defect trackers might require settings outside of those required to configure replication. For example, Bugzilla allows you to specify a MySQL database other than its default database. To configure settings for a specific plug-in, edit its attributes.
To edit attributes, click Edit Attributes.... For details about a specific field, click the help button (?) for the field. Attributes and valid entries are specific to each plug-in, and your defect tracker might not require you to set attributes.
Default attribute settings, which are provided by the plug-in, are displayed in light gray. Required attributes are marked with an asterisk (*). Attribute settings are validated by the plug-in when you click OK.
Important Jira attributes
Workflow and field definitons: The Jira configuration XML file (default, "jira-rest-config.xml") is for defining custom fields and workflows (steps, transitions, etc.). This file must exist in the config directory.
Java options: Use this attribute to specify additional Java options for starting the Jira plugin.
Only change this value with the help of Perforce support.
Allow Jira issue creation: Enable creating of new Jira issues through replication by specifying y. (The default is n to disallow such creation.) For Jira issue creation to work you must map all Jira required fields.
We do not recommend allowing the creation of Jira issues.
Jira plug-in configuration file
The configuration XML file (default name is jira-rest-config.xml) is for defining custom fields and workflows (steps and transitions). Verify the XML file contains all the necessary information to reflect custom fields, active workflows, and default status and resolutions for your Jira version.
Configuring custom fields
-
Log in to the Jira server as the Jira administrative user and locate the list of custom fields.
-
Add each replicated custom field to the configuration XML file (default,
config/jira-rest-config.xml).-
Open the configuration XML file and enter each custom fields from the screen as XML
<CustomField>...</CustomField>elements inside the<CustomFields>...</CustomFields>outer XML element. -
Choose from the supported DTG field data types.
-
Accept the default DTG access permission of
"RO"(read-only), or change it to"RW"(read and write).
DTG data type Jira data type LINE Text Field (< 255 characters) TEXT Free Text Field (unlimited text) DATE Date Time SELECT Single Select List -
3. Verify that your XML conforms to this hierarchy of elements:
<Config>
  <CustomFields>
    <CustomField name="Test Custom Field Line" type="LINE" access="RW" />
    <CustomField name="Test Custom Field Text" type="TEXT" access="RW" />
    <CustomField name="Test Custom Field Date" type="DATE" access="RO" />
    <CustomField name="Test Custom Field Radio" type="SELECT" access="RO">
      <Option value="Radio 1" />
      <Option value="Radio 2" />
      <Option value="Radio 3" />
    </CustomField>
  </CustomFields>
  ...
  ...
</Config>
Configuring Jira Project Handling
Five additional configuration sub-elements are specified with the JiraHandling element. The sub-elements are:
UserStyle
When replicating from Jira to Perforce, you can choose which Assignee or Reporter detail fields are checked and in what order.
This comma-delimited list defaults to looking for Jira's name (only good for on premises), email, emailshort (truncated at "@"), and Jira's
displayname (typically Full Name.) Note you must configure each user's
Jira account to allow access to its email.
IgnoreProjects
Only when using source project = *All*, ignore this comma-delimited list of project keys. Spaces and newlines are allowed.
SocketTimeoutSeconds, ConnectionTimeoutSeconds, and RequestTimeoutSeconds
These control the socket timeouts for the Jira connection. These three sub-elements are a Technical Preview feature.
Define P4 Server sources
To define P4 Server sources, specify the host machine and TCP/IP port using the host:port syntax . The default host is localhost and the default port is 1666.
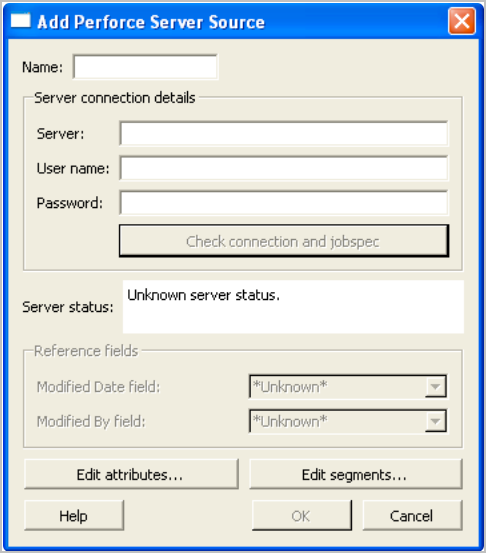
To add a P4 Server source:
- Click New. The Add Perforce Server Source dialog appears.
-
Enter the server connection:
Field Description Name An alias for the P4 Server and its associated connection information.
Server The name of the P4 Server host machine and the port on which it is running. Specify as host:port; for example 4host 1667. The server host defaults to localhost and the port defaults to 1666.
User name
The P4 Server user name used by the replication engine to connect to the P4 Server.
To ensure that you can distinguish jobs modified by the gateway, create a dedicated P4 Server user to be used only by the gateway. The user name must be used only for defect replication. Do not use this user name for any other purpose.
Ensure that the user name is neither a prefix nor a suffix of any other user name. For example, if you have a user named admin-logger, do not use admin or logger as the user name.
Password
The password for the specified user, if required.
If you intend to use filtered replication for P4 Server jobs, define segments by clicking Edit Segments.... For details, see Filtered replication.
-
Click Check connection and jobspec. If you have entered valid values, the configuration control panel retrieves the job specification for the specified server and displays the names of the reference fields, which are the P4 Server job data fields required for replication.
If a connection error appears, correct your entries and click Check connection and jobspec again.
If the Server status field says that the server is not configured, add the required fields to the P4 Server job specification. For details, see Add required fields to the P4 Server job specification.
- Click OK to save your entries and dismiss the dialog.
Your newly defined P4 Server source now displays in P4 Server sources.
P4 Server sources that have been edited and need to be saved are displayed in bold.
To edit a P4 Server source, click the source in the P4 Server sources list, then click Edit.
To delete a P4 Server source, click the source in the P4 Server sources list, then click Delete. The source is displayed in bold, marked for deletion, but is not deleted until you click OK or Apply.
To undo deletion, click the marked source, then click Undelete.
Filtered replication
To replicate sets of selected defects from a single data source to multiple other defect trackers, define segments. For example, if you use Jira to track your database bugs, and Bugzilla to track your Web application bugs, create separate segments for each project and replicate them independently. You can create a segment named “Database” that selects all P4 Server jobs with the Subsystem field set to “db”, and another segment named “Web Application” that selects all P4 Server jobs with the Subsystem field set to “webapp.”
To use segments for replication, choose the segment when defining mappings on the Gateway Mappings tab. Note the following requirements:
- If you segment a P4 Server source or a Defect Tracking Source, you are required to choose a segment and cannot choose the top-level source.
- A non-segmented data source that is in use (already referenced by a mapping) cannot be segmented.
- After a data source has been segmented and one or more of the segments has been mapped, you cannot remove SELECT values from the segment definition.
- If a data source is already being replicated, you cannot create segments for it.
- Fields only appear in the P4 Server Source segmentation list if they are defined as SELECT fields in the P4 Server job specification.
To create a segment for a P4 Server or Defect Tracking Source:
- On the P4 Server Source or Defect Tracking Source tab, click Edit Segments.... The Edit Segments dialog appears.
- Specify the field to be used to filter defects by choosing the field from the Segment using SELECT field list. (The fields listed are SELECT fields returned by the data source plugin.)
- To add a segment, click New.... In the New Segment dialog, specify a name for the segment, and click OK.
- Specify the values that you want to include in the segment by moving them from the Unassigned options column to the Included options column.
- Save your segment definition and dismiss the dialog by clicking OK.
- Save your changes by clicking OK on the P4 Server Source or Defect Tracking Source tab.
Map data between P4 Server and P4 DTG
After defining P4 Server sources and defect tracker sources, specify how data is replicated between them when a job or issue is changed. In addition, you can configure the data that is transmitted to the defect tracker when a job is fixed in P4 Server.
Before entering mappings, define the relationships between the data in P4 Server jobs and the data stored by your defect tracker. To display the fields defined for P4 Server jobs, issue the p4 jobspec command. See p4 jobspec in P4 CLI Reference.
If you want to modify the job specification, see Customizing Helix server: job specifications in P4 Server Administration Documentation.
For details about the data that is stored by your defect tracker, see the documentation of your defect tracker.
P4 DTG supports replicating fields with either of the following:
| Copy: one-way replication | Mirror: two-way replication |
|---|---|
|
One-way replication copies changes from the source system to the target system. We recommend you use one-way replication, if possible. |
Two-way replication mirrors changes from either system to the other system. If a mirrored field is updated in the same replication interval, the defect tracker value will overwrite the job value, possibly losing data. |
Every field has a data type, and mappings between fields must ensure that the data types are compatible:
| Field | Description | Valid target data types | |
|---|---|---|---|
| Copy | Mirror | ||
|
word |
A one-word entry |
word, line or text |
word |
|
line |
A single line of text |
line or text For targets of type word, only the first word is copied. |
line |
|
text |
Multiple lines of text |
text or line For targets of type line, only the first line is copied. For targets of type word, only the first word is copied. |
text |
|
date |
A date and time |
|
date |
|
select |
A field that is assigned one of a specified set of values. The number of possible values much be identical for P4 Server and the defect tracker. |
select, word, line, text For select fields, all possible values must be mapped. |
select All possible values must be mapped. |
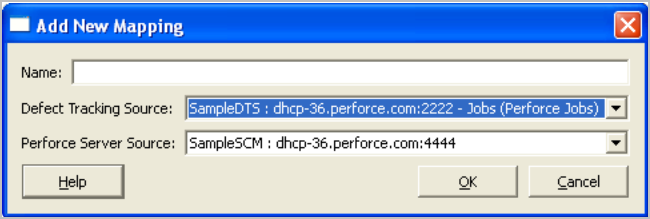
To add a set of mappings:
-
On the Mappings tab, click New. The Add New Mapping dialog is displayed.
-
Enter a name for the mapping, and choose the P4 Server source and the defect tracking source that you want to map. Click OK. The Edit Perforce-Defect Tracker Mapping dialog appears.
List of Change Numbers : LINE * and Fix Details : TEXT (append) * are the fields used for replicating P4 Server fix information.
The Edit Mapping dialog contains:
- Defect tracker fields - lists fields defined in the defect tracker that you can choose to replicate in P4 Server jobs. Unmapped fields are displayed in bold.
- Perforce fields - lists fields from the P4 Server job specification that you can choose to replicate in the defect tracker. Unmapped fields are displayed in bold.
- Field mappings - lists the mappings you have defined, categorized by the method and direction of replication. The mappings are displayed using a tree format, grouped by type.
Read-only fields are indicated by an asterisk (*).
-
For each field you want to replicate, select the field and choose the method of replication:
- To replicate Perforce fields in the defect tracker, select the source field in the Perforce fields pane and click the Copy to Defect tracker or Mirror with Defect tracker button.
- To replicate defect tracker fields in P4 Server, select the source field in the Defect tracker fields pane and click the Copy to Perforce or Mirror with Perforce button.
When you click a Copy (or Mirror) button, a list of available target fields appears.
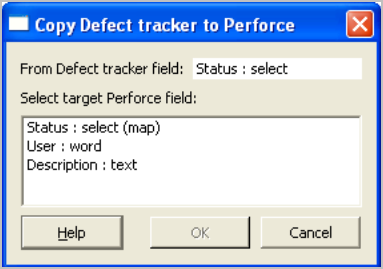
If no valid target fields exist, the list is empty.
- Choose the target field to which you want to map the selected source field and click OK.
-
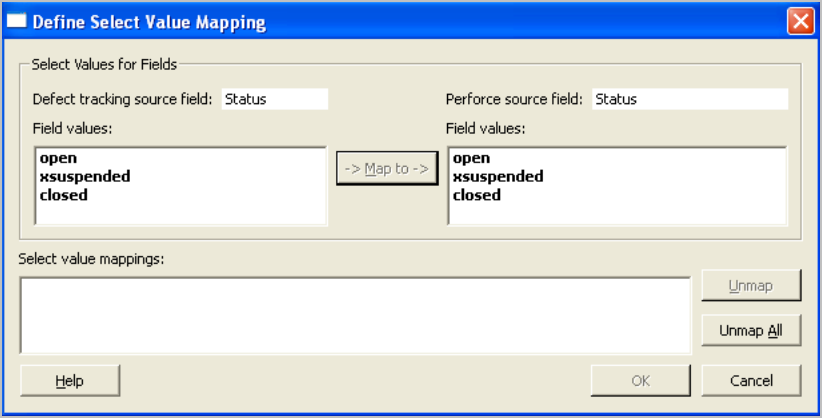
If the target field is a select field (meaning a field that can contain one of a defined set of values), the Define Select Value Mapping dialog appears.
Fields in bold are unmapped.
-
Specify the correspondence between values in P4 Server and those in the defect tracking system by selecting the P4 Servervalue and its corresponding defect tracker value, then clicking Map to.
All the values of the left-hand list must be mapped. You can save incomplete mappings and exit, but the replication engine cannot run until you have mapped all values. If you save incomplete mappings, the unmapped values are displayed with “(unmap)” in the Field Mappings pane, to indicate that you need to map them.
- Click OK to save your entries and close the dialog.
- On the Gateway Mappings tab, click Apply to save your changes.
After you map select fields, the field pair is listed in the Field Mappings pane, indicated by “(map)”. To view the value mappings, place the cursor over the field pair, and the mappings appear in a tooltip. To change the values mapped for a field, click the field in the Field Mappings pane and click Edit Value Mappings. To remove a mapping, click the mapping in the Field Mappings pane, then click Unmap.
Map fix data
In P4 Server, you can associate a job with a changelist. When the changelist is submitted, the job status is changed, usually to a “closed” status, to indicate that the changes being submitted fix the problem reported in the associated job.
P4 DTG enables you to configure how data from fixes submitted in P4 Server are transmitted to the defect tracker. To add fix mappings, click Fix Details in the Perforce Fields list.
To select the P4 Server data that is to be transmitted to the defect tracker when a job is fixed:
-
On the Mappings tab, scroll to the bottom of the Field Mappings list and select the mapping you want under PERFORCE FIX DETAILS > COPIED > DEFECT TRACKER.
The Select Fix Details to Map dialog appears.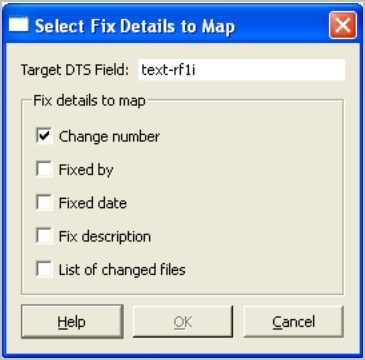
- Check the fields that you want replicated to the defect tracker, then click OK to save your changes and close the dialog.