Project settings
This section describes how to use the new project settings page to view and edit project settings for a project. For more information about how to add a project, see Add a project.
Modifying the project's definition is restricted to project owners and administrators (users with admin-level or super-level privileges in P4 Server). See Membership for more details.
To view or edit project settings for a specific project:
-
Click Projects in the menu.
-
Click on a project name displayed in My Projects list.
-
Click Settings in the menu.
A project summary with Participants tab, Branches tab, Integrations tab, and General Settings tab is displayed.

The following information is displayed in the project summary:
-
The name of the project.
-
The unique associated project identifier.
-
A Follow button that you can click to follow the project. This button is not available if you are a member of the project.
-
Total number of members, followers, and branches associated with the project.
-
A short description about the project.
-
Participants tab
To learn how to customize participants for a P4 Code Review project, watch this video or review the instructions following the video.
The Participants tab shows the following details:
Members
Displays a list of all the project members. This includes users, groups, and projects.

To add a project member:
-
Click Manage members button.
-
Select the Users, Groups, or Projects tab that you wish to add to the project members list.
-
Type in to search the name of a user, group, or project and click Add button.
To delete a project member, click the delete icon against their name.
Owners
Displays a list of all the project owners.
Only users can be added as project owners.

To add a project owner, click Manage owners button. Type in the name of the user you wish to add to the project owners list. The field auto-suggests users within P4 Server as you type. Click the Add button to add a user to the project owners list.
To delete a project owner, click the delete icon against their name.
The P4 Code Review user cleanup API requires the P4 Code Review user to have ownership privileges on the affected projects and groups. If the P4 Code Review user has insufficient permissions, cleanup for those P4 projects or groups will fail. To resolve this, add Super or admin privileges to the P4 Code Review user or ensure that the user is an owner of all relevant projects and groups.
Default reviewers
Displays a list of all the default reviewers. A default reviewer can be a user or a group.

To add a new default reviewer:
-
Click Manage default reviewers button.
-
Select the Users or Groups tab that you wish to add to the default reviewers list.
-
Type in to search the name and click Add button.
-
Click the drop-down box against the user or group name and select your desired option.
To edit your default reviewer preferences for an existing reviewer, click the drop-down box against the user name and select your desired option.
For a user, you can set the vote requirement to Optional or Required. When a group is a default reviewer, it can be set to operate in one of three ways:
-
Optional:
No members of the group are required to approve the review.
-
Require one indicated by a star badge with a 1:
At least one member of the group must up-vote the review to allow the review to be approved. If any member of the group down-votes the review, the review cannot be approved.
-
Required indicated by a star badge:
All members of the group must up-vote the review to allow the review to be approved.
To delete a default reviewer, click the delete icon against their name.
Default reviewers for reviews in multiple projects or branches:
When a review belongs to more than one project or branch:
-
The default reviewers from all the related projects and branches are combined and added to the review.
-
If a reviewer has different vote requirements in different places, the strictest setting is used.
For example:
-
In Project-A, Reviewer X is optional.
-
In Project-B, Reviewer X is optional.
-
In the project branch, Branch-b, Reviewer X is required.
As a result, Reviewer X will be added as a required reviewer on the review.
Mentioning default reviewers
If users or groups are @mentioned in a new changelist description that includes #review, they will be added to the review as reviewers. If any of these reviewers are already specified as default reviewers they will not be added to the review again, the reviewer's most restrictive reviewer option is used for the review.
To retain default reviewers, toggle the Retain default reviewers switch. For more details about retaining default reviewers, see Membership.
Followers
Displays a list of all the followers.

By default, project members and moderators are notified when a new review is started. Project members, moderators, and followers are notified when a change is committed.
Toggle the following switches at the bottom of the Participants tab to ensure which actions send a notification:
- Email members, moderators, and followers when a review is requested: When a new review is requested for the project, all project members and moderators of the project are added to the email notification list.
- Email members, moderators, and followers when a change is committed: When a change is committed for the project, all project members, project moderators and project followers of this project are added to the email notification list.
- When a group is a project member or project moderator, all of the members of that group are notified using the same logic as for individual project members and moderators.
- Any Links in descriptions and comments users and groups, or users and groups who are explicitly added to a review or changelist, will receive notifications even if new review/committed review notifications are disabled.
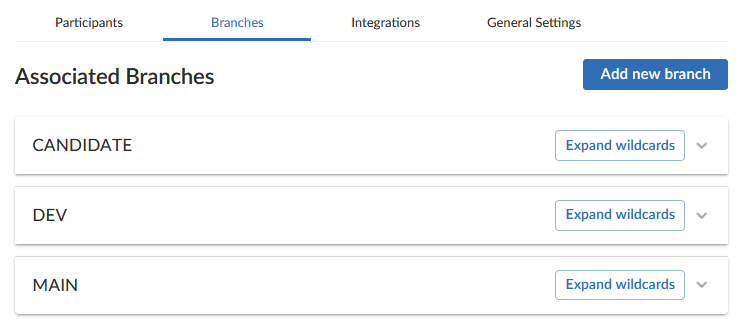
Branches tab
The Branches tab enables you to add a branch and configure the following options:
-
Associate a workflow with the project branch
-
Set minimum up votes
-
Manage moderators
-
Manage branch specific default reviewers
To learn how to create branches for a P4 Code Review project, watch this video or review the instructions following the video.
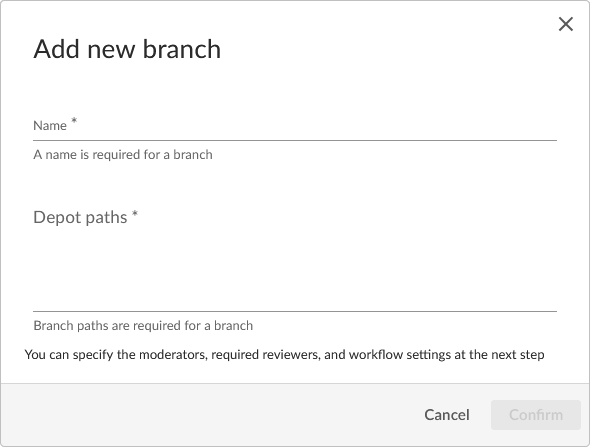
Add a branch
To add a new project branch:
-
Click the Add new branch button. This opens an Add new branch dialog.
-
Enter a short Name for your branch.
-
Enter one or more branch paths in the Depot paths field using depot syntax, one path per line. For more information on branch paths, see Example branch paths.
Branch paths are case sensitive. -
Click the Confirm button.
A new branch is created.
If you have entered multiple branch paths into the Depot paths field, these paths are processed in order, starting with the first path in the list.
Branch paths, and files can be excluded by putting a minus symbol - at the start of the path. In the following example:
-
The first path includes all of the directories and files under //depot/main/swarm/ in the project branch.
-
The second path excludes all of the files in -//depot/main/swarm/test/ from the project branch.
-
The third path includes the ResultSummary.html file from the previously excluded //depot/main/swarm/test/ directory.
//depot/main/swarm/...
-//depot/main/swarm/test/...
//depot/main/swarm/test/ResultSummary.html
Wildcards in branch paths
There are two kinds of wildcards that are supported in project branch paths: ... and *.
Only use the P4 Server wildcard ... at the end of a branch path.
Branch paths, and files are not checked to see if they are valid when you save the branch:
- If you enter an invalid path ending in the wildcard ..., the path will not be displayed in the project file browser until the path is created. This allows you to specify a path before it has been created.
- If you enter a path that ends with a file that has not been committed, or a non-existent file, P4 Code Review displays a 404 error when you navigate the path to the file with the project file browser.
The wildcard * is supported within the branch path itself. For example, VersionA and VersionB could be replaced with the wildcard * in the following paths:
//ProjectY/UserZ/VersionA/LibA/SubLib1/Data1/...
//ProjectY/UserZ/VersionA/LibA/SubLib2/...
//ProjectY/UserZ/VersionB/LibA/SubLib1/Data1/...
//ProjectY/UserZ/VersionB/LibA/SubLib2/...
Resulting in the following fllepaths with wildcards.
//ProjectY/UserZ/*/LibA/SubLib1/Data1/...
//ProjectY/UserZ/*/LibA/SubLib2/...
Handling new sub-directories
If new sub-directories are added or removed after the initial branch paths have been created, you can update branch paths by clicking the Expand wildcards button. This will expand all * wildcard paths to the matching single level sub-directories path.
Alternatively, you can expand the wildcards by editing and re-saving a branch to trigger expansion.
However, data sets of tens of several thousand may impact performance. We have tested performance when expanding up to 30,000 paths and found no issues.
Supported wildcard formats
The following are examples where * wildcards are supported:
-
//depot/Project/*/src/... -
//depot/Project/* -
//depot/Project/MA* -
//depot/Project/REL*/src -
//depot/Project/R*/src -
//depot/Project/*/src -
//depot/*/*/src -
//depot/*/*/* -
//depot/*/MAIN/* -
//depot/Project/REL*/s*
The following are examples where * wildcards are not supported.
The * at the start of the path is not allowed, it is only allowed in the middle or the end of a branch path:
-
*//depot/Jam/*/src/...
The * is only allowed at the end of text, for example RHEL*
-
//depot/Jam/R*EL/src -
//depot/Jam/*HEL/src
Edit a branch
Once you have created a branch, additional options become available for managing the branch further. Click on the name of the branch to expand the branch pane to view the additional options. All settings described in this section are optional.

Workflow
You can associate a workflow with the project branch. If you have disabled the workflow feature, this option will not be displayed.
To associate a workflow with a project branch, select one from the Workflow dropdown list, or enter the workflow name in the search field. You will only be able to see the workflows that you own or shared workflows. When a workflow is associated with a project, the workflow is used for all of the branches in that project.
To use the parent project workflow, select Inherit from project from the Workflow dropdown list. This option is select by default when you create a new branch. If the parent project is set to No workflow, the branch will use the global workflow rules. When a project branch is associated with a workflow, the workflow of the parent project is ignored and the branch workflow is used.
To remove the existing workflow without replacing it with another workflow, select No Workflow from the Workflow dropdown list. This is the default when you create a new project.
For more information about workflows and how project workflows interact with branch workflows, see Workflow basics.
Minimum up votes
Use Minimum up votes to set the minimum number of up votes required for reviews in this branch.
A review cannot be approved until all of the Required reviewers have voted up the review and the Minimum up votes specified has been satisfied.
When this setting is defined at the project level, minimum number of up votes is automatically applied to all branches. However, if you set Minimum up votes to 1 or higher on a specific branch, that branch will use its own setting and ignore the project-level setting.
To use the project-level value, set Minimum up votes to Inherit from project. This is set by default for new branches.
To override the project setting and use a custom value for a certain branch, set Minimum up votes to 1 or higher on that branch.
Notes on minimum up votes
-
If a review includes changes across multiple projects or branches, the minimum number of up votes on each project or branch must be met before the review can be approved.
-
Required reviewers are included when counting up votes.
-
When the workflow rule Count votes up from is set to Members for a project or branch, only up votes from members belong to that project or branch will count toward the minimum up votes requirement. For more information on the Count votes up from rule, see Workflow rules.
If workflows are disabled, all votes are counted, not just votes from project members.
Troubleshooting: Commits not displayed in the top level view
The Project Commits tab can fail to show some P4 Server commits in the top level view. However, the branch views for individual project display the commits correctly.
The Project Commits tab top level client view is made up of all of the branches of the project.
For example, Project Alpha has the following branches:
Branch: QA
-
//depot/alpha/dev/QA/...
Branch: Dev
-
//depot/alpha/dev/...
-
-//depot/alpha/dev/QA/...
The Project Commits tab view displays the branches in the order they were created, going through each path from top to bottom within each branch.
For example, in the Alpha project:
-
The first path shows everything under
//depot/alpha/dev/QA/in the top-level commits view. -
The second path shows everything under
//depot/alpha/dev/in the top-level commits view. -
The third path removes (excludes) everything under
//depot/alpha/dev/QA/from the top-level commits view.
As a result, commits to //depot/alpha/dev/QA/ that should appear in the QA branch do not show up in the top-level Project Commits tab.
To avoid this problem, and ensure every branch is displayed in the top-level Project Commits tab, use a simple branch structure and plan the branch order as you create them.
In the example above, if you created the Dev branch first, and then created the QA branch, //depot/alpha/dev/QA/ would not be excluded, and the commits would show up correctly in the Project Commits tab.
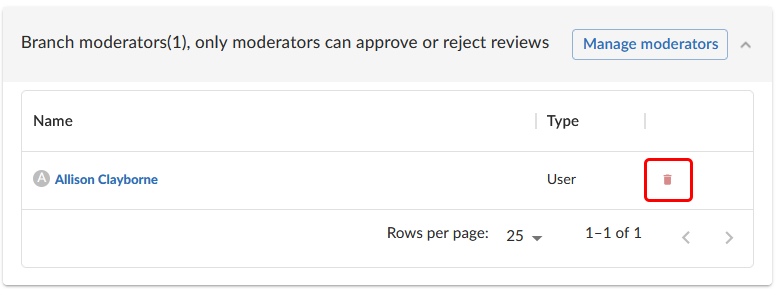
Branch moderators
Only moderators can approve or reject reviews on the branch.
To add moderators to a branch:
-
Click the Manage moderators button.
-
Choose the Users or Groups tab.
-
If you selected Users, start typing a the name of a user. Suggested users on the P4 Server will appear automatically.
-
If you selected groups, then all of the members of that group will have the same moderator privileges for that project branch. Use this option if you wanted to add several users at once.
-
-
Click Add.
After you finish setting up the branch and save the project, reviews on this branch can only be approved or rejected by moderators.
Moderators can also transition a review to any other state. Below is a summary of branch moderator roles and review state rules.
| Role | Allowed actions | Restrictions |
|---|---|---|
|
Moderators |
Can move a review to any state. Can approve or reject reviews. Can prevent automatic approvals. |
None (unless |
|
Authors (not moderators) |
Can change state to:
Can attach committed changelists. |
Cannot approve or reject reviews. |
|
Authors (also moderators) |
Can change state to:
Can attach committed changelists. |
Cannot approve their own reviews if |
|
Project members |
Can change state to:
Can attach committed changelists. |
Cannot approve, reject, or archive reviews. |
|
Other users |
None |
Cannot change review states. |
|
All roles |
Can start a review. |
Cannot change state if it’s not in their allowed states (for example, can’t change from Rejected). |
Additional notes
-
Moderators can prevent automatic approvals. For more information about automatically approving reviews using workflow rules see Workflow rules.
-
By default, if a review spans multiple branches with different moderators, only one moderator from any branch needs to approve it. You can change this (via a global setting) to require one moderator per branch. If a moderator belongs to multiple branches, one approval counts for each. For instructions on how to configure moderator behavior, see Moderator behavior when a review spans multiple branches.
To delete a moderator, click the delete icon against their name.
Default reviewers
You can add default reviewers in the Default reviewers pane. To add a default reviewer:
-
Click the Manage default reviewers button.
-
Choose the Users or Groups tab.
-
If you selected Users, start typing a the name of a user. Suggested users will appear automatically.
-
If you selected groups, then all of the members of the selected group will be added as a default reviewer.
You can add up to 25 users or groups combined.
-
-
Click Add.
From now on, each new review on this branch will automatically include these reviewers.
To keep default reviewers from being removed on reviews for this branch, turn on Retain default reviewers. For more information about retained default reviewers, see Retain default reviewers.

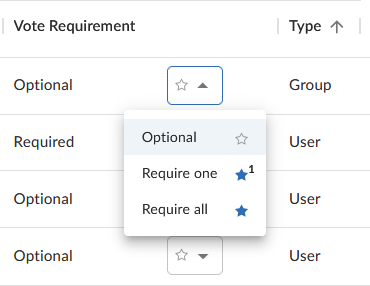
After you add default reviewers, you can control whether their votes are required or optional for approving a review. This is done using the Vote Requirement column.
For users, select on of the following vote requirements.
-
Optional - This users vote is not required to approve a review.
-
Required - This users vote is required to approve a review
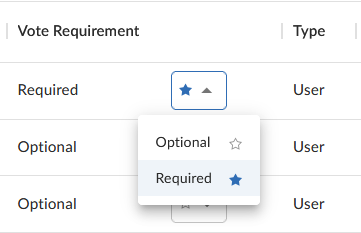
For groups, select on of the following vote requirements.
-
Optional - The vote from users in this group is not required to approve a review.
-
Required one - At least one member of the group must approve the review, and no member votes down the review either.
-
Required all - All members of the group must vote up the review to approve it.
Default reviewers for reviews in multiple projects or branches:
When a review belongs to more than one project or branch:
-
The default reviewers from all the related projects and branches are combined and added to the review.
-
If a reviewer has different vote requirements in different places, the strictest setting is used.
For example:
-
In Project-A, Reviewer X is optional.
-
In Project-B, Reviewer X is optional.
-
In the project branch, Branch-b, Reviewer X is required.
As a result, Reviewer X will be added as a required reviewer on the review.
Mentioning default reviewers
If users or groups are @mentioned in a new changelist description that includes #review, they will be added to the review as reviewers. If any of these reviewers are already specified as default reviewers they will not be added to the review again, the reviewer's most restrictive reviewer option is used for the review.
To remove a user or group as a default reviewer, click the delete icon in their row of the table.
Integrations tab
The project level test and deploy code features will be deprecated in a later P4 Code Review release. We recommend you use test integration to automatically deploy code within a review. For more information, see Add a test.
The project Automated Tests and Automated Deployment details are hidden from project members unless they are an owner or an administrator. This enables project members to check the project settings but not change them.
In the Integrations tab you can configure Automated tests and Automated deployment options.
You can edit and save all options for automated tests and automated deployment when each of their toggles is disabled. However, the new updates take effect only when the toggles are enabled.
To learn how to enable automated tests and deployment for a P4 Code Review project, watch this video or review the instructions following the video.
Automated tests
To enable or disable running automated tests for a project when reviews are created or updated, slide Automated tests toggle. When you wish to enable automated tests, enter a URL that triggers a test suite execution. Use the special arguments described in the dialog to help compose a URL that informs your test suite about important details.
Select the format of the POST parameters, either URL Encoded or JSON Encoded.
-
URL Encoded: POST parameters are parsed into name=value pairs.
-
JSON Encoded: parameters are passed raw in the POST body.
For more details about automated tests, see Automated testing for reviews.
Automated deployment
To enable or disable deploying a project when reviews are created or updated, slide the Automated deployment toggle. When you wish to enable automated deployment, enter a URL that triggers a deployment of the project's code. Use the special arguments described in the dialog to help compose a URL that informs your deployment program with important details. For more details about automated deployment, see Automatically deploy code within a review.
General Settings tab
To learn how to customize general settings of a P4 Code Review project, watch this video or review the instructions following the video.
In the General Settings tab, you can configure the following options:
-
Specify a project name.
-
Add a short description about the project.
-
Select a Workflow to associate with the project. Your selection is auto saved.
The Workflow option is not displayed if the workflow feature is disabled.
To remove the existing workflow without replacing it with another workflow, select No Workflow from the Workflow dropdown list. This is the default when you create a new project.
You can associate a workflow with the project branch. If you have disabled the workflow feature, this option will not be displayed.
To associate a workflow with a project branch, select one from the Workflow dropdown list, or enter the workflow name in the search field. You will only be able to see the workflows that you own or shared workflows. When a workflow is associated with a project, the workflow is used for all of the branches in that project.
To use the parent project workflow, select Inherit from project from the Workflow dropdown list. This option is select by default when you create a new branch. If the parent project is set to No workflow, the branch will use the global workflow rules. When a project branch is associated with a workflow, the workflow of the parent project is ignored and the branch workflow is used.
To remove the existing workflow without replacing it with another workflow, select No Workflow from the Workflow dropdown list. This is the default when you create a new project.
For more information about workflows and how project workflows interact with branch workflows, see Workflow basics.
-
Set the Minimum up votes for a project. The project setting is used on the project branches unless Minimum up votes is set to 1 or higher on a branch. In this case the branch setting is used and the project setting is ignored.
Enter the Minimum up votes or use the up and down arrow keys to increase or decrease the number of Minimum up votes. To save your changes click the green tick icon. Click the cross icon to delete your changes.
Use Minimum up votes to set the minimum number of up votes required for reviews in this branch.
A review cannot be approved until all of the Required reviewers have voted up the review and the Minimum up votes specified has been satisfied.
When this setting is defined at the project level, minimum number of up votes is automatically applied to all branches. However, if you set Minimum up votes to 1 or higher on a specific branch, that branch will use its own setting and ignore the project-level setting.
To use the project-level value, set Minimum up votes to Inherit from project. This is set by default for new branches.
To override the project setting and use a custom value for a certain branch, set Minimum up votes to 1 or higher on that branch.
Notes on minimum up votes
-
If a review includes changes across multiple projects or branches, the minimum number of up votes on each project or branch must be met before the review can be approved.
-
Required reviewers are included when counting up votes.
-
When the workflow rule Count votes up from is set to Members for a project or branch, only up votes from members belong to that project or branch will count toward the minimum up votes requirement. For more information on the Count votes up from rule, see Workflow rules.
If workflows are disabled, all votes are counted, not just votes from project members.
If the Minimum up votes requirement is higher than the total number of reviewers on a review, it will be impossible to approve it, even if every reviewer votes to approve. Take this into consideration when setting Minimum up votes. -
-
The job filter allows you to specify criteria that are used to associate jobs with projects. For example, entering Subsystem=ProjectA associates jobs whose subsystem field is set to ProjectA with the current project.
This job filter is simpler than the filters available in other P4 Server clients. The filter must be expressed as
field=valuepairs; bare keywords are not permitted. The asterisk for wildcard matching is permitted, but no other filter expression syntax is permitted. -
Slide the Private project toggle to make this project private. Private projects and their associated reviews are only visible to project owners, moderators, and members, plus users with super privileges in P4 Server.
For more information, see Private projects.
-
Delete a project as follows:
-
Click Delete Project.
A confirmation dialog appears to confirm whether you want to delete this project.
-
Click Confirm to delete the project.
-
After you have deleted a project, P4 Code Review will attempt to cleanup the deleted project. For more information, see Delete a project.
It is possible to create a project that you cannot edit. This can happen if you have specified owners but not yourself as an owner, or if you have not specified yourself as a member. P4 Code Review can detect some (but not all) such situations when you save a project; when it does detect such a situation, a warning dialog is displayed.
If you see this dialog, click Continue to save the project without your ownership/membership, or click Cancel within the dialog to continue editing the project. The project page's Save and Cancel buttons are disabled while this dialog is visible.