Configuring Jira integration
Before users can work with Jira issues from Perforce ALM, an administrative user or another user with high-level security permissions needs to configure a connection to a Jira instance. You also need to select the Jira projects, item types, and fields available when users create issues from the ALM project.
1. Choose Tools > Administration > Jira Integration.
The Jira Integration dialog box opens.
2. Select Enable Jira integration.
If you no longer want to use the integration, clear this option. Users will no longer have access to work with Jira issues from ALM. Jira information is no longer displayed in ALM, but is still stored in the project database in case you enable the integration again.
3. Enter the Jira instance location. This must be a URL that starts with http:// or https://.
If you are changing the Jira instance location, see Changing the Jira instance location.
4. Enter the Default Jira username and password (for on-premise installations) or API token (for cloud installations) for the instance.
These are the default credentials used to log in to Jira from ALM. if you do not require users to specify a username and password. Work items created from ALM show the default user instead of a specific user in the Jira work item history.
5. Select Require users to provide login credentials if you want users to log in to Jira from ALM with their username and password instead of automatically logging them in with the default credentials.
If this option is selected, users need to enter their Jira credentials in user
If this option is not selected, the default Jira username and password for the instance are used to automatically log in users to Jira. Work items created from ALM show the default user instead of a specific user in the Jira work item history.
6. Click Test to test the connection to the Jira instance.
Errors are displayed if the test fails. Correct any errors and test the connection again.
If the connection fails and you are prompted to use a trusted certificate, see Troubleshooting certificate issues for help.
7. Click the Fields tab to configure the Jira projects, issue types, and fields available when creating Jira issues from ALM. See Configuring fields for creating Jira issues.
You must configure fields before saving the connection settings.
8. Click Save to save the changes.
When you test the connection to a Jira instance from ALM, you may be prompted that the connection failed and the certificate returned from Jira is not trusted. This commonly occurs if you have an on-premise Jira Server installation.
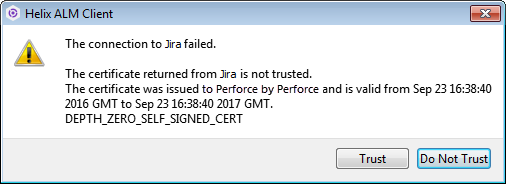
When installing the server, you must generate an SSL certificate to run Jira over HTTPS. If the certificate is not generated by a certificate authority, is expired, or uses an unsecured algorithm, the networking layer rejects the request between ALM and Jira and you are prompted about the certificate.
- If the certificate displayed in the dialog box is correct for your installation, click Trust. ALM accepts the Jira connection request and remembers the certificate.
- If the certificate information is incorrect or you are unsure, click Do Not Trust to prevent possible man-in-the-middle attacks. Ask your Jira administrator for help with generating a valid certificate and then configure the Jira connection again.
- If errors persist after clicking Trust or if you click Do Not Trust, you must make changes before ALM can connect to Jira. See the knowledge base for information.