Working with requirement documents
Requirement documents display requirements in a hierarchical outline format. Depending on your role, you may modify documents to change the content or only review documents to provide feedback.
Note: If you need to modify document details, such as the name, owners, or description, see Editing requirement document details.
1. In the Requirement Documents list window, select the document to view and click Open Specification Document.
The Specification Document window opens in Document View.

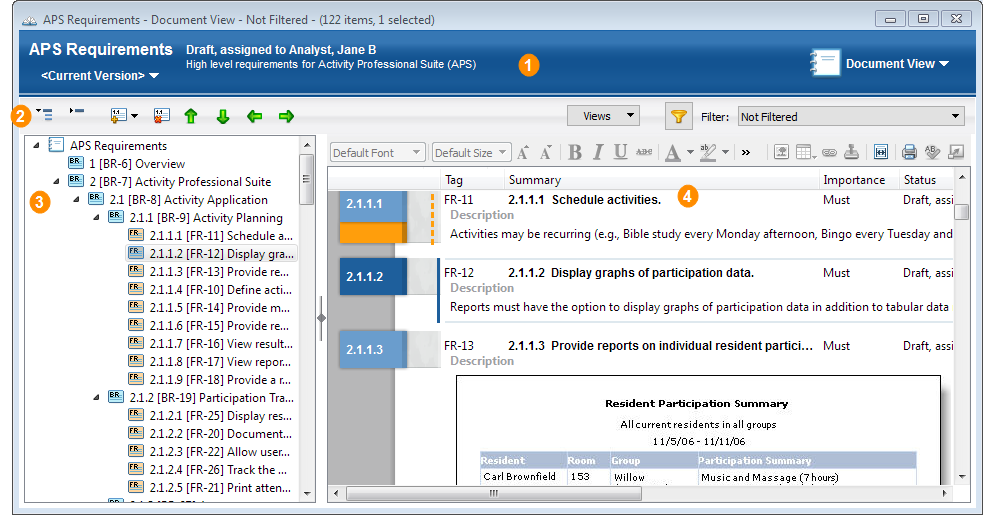
Information is displayed in the following areas.
| # | Description |
|---|---|

|
Displays the document name, |

|
Provides access to add, move, |

|
Displays requirements in the document in hierarchical order. Requirements are labeled with the outline number, tag, and summary. Outline numbers are automatically assigned based on the requirement position in the document. Click a requirement to view it in the details area. Double-click a requirement to edit it. See Editing requirements. |

|
Displays requirement content. Indicators, such as locks and flags, are displayed to point out additional information. See Requirement and document indicators. To edit a requirement, |
Note: You can only open 20 instances of the Specification Document window at once.
2. Choose View > Specification Document View Mode and select a view to work in. You can also switch views in the document header area.
- If you are adding, modifying, or organizing requirements in the document, choose Document View. See Modifying requirement documents.
- If you are reviewing and commenting on requirements or the document, choose Review Mode View. See Reviewing requirements and documents.
Note: You can add workflow events to requirements, run reports, and perform other actions, such as emailing users, in both views.
Use the
Note: Right-click the toolbar to customize how requirements are displayed in the details area. See Customizing the Specification Document window.

| Button | Use to: |
|---|---|

|
Expand all requirements in the tree. |

|
Collapse all expanded requirements in the tree. |

|
Add existing or add new requirements to the document. See Adding requirements to documents. |

|
Remove the selected requirement from the document. See Removing requirements from documents. |

|
Move the selected requirement up one level in the document hierarchy. |

|
Move the selected requirement down one level in the document hierarchy. |

|
Move the selected requirement out one level in the document hierarchy. |

|
Move the selected requirement in one level in the document hierarchy. |

|
Save the current column configuration and filter applied to the document as a view to use again later, apply a saved view to the document, and manage saved views. See Using requirement document views. |

|
Filter the requirements displayed based on values in the columns. When you select a filter value, the document updates to display only requirements that contain the selected value. See Filtering list window columns. |

|
Apply a filter to only display requirements in the document that meet specific criteria. See Applying filters. |
Use the Review Mode toolbar to navigate and add review notes to requirements or the document.
Note: Right-click the toolbar to customize how requirements are displayed in the details area. See Customizing the Specification Document window.

| Button | Use to: |
|---|---|

|
Expand all requirements in the tree. |

|
Collapse all expanded requirements in the tree. |

|
Go to the previous requirement review note in the document. |

|
Go to the next requirement review note in the document. |

|
Filter the review notes displayed in the document. You can view all notes, only notes you added, all notes added during the current session, all notes added since the last snapshot was created, or you can hide all notes. |

|
Add a review note or comment to the document or selected requirement. |

|
Save the current column configuration and filter applied to the document as a view to use again later, apply a saved view to the document, and manage saved views. See Using requirement document views. |

|
Filter the requirements displayed based on values in the columns. When you select a filter value, the document updates to display only requirements that contain the selected value. See Filtering list window columns. |

|
Apply a filter to only display requirements in the document that meet specific criteria. See Applying filters. |


