Using item lists
Helix ALM items are displayed in list
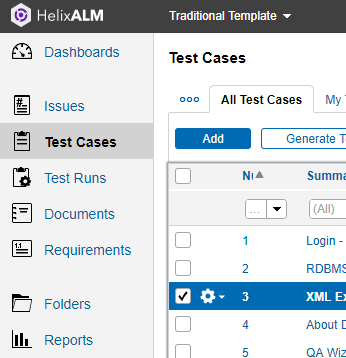
To open a list, click the area you want to work in on the left side of the page.

Following are the default work areas in Helix ALM. Keep in mind that the names may be different to match your team's terminology and you may not have access to all areas depending on your security permissions.
| Work area | Use to: | More information |
|---|---|---|
| Dashboards | View important project information and metrics. | Using dashboards |
| Issues | Add and work with tasks, defects, feature requests, change requests, or other work items. | Managing Issues |
| Test Cases | Add and work with test cases, which document the conditions, actions, expected results, and other criteria used to determine if a product component is working correctly and meets its specified requirements. | Managing Tests |
| Test Runs | Work with test runs, which are instances of test cases created for different configurations and used to perform a specific test and document the results. | |
| Documents | Work with and review requirement documents, which group and organize related requirements. | Managing Requirements |
| Requirements | Add and work with business, functional, technical, or other types of requirements. | |
| Folders | Organize items in a hierarchical folder structure. If release planning is configured, you can view release information, such as the remaining days in the release period and available man hours. You can also view task boards for an alternate, interactive view of folder contents. | Organizing Items with Folders |
| Reports | Run a variety of reports that can help you analyze project data. | Running Reports |
| Administration | Perform administrative tasks, such as managing users and customers, and configuring dropdown field values in the project. | Managing Helix ALM |
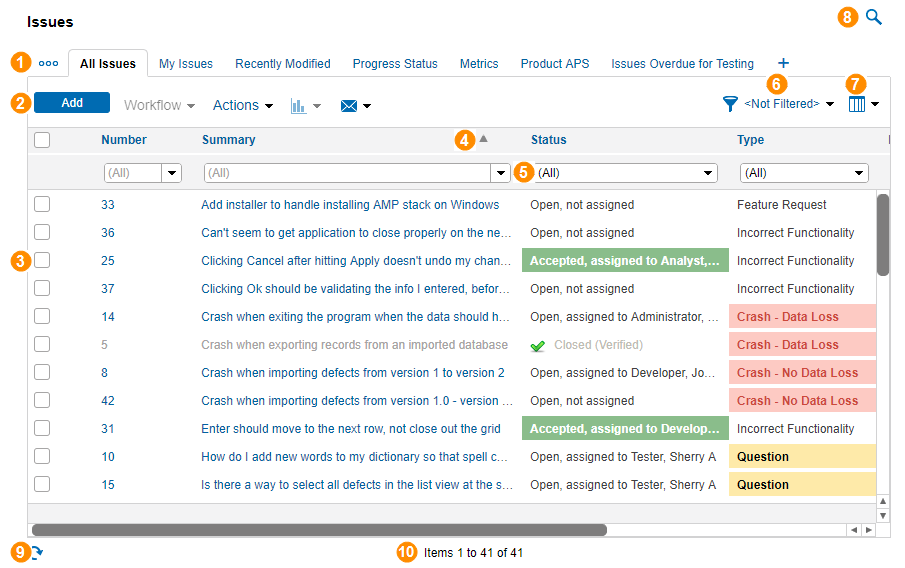
Following are the key components of item lists. Some of these are only available in the Issues, Requirements, Requirement Documents, Test Cases, and Test Runs lists.

| # | Area | Use to: |
|---|---|---|

|
Tabs | Add tabs to easily switch between multiple instances of lists that display different information. Click a tab name to display it. You can also rename tabs, save tabs to open them again later, and remove tabs you no longer use. See Using item list tabs. |

|
Actions |
You can also select multiple items to perform actions on them at the same time. |

|
Item |
|

|
Sort arrow | Sort items based on column values. Click a column heading to sort items based on the column values. An up arrow indicates ascending order and a down arrow indicates descending order. You can also sort on a secondary value. See Changing item list columns. |

|
Column filter | Filter lists based on values in columns. When you select a filter value, the list is updated to display only items that contain the selected value. See Filtering list columns. |

|
Filters | Apply filters to narrow the list to only items that meet specific criteria. See Applying filters. You can also add, edit, and delete filters. |

|
Columns | Configure the list columns. See Changing item list columns To select all items, click the check box in the column headings row. |

|
Search | Search the list for items by text or number, or perform an advanced search with more specific criteria. See Searching for items. |

|
Refresh | Refresh the list. |

|
Item count and previous/next arrows | See the item count and navigate between multiple pages of items. |
To find items in lists, you can:
- Search based on text or number, or perform a more advanced search. See Searching for items.
- Apply a filter to display only items that match specific criteria. See Applying filters.
You can customize lists to display exactly the information you need in your preferred layout. See Customizing item lists.
 , and choose a report. See
  , and choose an option. To send email unrelated to a specific item, do not select or open any items. See


