Security
Understand Perforce IPLM security settings and how to apply settings.
Overview
It is often necessary to limit access to IPs in the server and on disk in both a user's workspace and in the shared cache area. Server access is controlled via Permissions Management on the Perforce IPLM server. On-disk access can be restricted per IP. Each individual IP can be configured to be loaded onto disk with a particular Unix group. Access to this group can then be restricted as necessary.
Typically one or two Unix groups will be configured to access the various IP needed in a particular project.
Access controls
Perforce IPLM manages a full set of access controls on its various objects. See Permissions Management for additional information. Normal workspaces can be created even if a user only has permission to some of the IPs in the Hierarchy. See Workspaces and Permissions for more information.
Configuring the Workspace Unix Group of an IP
An IP's Unix group is configured via its a project property definition either from the command line or from the IPLM Web interface. See Workspace Configuration for additional details
Command line
> pi ip edit my_ip
Under the project properties section 'project_props' add the --unix_group flag:
#    --unix_group: Group owner of the IP directory in the shared area and
#                  workspaces.
#                  eg: --unix_group group1
project_props = * --path $IP --unix_group project1group
IPLM Web
Go to the latest IPV page and edit the IP:
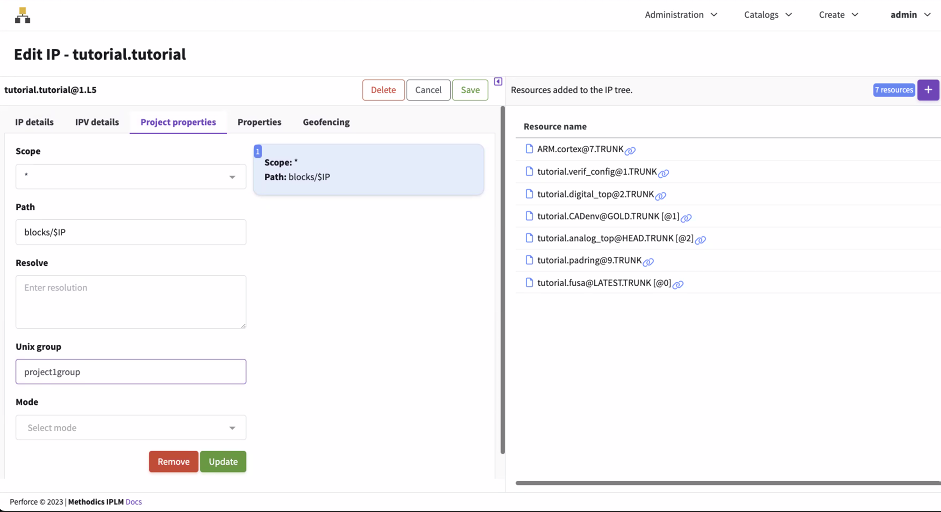
The Unix Group can be set in the provided field.
Workspace Manager Configuration
In order to set permissions on disk the Perforce IPLM workspace manager must be configured to allow it to do so. Edit the /etc/mdx/picache.conf file as follows:
# Disable access controls on PiCache directories
# default is False
#ipv-no-setaccess = False
Unix Group Configuration
In order to successfully build workspaces and the shared area the user account running IPLM Cache must be a member of all the Unix groups that will be used to control access.
Client-Server Encryption
How Can I Run IPLM CLI in Secure Mode (Secure Socket Layer: SSL) ?
Requirement
- Existence of a pre-configured SSL-terminated end-point for IPLM Server, typically a software/hardware load balancer with correct SSL CERTS that has been configured to route traffic to a IPLM Server Origin server.
- Due to the fact that there are many SSL termination implementations and request routing methods, feel free to reach out for guidance to https://www.perforce.com/support.
bash# export MDX_PI_SERVER=https://<load_balancer_ip/FQDN>:<load_balancer_ssl_port>
HAPROXY SSL termination for piserver example
In haproxy.cfg
frontend piserver-ssl
 bind *:443 ssl crt /etc/haproxy/piserver_ssl_certs.pem
 mode http
 default_backend piserver_all
backend piserver_all
 mode http
 option http-keep-alive
 #option http-server-close
 fullconn 1000
 balance roundrobin
 option forwardfor
 default-server inter 60s fall 2
 option httpchk HEAD /public/v1/system/info HTTP/1.0
 server piserver1.sf.methodics-da.com 10.8.6.22:8080 check
 server piserver2.sf.methodics-da.com 10.8.6.23:8080 check
With the above examples:
export MDX_PI_SERVER=https://lb.example.com:443 , all `pi` commands will now be encrypted via SSL between the client and haproxy fronting piserver. haproxy will terminate the SSL connection and open up a connection to the servers defined in the piserver_all back-end definition
A few recommendations of software proxies and load balancers that handle SSL termination are:
- http://trafficserver.apache.org/
- http://www.haproxy.org/
- https://www.nginx.com/resources/admin-guide/reverse-proxy/
User Login expiration
accessTokenExpirationTime attribute from the default setting to a setting that meets the requirements of the installing organization. The default may not be in compliance with some industry standards or best practices./etc/mdx/piserver.yml file
security: Time an access token can be idle before it is invalidated. If set to 0, access tokens never expire accessTokenExpirationTime: 0 seconds
See piserver.yml Configuration File page for more information on settings available through the PiServer Configuration File. Default is 0 - never expires.