Enabling custom icons
Custom icons can be added to many objects displayed in IPLM Web so that you can visually organize them.
You can assign the same icon to multiple objects. You can either use the default Font Awesome icon names and colors, or an admin can define each icon with a color and shape as shown in Defining custom icons.
The preferred loading order for icons is: IPV > IPL > IP.
Overview
The following objects support an icon field in their object configuration:
| Object | Pages displayed |
|---|---|
| IP | IP, IP catalog, Advanced search |
| Library | Library catalog |
| Saved query | Advanced search |
| IP Line | IP |
| IP Version | IP |
| Property | IP, IP catalog, Advanced Search, Shopping cart, Create/Edit IP |
| Property set | IP, IP catalog, Advanced Search, Shopping cart, Create/Edit IP |
Configuring icons
To display icons on an object, users with edit permission to an object type can then enter the name of a Font Awesome icon or the administrator configured name of the icon in the ‘icon’ field of an object.
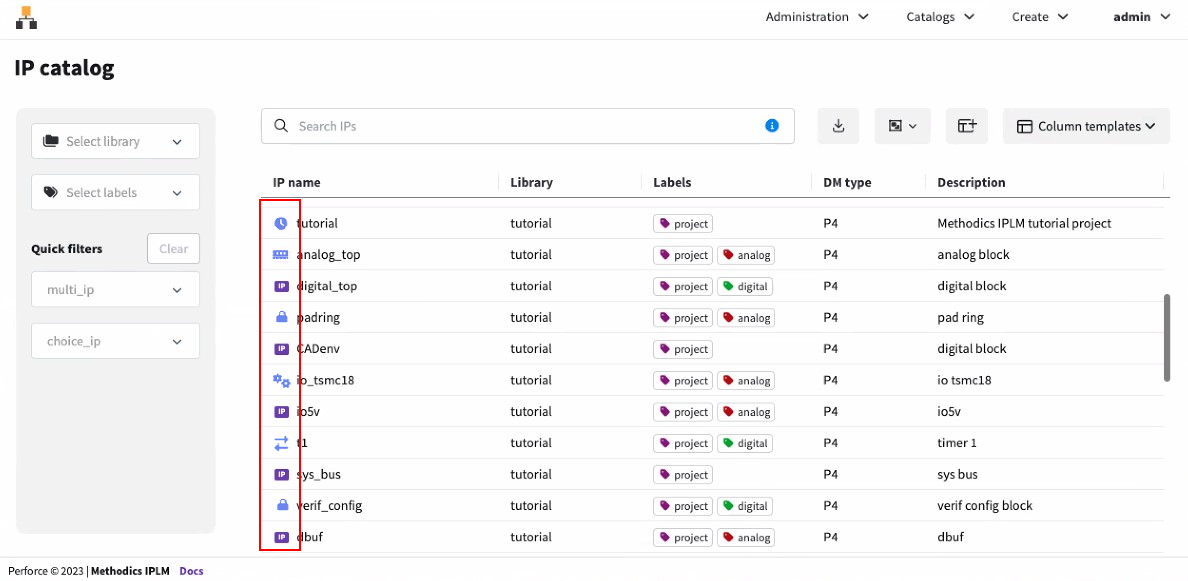
In this example image, icons have been assigned to the IPs.
Configuring /etc/mdx/piweb-custom/styles.css
IPLM Web comes with a simple and powerful mechanism for customization. A CSS file is installed in /etc/mdx/piweb-custom/styles.css during the IPLM Web package installation.
styles.css comes with examples of useful customizations and admins can uncomment these styles or create new ones. If you add classes to styles.css, they can be added anywhere in the file. These styles target HTML elements in the UI and their default styles can be overridden using the css definitions in this file. Settings added here persist across IPLM Web upgrades.
Defining custom icons
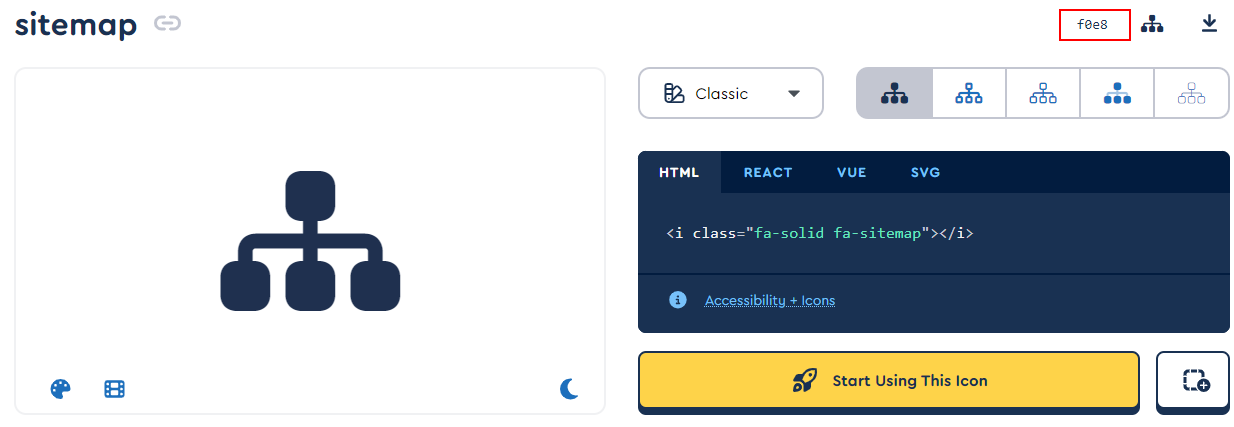
Admins can define custom icons. Go to Fontawesome.com and find the right icon. Then, click on it to see its details.
Currently the icons included with IPLM Web are limited to the free icons in version 6.5.1, see here: https://fontawesome.com/v6/search?m=free Pro icons are not available unless a Pro license is purchased.
Within the details page, you can find the content code for the icon. Marked with a red square in the screenshot below:
In the styles.css file, create a new style with this code:
.toplevel:before {
  content:"\f0e8";
  color:red;
}
In this css snippet, the name of the class toplevel can be changed to the desired icon name. Replace the value of the content field with the icon content code from the Font Awesome page. To set a color for the icon, add a class with either the Font Awesome icon name or the icon name that you set, and specify the color property.
Then, set this class name as the value of the icon field to use the icon.
Example tutorial.tutorial IP section with toplevel icon configured
This example is from the pi ip edit tutorial.tutorial command.
# IP Permissions apply
# Name is required
name = tutorial

# Read-only
library = tutorial

# Read-only
dm_type = P4

# Host is used for p4 IP only
host =

# Description is optional
description = Perforce IPLM tutorial project

# Icon is optional
icon = toplevel