How To: Technical overview and server admin tool
As seen below, P4 Plan is based on a server/client setup including these components:
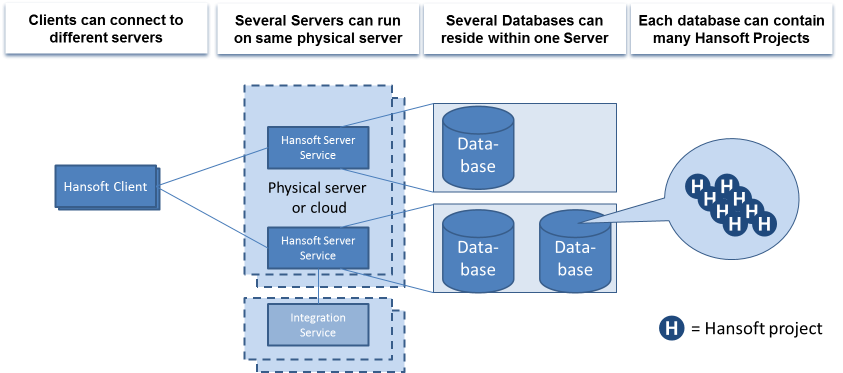
P4 Plan Server Service
The P4 Plan Server Service is a process or service (depending on server operating system) that acts as the actual server for P4 Plan. It can run on a physical or virtual machine on Windows, Mac, or various Linux distributions. The P4 Plan Server Service is fully self-contained and no additional software (e.g., middleware or database) is required. Several P4 Plan Server Services can be run on the same physical virtual machine if you want to share processing resource and/or centralize administration.
Databases
A P4 Plan server can host one or more databases. The P4 Plan database appears in a folder system in the host file system and contains all information related to the projects created in this database including stored documents and historical data. Usually there is one database per organizational unit. Using more than one database per server can be beneficial for distributing work over multiple CPUs/Cores, but this gain in server work efficiency will have to be weighed against having different projects separated, which is not always beneficial.
P4 Plan Clients
The P4 Plan clients are used to connect to the server and one client is installed on each user’s machine. Just like the P4 Plan Server Service, the client can run on Windows, Mac, or various Linux distributions. The client software will automatically synchronize and update to the same version of P4 Plan that the server is running meaning that after installation there is no additional maintenance work to keep clients updated.
Integration Service
The P4 Plan SDK license gives access to different ready-made integrations for connecting P4 Plan with external systems, for example the LDAP integration and the Git integration. The ready-made integrations are running as separate services. We recommended these services to be running on a separate Windows machine. The SDK license also allows you to build custom solutions and integrations utilizing the P4 Plan programming API. SDK applications can be written in C, C++, Java or any of the .NET languages.
Although you can have multiple databases per service instance we recommend you to have one P4 Plan service instances per database with the different P4 Plan service instances being accessible on different ports. The reasons are:
When starting up the P4 Plan server service it loads all databases in sequential order. Not until all databases are loaded will the server start responding to connection requests. Spreading the databases across several service instances allow the start-up time to be reduced by spreading the work across several CPU cores. Also, small databases will be available much faster.
In the rare event that the P4 Plan server service stops working, all databases connected to this server will become inaccessible. Hence, by spreading the databases across several services you isolate any issue with the server service to affect a single database.
Installing your server
There are basically two ways for you to get started with P4 Plan:
- Fast track – Download the trial version of P4 Planwhich includes the server, client and an already prepared database with a few example projects.
- Slow track – Download the server and client independently and set up everything yourself. Below is a summary of the required steps.
- Download the P4 Plan server and client for your operating system.
- No additional or software such as database server is needed.
You will need to provide a name for the database, port number to run the service on, Administrator password (for the built-in user with the name ‘Administrator’).
Server Admin Tool
The P4 Plan Server Administrator tool gives you access to server and database settings. You can find this tool on the machine where the P4 Plan server was installed, and it can also be installed on a user's machine. To access the tool, select the Start button, select All Programs > P4 Plan > P4 Plan Server Administrator. You can also launch the tool by running HPMClient.exe -adminserver
You log in as the user ‘Administrator’ with the password ‘hpmadm’ for the provided example database or with the password you provided yourself during the installation.
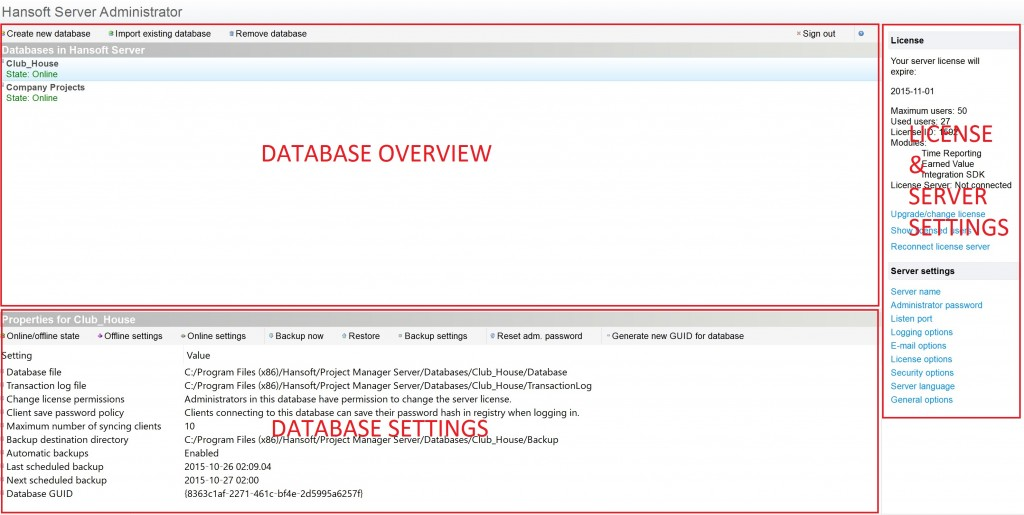
The bottom left panel displays the settings for the currently selected database while the panels on the right allows for configuring the server and licenses.
If you do not have any database listed here, create a new one and specify the name, database file location and a new password for the Administrator user for that database. Note that database files by default are stored in the subdirectory ‘Databases’ of the directory where you installed the P4 Plan server software.
We recommend you to look over the security settings and changing the administrator password before continuing.
If you have chosen to download the complete trial there is a free 5 user license included. If you want to buy additional seats you can contact Perforce Support.
In the License & Server Settings you can update the license by selecting Upgrade/change license and paste a license key there which you can obtain from P4 Plan as mentioned above.
There is an alternative way of adding licenses to P4 Plan using the Admin tab in the client. Using that alternative also give you an option to order licenses within the system.
Backups
There are two main alternatives for backing up P4 Plan. They can be used individually or in combination:
Snapshots
By taking a snapshot of the entire machine on which the P4 Plan Server is running and the database files stores you could easily restore the environment if needed. Snapshot functionality is covered in a later lesson, see Project History.
The backup functionality in the P4 Plan Administrator Tool
Backups can be scheduled in the Server Administrator by selecting Backup settings (see Figure 3). It is recommended that you enable automatic backups at least once per day. By having each database backed up separately you can more easily restore accidental deletes and changes of project for a single database. It is also recommended to place the backup directory on a networked drive.
Security
P4 Plan features state-of-the-art security with 128-bit AES (Advanced Encryption Standard) for communication/storage and SHA-256 for password hashing. These standards are well established and AES is used by, for example, the US Government for “TOP SECRET” classified information.
There are a few options for data isolation if for example security or regulatory constraints require this.
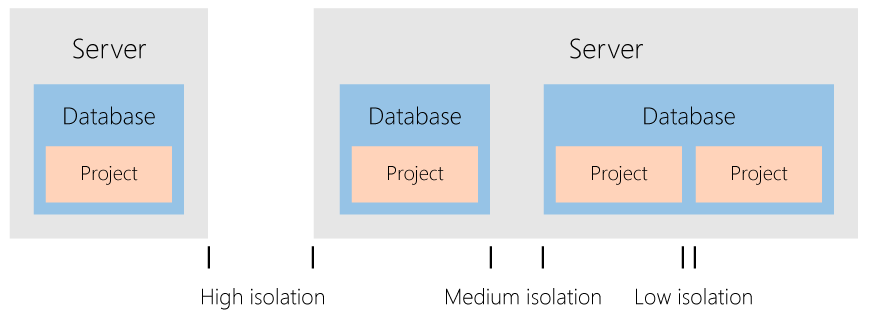
By separating data between different projects in the same database you can control the isolation through the user management within the client. By keeping the project data separated between databases but on the same server a higher level of isolation is achieved as there may be different database administrator passwords and that they are not stored in the same file on disk. However, the highest level of isolation is achieved by also separating the servers from each other.
SMTP settings
In order to get e-mail log messages from the server you will need to setup a connection to an SMTP server. Below is an overview of how this is done:
1. Open the P4 Plan Server Administrator tool
2. Select E-mail options
3. Configure the outgoing SMTP server:
Note that this configuration concerns status messages regarding the technical aspects of the P4 Plan server. You can also configure P4 Plan to send emails to end users when tasks are assigned to them and similar but that is done in each respective database and project. See Configuring project email notification settings.