How To: Setting up the first project
In P4 Plan, a project is the top level container for structuring work and plans in the organization. What this corresponds to differs between organizations and it is wise to be clear about this from the start. In some organizations a P4 Plan project may map to an endeavor that is limited in time, have a budget, a set of people, and a specific goal, i.e., what you commonly would think of as a project. However, it is also common that a P4 Plan project maps to a product or a set of products that will live for many years. In this case you will plan the product backlog in P4 Plan towards different releases which in their turn may be realized by different development projects all working from the same P4 Plan project.
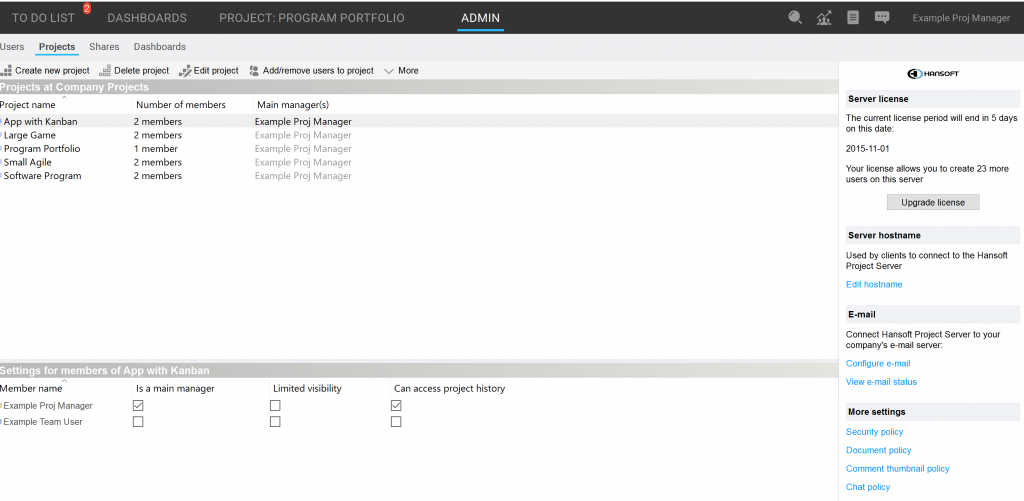
You will find the creation and configuration of each project under Administration > Projects
Setting up a project
When creating a new project or when double-clicking an existing project in the Administration section of P4 Plan, you can configure the project specific settings.
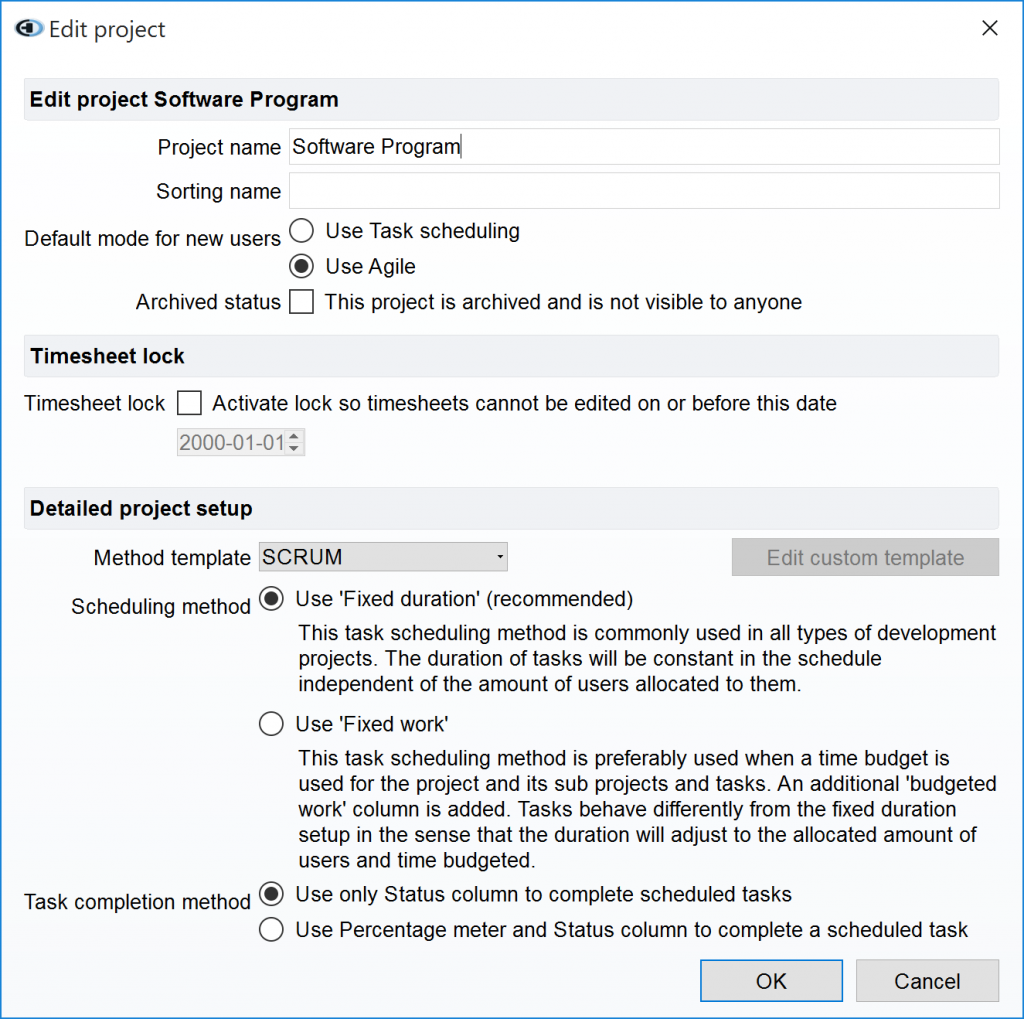
The basic settings include defining the project’s name, if the default mode for new users should be task or agile based scheduling and also if the project should be given Archived status (hidden).
The more detailed settings include:
- Method template: This defines the terminology to be used, for example if the organization uses the term “iteration” or “sprint”. You may edit the custom templates according to your needs.
- Scheduling method ‘Fixed duration’: Fixed duration is the recommended option and can be used in most types of development projects. The main consequence of this option is that tasks are time boxed.
- Scheduling method ‘Fixed work’: Duration of tasks will adjust to the allocated amount of users and time budgeted (an additional column ‘budgeted work’ will be added). This is used in more traditional waterfall and task scheduling practices.
- Task completion method: This defines whether completion should be percentage completion or binary, we strongly suggest that you use the binary option to ensure that the project status is as accurate as possible in terms of actual progress and delivered value.
Assigning users to the project
This section covers how to add and remove members to a project. This window is opened by selecting “Add/remove users to project” when viewing the Administration > Projects tab in the P4 Plan client.
When you add a user to a project, the user will immediately have access to the project.
After adding users to your project, go and configure project level settings for each user in the project. For each user you can set the following options:
- Is a main manager: This should only be selected for the Main managers in your project. A Main manager is someone who has the full access to the project and the project plan, and who delegates parts of the project to other users. Any number of users can be main managers but is good to keep this to a limited number of persons to avoid too much churn and conflict.
- Limited visibility: Limited visibility is used, for example, if you want to connect outsourcing partners or other external project partners and let them see only a part of the project.
- Can access project history: This setting controls the access to project history to look at historic snapshots of the project.
Remove a user from the project
When you remove a user from a project, all references to the user in the project will be removed. Therefore, make sure to filter out the tasks that are assigned to the user and re-assign them to someone else before doing this.
Structure the project
The description in this part assumes that you have already created your project, made the initial decision of a methodology to use (in this case an agile approach is assumed) and assigned users to the project.
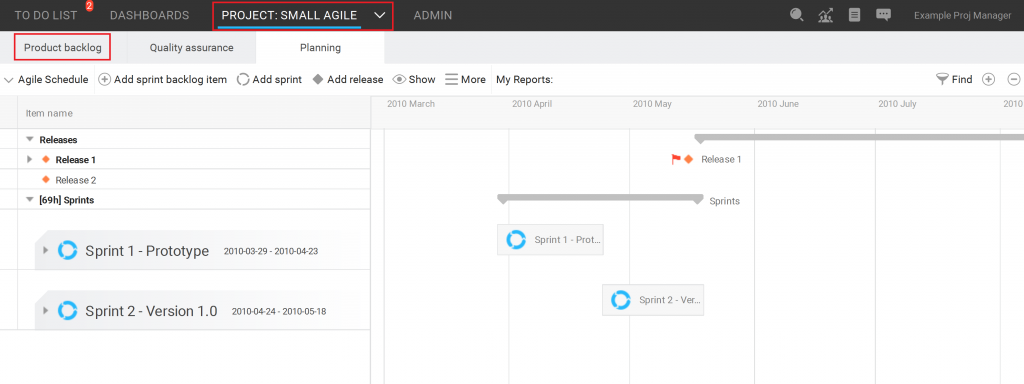
Every P4 Plan project has three main views which you access by selecting the corresponding tab in the P4 Plan client, they are:
- Planning – This is the planning view, sometimes called the project schedule. Here you will plan how the product is built by committing product backlog items and creating, planning, and assigning the tasks that are required to realize the functionality and characteristics defined in the product backlog
- Quality assurance – This is the bug tracking functionality that allows you to track found bugs and the work to resolve them
- Product backlog – The product backlog defines the product you are working in including all desired functions and characteristics
It all starts with the Product Backlog
You can find one product backlog view under each project view in P4 Plan. You open up the Product Backlog by selecting Product Backlog in the main view of the project you are working in, see below:
The purpose of the product backlog is to capture the “What” of the product/project we are working on. This typically includes things that are called features, epics, user stories, requirements, goals, objectives and so on. The “How”, e.g. tasks, sprints and similar are not described in the product backlog but belongs to the Planning section of P4 Plan and will be covered later in this document. The Product backlog in P4 Plan does not force you to use a particular structure or terminology but you are free to organize the backlog in a way that:
- Best describes the product you are building
- Fits your way of working
- Maps to how you have organized your teams
Here is an example of what a product backlog can look like when developing a email application.
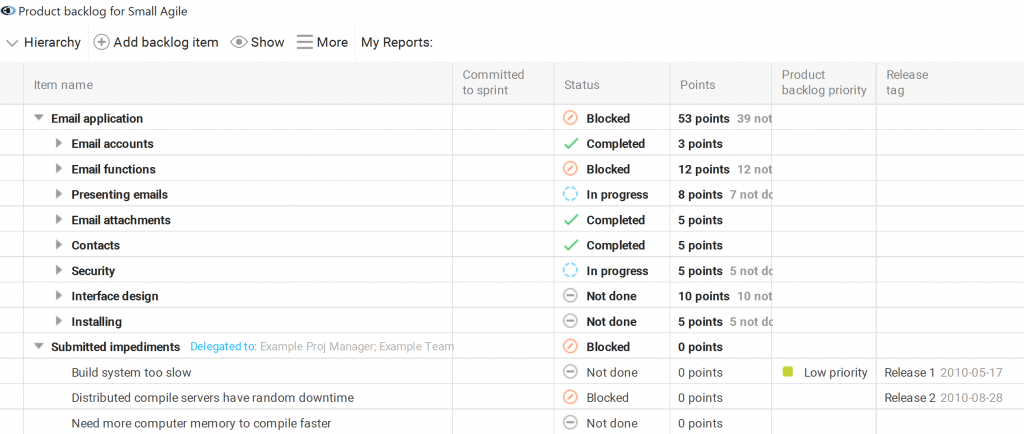
The backlog has a number of columns enabled by default (Item name, Status and so on) and, as required, you can hide the columns you do not need to make things as simple as possible or create new custom columns (described further down in this document).
You could keep the product backlog as a flat list but P4 Plan makes it very easy to create a hierarchy among the backlog items. Use the tab key to do this (works for any number of selected items) and the mouse to drag and drop the items in new locations. In the figure above you can see that the backlog in this example is an email application with the backlog split into different containers.
There are obviously endless alternatives on how to structure your product backlog; some prefer to do it by product features or by architecture while others do it by the organization.
Tips
- As P4 Plan allows for updating multiple items at the same time (all selected items will be updated) you can use the Find functionality in innovative ways to avoid repetitive updates.
- When setting up your backlog structure, you can gain speed by using the keyboard shortcuts for actions like indenting (Tab) and outdenting (Shift+Tab).
- If you have an already existing product backlog (typically in Microsoft Excel), you can import it into P4 Plan.